


The Booking Form Builder in Booking Calendar helps you create booking forms visually with drag and drop. You can build booking forms, appointment forms, contact forms, and inquiry forms without manually editing form code.
This guide gives you a simple overview of the new Booking Form Builder interface, explains what each section does, and shows how to start creating your form more easily.
Top area of the Form Builder
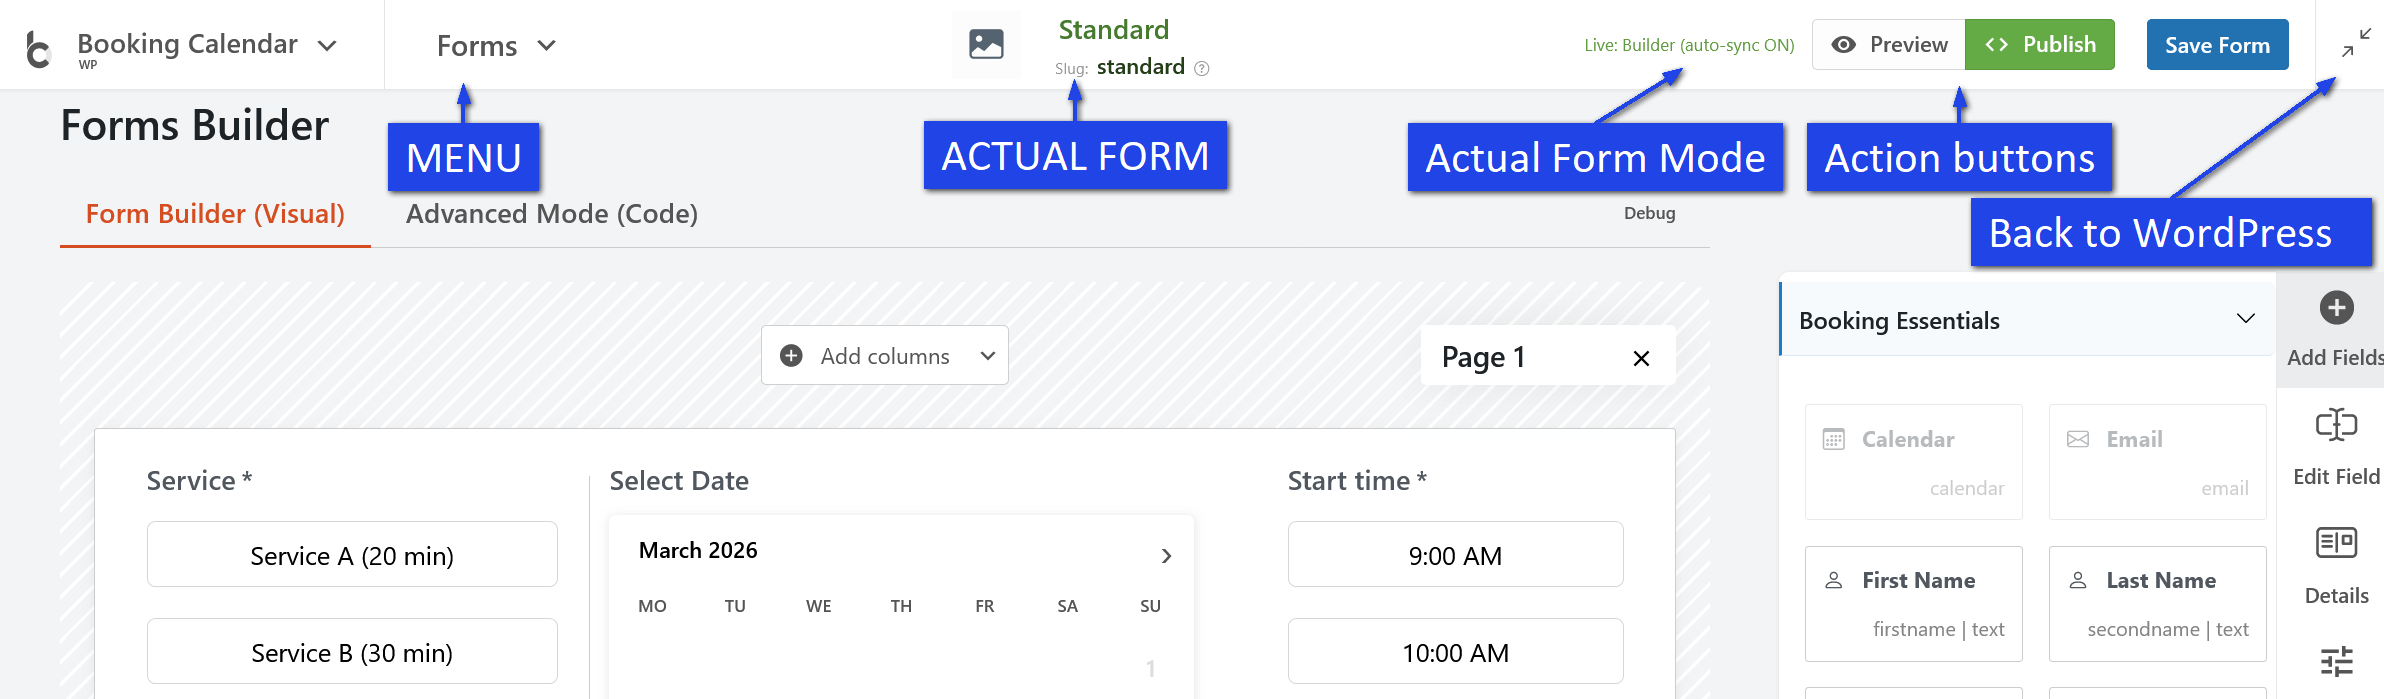
At the top of the page, you can see the current form name and form slug. This helps you identify which booking form you are editing.
On the top right side, you will usually see these main action buttons:
- Preview – opens a preview of your booking form so you can check how it looks and works.
- Publish – helps you publish or embed the form into a page.
- Save Form – saves your current form configuration.
If Live Builder is enabled, some visual changes can be updated automatically while you work.
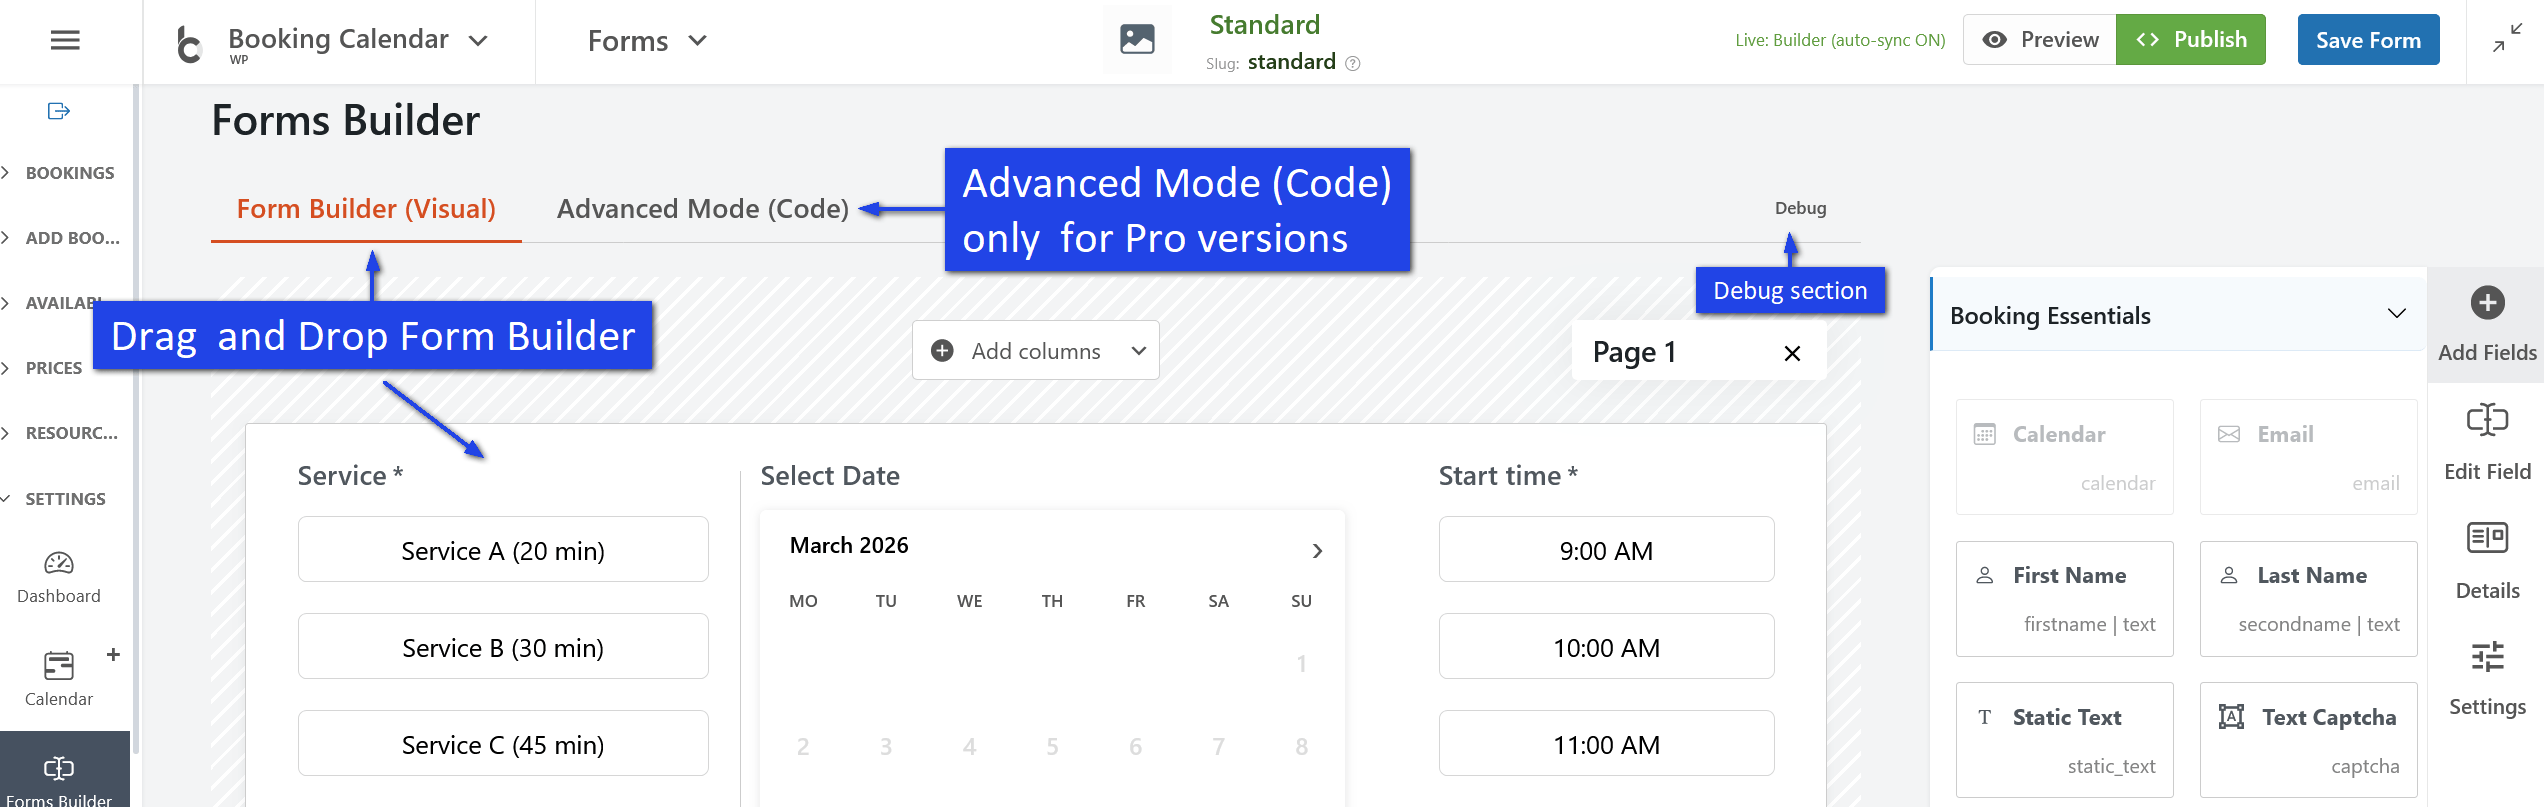
Builder modes
The Booking Form Builder usually includes several tabs or work modes:
- Form Builder (Visual) – the main drag and drop area where you build your form visually.
- Advanced Mode (Code) – for advanced users who want to work with the form code directly.
- Debug – used for technical review, testing, or checking advanced form data.
Most users will work mainly in Form Builder (Visual).
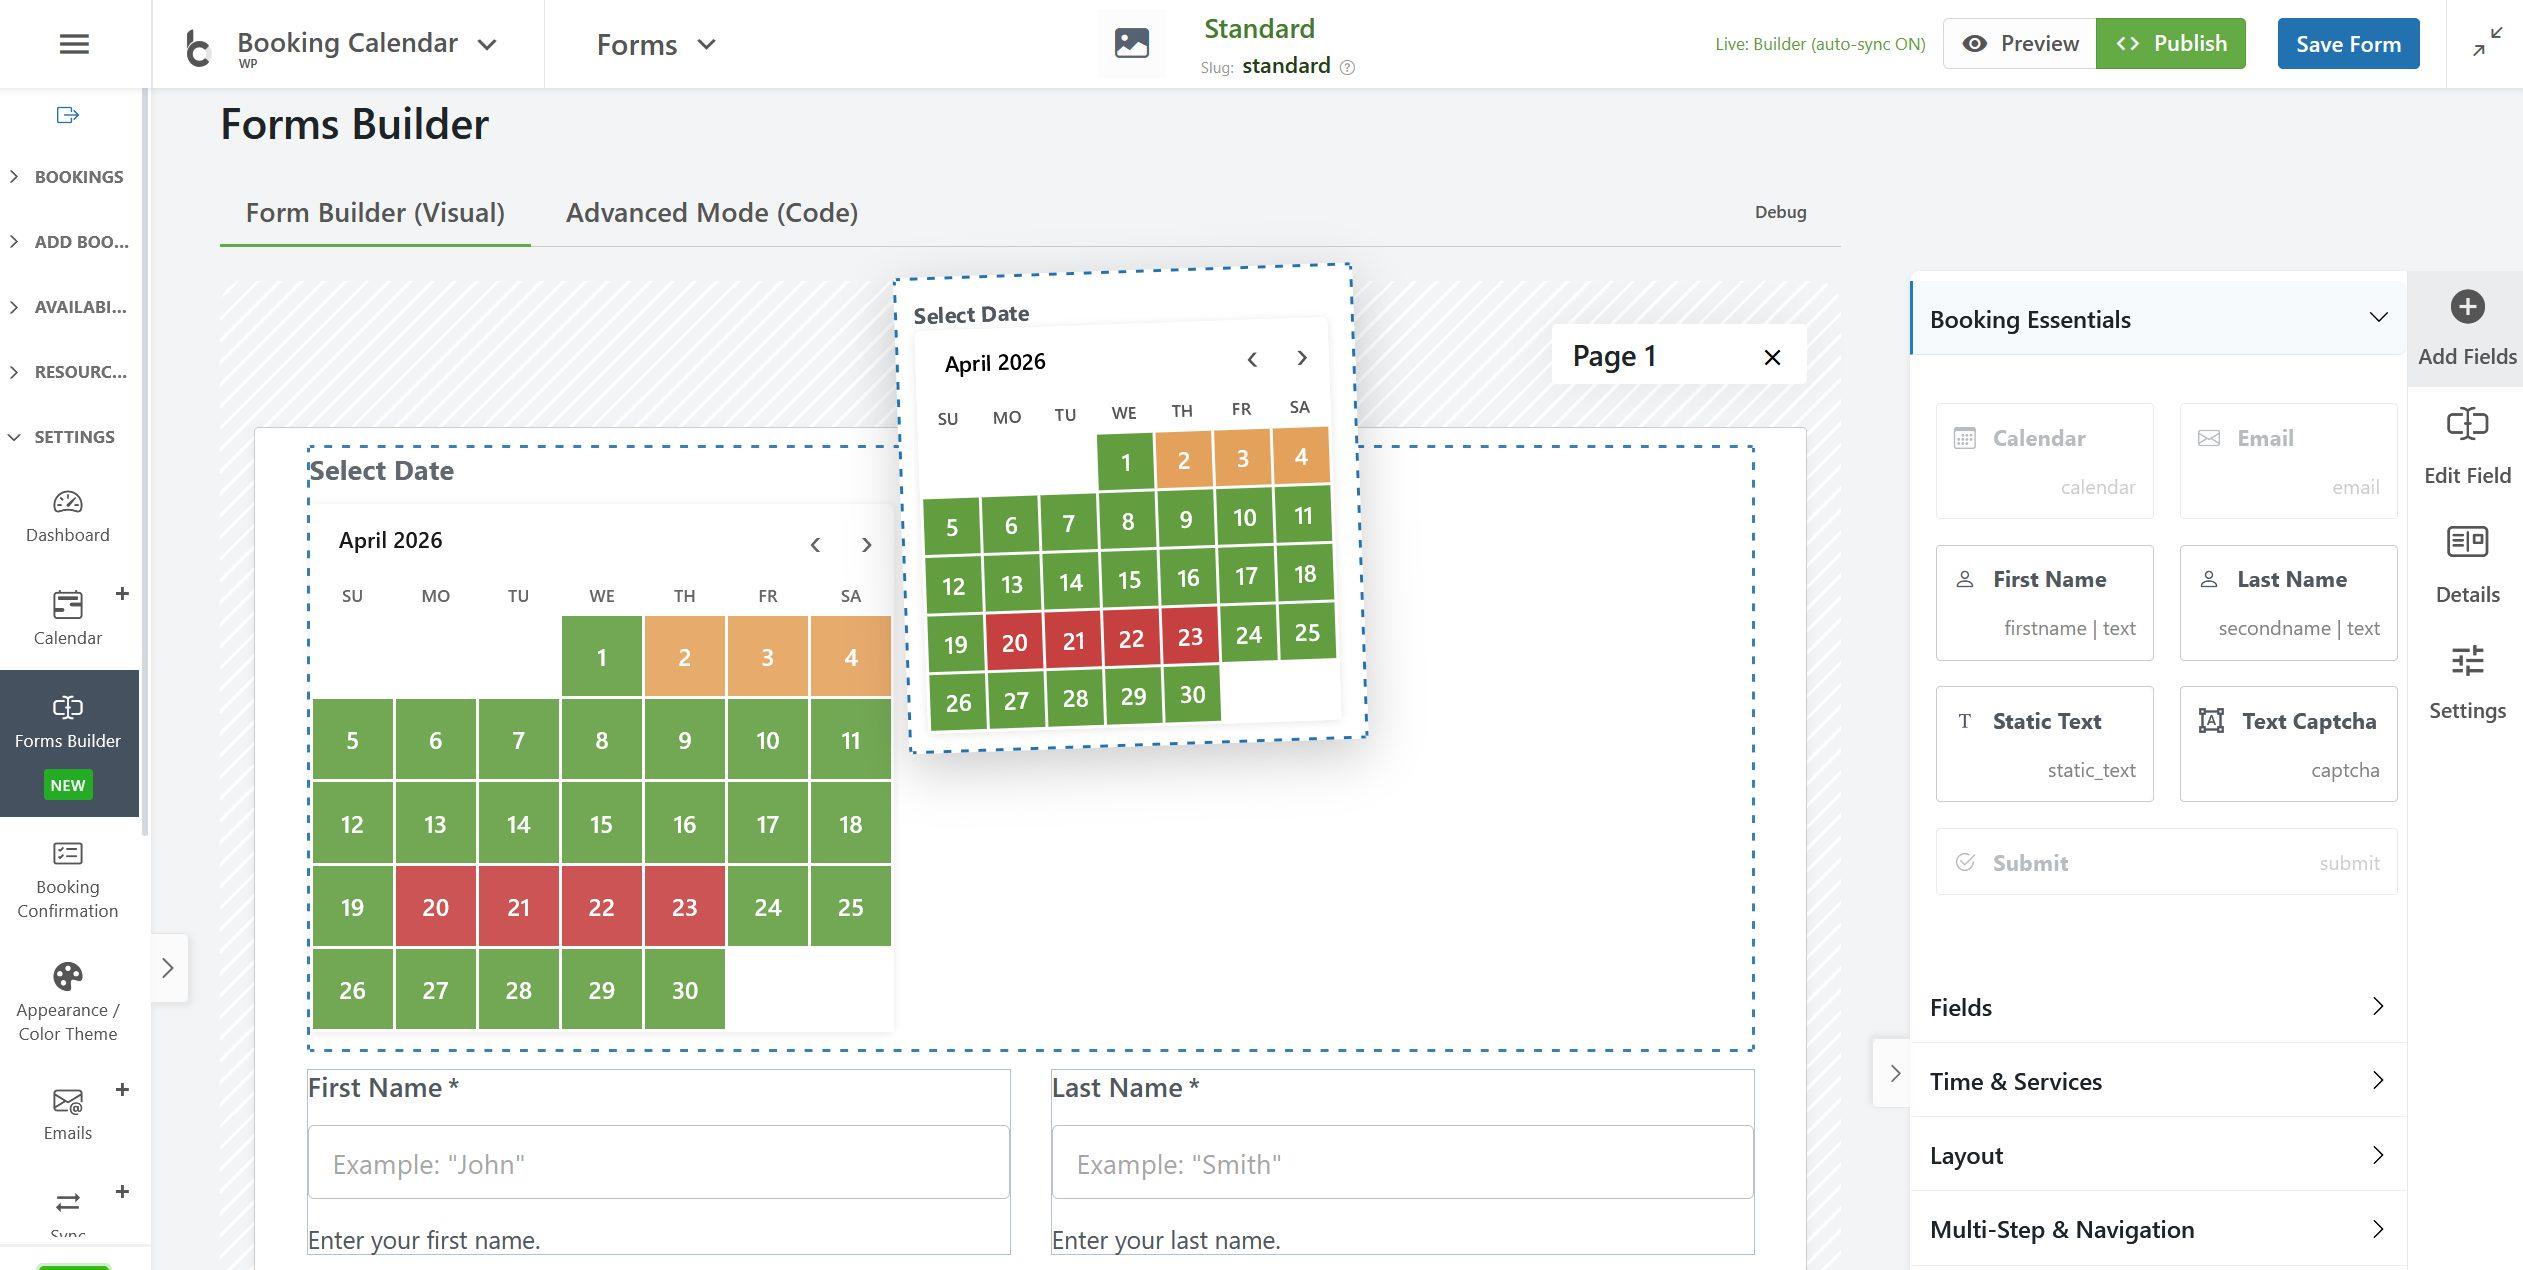
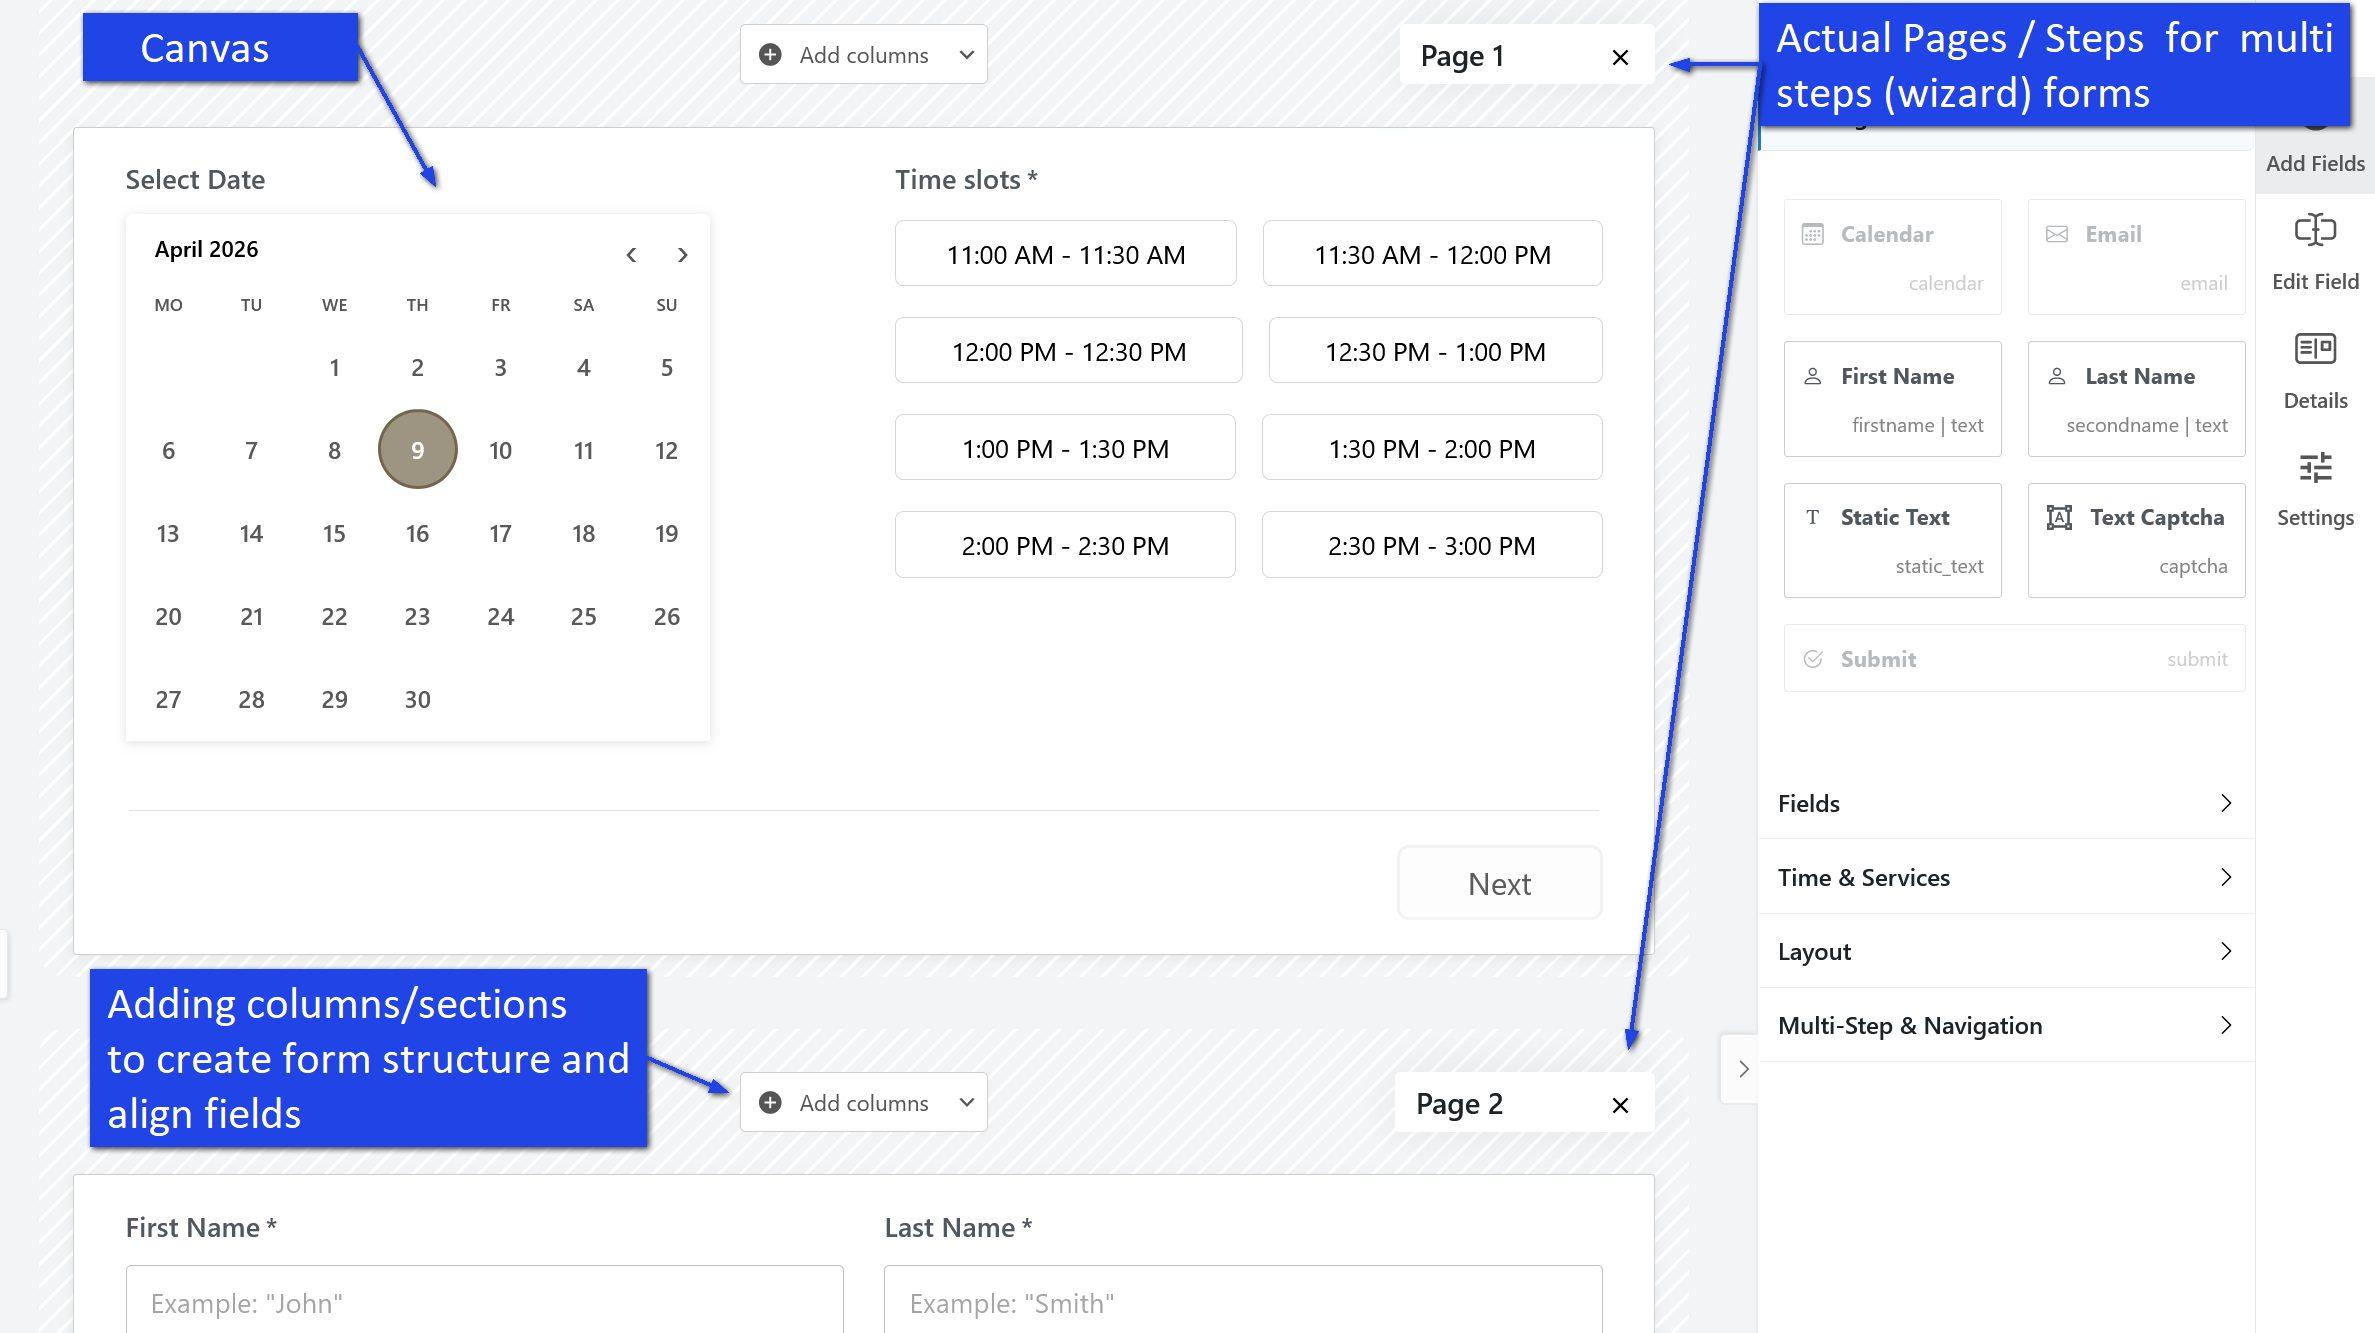
Main canvas area
The large center area is the main form canvas. This is where you build the structure of your booking form.
In this area, you can:
- add new fields,
- move fields to a different position,
- create form rows and columns,
- build one-page or multi-step forms,
- see a live visual layout of your form.
When you drag a field into the canvas, it becomes part of your booking form. You can then click that field to edit its settings.
Pages and sections
The new builder can work with pages and sections. This makes it easier to create simple forms or more advanced multi-step forms.
- Pages are useful for step-by-step or wizard-style forms.
- Sections help you organize fields into rows and layout blocks.
- Columns allow you to place fields side by side, such as First Name and Last Name.
This layout system gives you much more flexibility when creating modern booking forms.
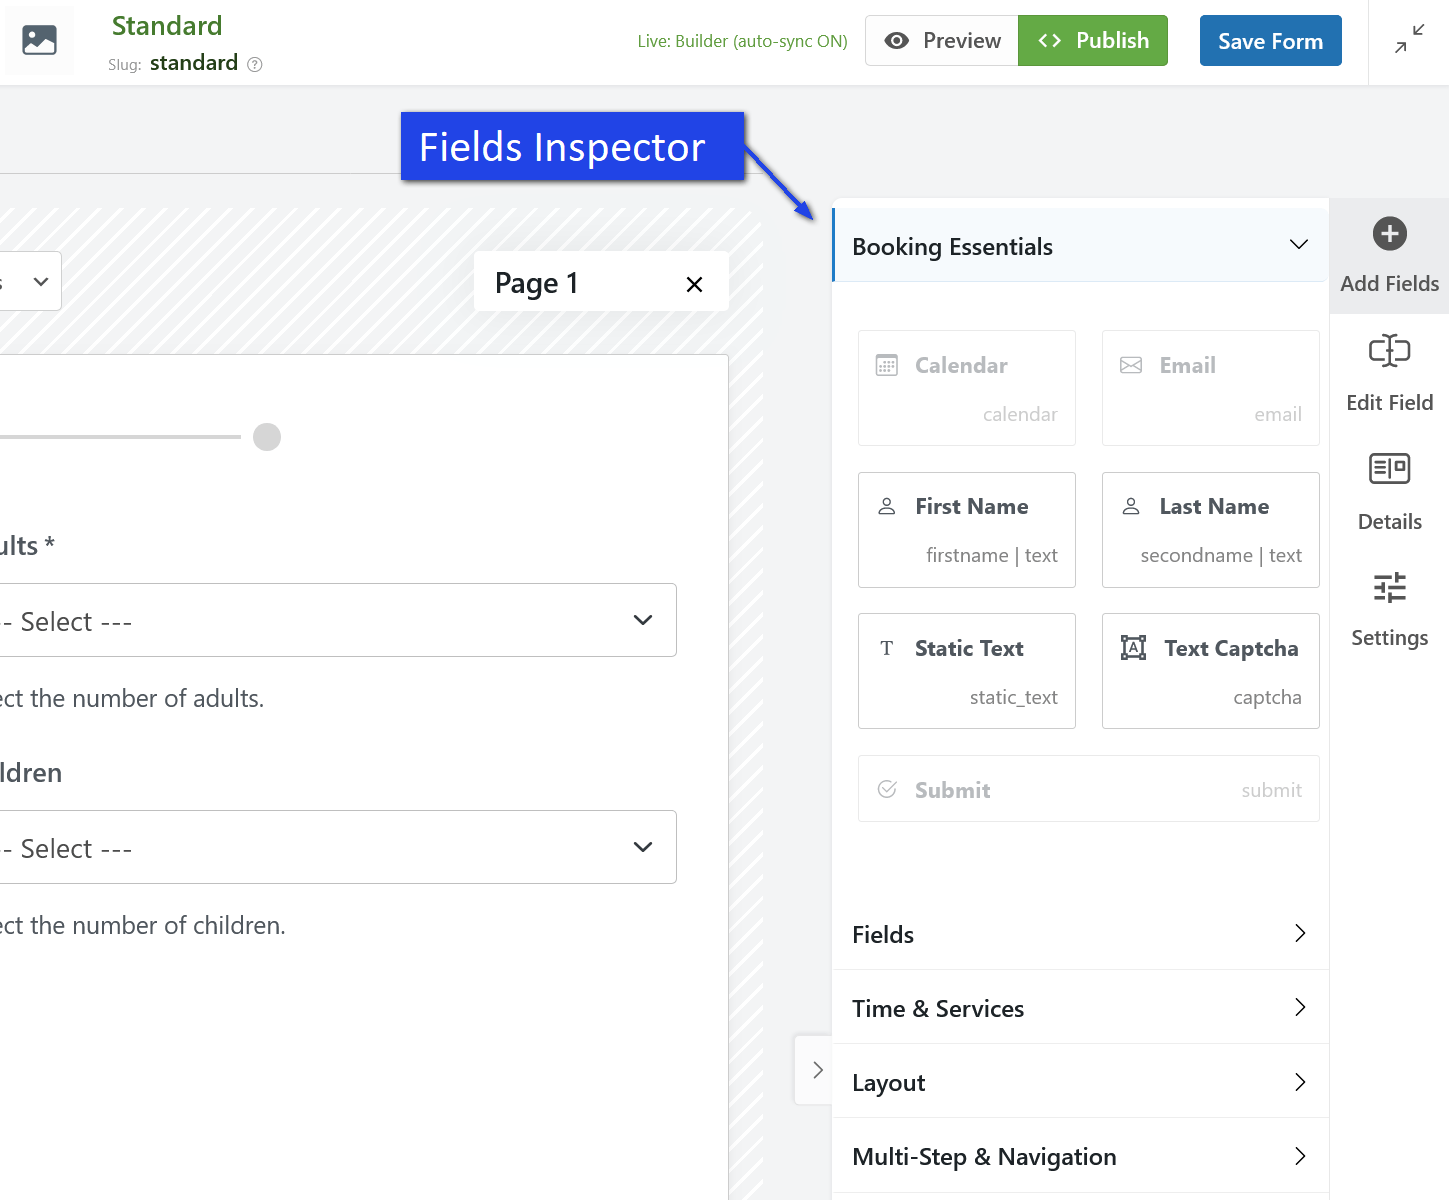
Right sidebar: field library and editing tools
The right sidebar is where you add and manage form elements. It is one of the most important parts of the interface.
Depending on the selected tab or button, this area lets you:
- browse available fields,
- insert booking or contact fields,
- edit the selected field,
- review field details,
- change settings for the selected element.
Quick sidebar actions
You may see quick action buttons on the right side, such as:
- Add Fields – opens the field library so you can drag new items into the form.
- Edit Field – lets you change the selected field.
- Details – shows more information about the selected item.
- Settings – opens configuration options for the selected field, section, or layout element.
These tools help you build and adjust the form without leaving the visual builder.
Field groups in the sidebar
The available fields are usually organized into groups, so it is easier to find what you need.
Booking Essentials
This section contains the most common booking form fields, such as:
- Calendar,
- Email,
- First Name,
- Last Name,
- Static Text,
- Captcha,
- Submit button.
These fields are often enough to build a basic booking or request form.
Fields
This section typically contains additional standard input fields that help you collect customer details, messages, and other booking information.
Time & Services
This section is useful for appointment booking forms and time-slot booking forms. It can include fields related to start time, service selection, duration, or time-based booking options.
Layout
This section helps you structure the form. You can use it to create rows, columns, and other layout blocks for better visual organization.
Multi-Step & Navigation
This section is useful when you want to build a multi-step booking form with several pages and navigation controls.
How editing works
The Booking Form Builder is designed to be simple:
- Choose a field from the right sidebar.
- Drag it into the center canvas.
- Click the added field to edit its settings.
- Adjust labels, placeholders, required options, styles, or other settings.
- Save your form.
- Preview and publish it when ready.
This workflow makes it much faster to create forms compared to editing form code manually.
What you can create with the Booking Form Builder
The new builder is flexible and can be used for many different types of forms, including:
- full-day booking forms,
- time-slot booking forms,
- appointment forms,
- contact forms,
- inquiry forms,
- request forms,
- multi-step booking forms.
This means you can use Booking Calendar not only for date selection, but also for collecting customer requests and service inquiries.
Basic tips for getting started
- Start with the Visual Builder if you are new to the feature.
- Begin with the most important fields first, such as date, name, email, and submit button.
- Use sections and columns to keep your layout clean.
- Use multi-step pages only when your form needs more space or more logic.
- Preview the form before publishing it.
- Always click Save Form after making changes.
Summary
The new Booking Form Builder interface in Booking Calendar gives you a more visual and flexible way to create forms. The center canvas is where you build the form layout, and the right sidebar is where you add fields and change settings.
With this interface, you can create simple or advanced booking forms faster, organize fields more clearly, and build a better booking experience for your website visitors.
Please check the screenshot for a visual example of the main builder sections and interface areas.