


How to Configure Time Slots in AM/PM Format in Booking Calendar Form Builder
If you want to display your booking time slots in AM/PM format instead of 24-hour format, you can do it directly inside the Booking Calendar Form Builder.
This is useful for websites where visitors are more familiar with time formats such as 9:00 AM, 1:30 PM, or 6:00 PM.
Booking Calendar makes this setup quick and easy. You only need to select your time field, switch the time format to AM/PM, generate the time slots, and adjust them if needed.
How to Set Time Slots in AM/PM Format
-
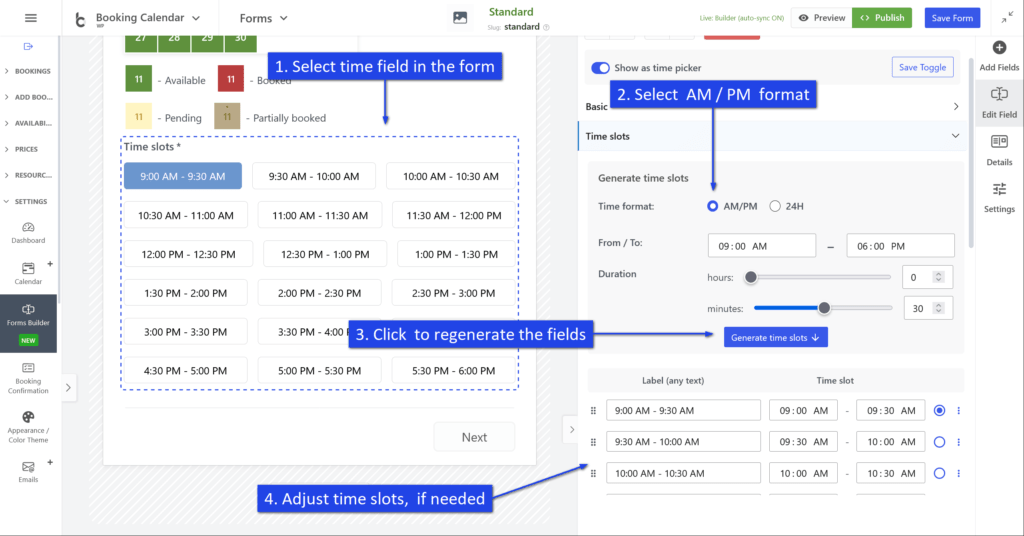
Select the time field in your form.
Open the Booking Calendar Form Builder and click the Time slots field in the form preview area. Once selected, its settings will appear in the right sidebar. -
Choose the AM/PM time format.
In the right sidebar, open the Time slots settings section. In the Time format option, select AM/PM. -
Set the working time range and slot duration.
Define the From / To time range for available appointments, for example from 09:00 AM to 06:00 PM.
After that, set the duration of each time slot using the hours and minutes controls, for example 30 minutes. -
Click “Generate time slots”.
After selecting the AM/PM format and setting the required time range and duration, click the Generate time slots button. The plugin will automatically create the list of time slots for you. -
Adjust the generated time slots if needed.
After generation, you can manually edit the slot labels and the exact start/end times. This is useful if you want to fine-tune your schedule or rename specific time slots. -
Save your form.
When everything looks correct, click Save Form to keep your changes.
Example
If you set:
- Time format: AM/PM
- From: 09:00 AM
- To: 06:00 PM
- Duration: 30 minutes
Booking Calendar can automatically generate time slots like:
- 9:00 AM - 9:30 AM
- 9:30 AM - 10:00 AM
- 10:00 AM - 10:30 AM
- 10:30 AM - 11:00 AM
- ...
Configure AM/PM Time Slots in Pro Version — Advanced Mode (Code)
If your form is configured in Advanced Mode (code), you can define time slots in AM/PM format by using the Title@@Value option format.
In this setup, the visitor sees a user-friendly label such as 09:00 AM - 09:30 AM, while Booking Calendar stores the internal value in strict 24-hour format, for example 09:00 - 09:30.
This is the recommended way to create AM/PM time-slot options in Advanced Mode.
Example Configuration
[calendar]

<r>
	<c><l>Select a time slot:</l><br />
	[selectbox rangetime
	"09:00 AM - 09:30 AM@@09:00 - 09:30"
	"09:30 AM - 10:00 AM@@09:30 - 10:00"
	"10:00 AM - 10:30 AM@@10:00 - 10:30"
	"10:30 AM - 11:00 AM@@10:30 - 11:00"
	"11:00 AM - 11:30 AM@@11:00 - 11:30"
	"11:30 AM - 12:00 PM@@11:30 - 12:00"
	"12:00 PM - 12:30 PM@@12:00 - 12:30"
	"12:30 PM - 01:00 PM@@12:30 - 13:00"
	"01:00 PM - 01:30 PM@@13:00 - 13:30"
	"01:30 PM - 02:00 PM@@13:30 - 14:00"
	]
	</c>
</r>

<r>
	<c>[submit "Send"]</c>
</r>
How It Works
- Before @@ — the visible title shown to visitors in AM/PM format.
- After @@ — the internal value saved by Booking Calendar in strict 24-hour format.
For example:
"01:30 PM - 02:00 PM@@13:30 - 14:00"This means the visitor sees 01:30 PM - 02:00 PM, but the saved booking value is 13:30 - 14:00.
Important Notes
- Use the reserved field name rangetime for a single time-slot range selector.
- Keep all saved values in strict 24-hour format.
- Use the Title@@Value format whenever you want to show friendly labels but save machine-friendly values.
Show Selected Value in Emails or Booking Details
You can use these shortcodes in booking details or email templates:
- [rangetime] — shows the stored 24-hour value
- [rangetime_val] — shows the visible AM/PM label selected by the visitor
Example:
<b>Selected time slot:</b> [rangetime_val]
<b>Stored value:</b> [rangetime]