


The [bookingcustomerlisting]
shortcode creates a secure My Bookings page where visitors can see the bookings made with their email address. Visitors do not need a WordPress user account. They receive a one-time verification code by email and then use a temporary customer session to view their bookings.
This feature is available in Booking Calendar Personal and higher editions. In the Free edition, the shortcode displays a Pro-only notice.
Set Up the My Bookings Page
Booking Calendar can create a page named My Bookings Listing during an eligible Personal or higher activation. Check WordPress Administration > Pages before creating another page.
If the page does not exist:
- Open Pages > Add New.
- Give the page a customer-facing title such as My Bookings.
- Add
[bookingcustomerlisting]as the page content.
- Publish the page.
- Open WP Booking Calendar > Settings > General > Bookings Options.
- Set URL of page for customer bookings listing to the full public URL of the page and save the settings.
Use the exact shortcode shown above. Its attributes are currently reserved for compatible future extensions and do not change the customer listing.
For the View or edit and Cancel booking actions, also configure URL to edit bookings in the same settings section. That URL must point to a published page containing [bookingedit]
. The My Bookings page still displays bookings if the visitor-edit page is not configured, but the action buttons cannot be generated.
Configure the Verification Email
Open WP Booking Calendar > Settings > Emails > Customer Verification. Keep this email enabled and review its sender, subject, content, and style.
[verification_code]inserts the six-digit one-time code.
[expiration_minutes]inserts the number of minutes before the code expires.
[blogname]and
[siteurl]identify the website.
The code expires after 15 minutes and can be used only once. Confirm that WordPress can deliver outgoing email before sharing the page. Customer verification email is intentionally disabled on Booking Calendar demonstration websites.
Add the published page to a menu, account area, booking confirmation page, or customer help message. You can also place [visitorbookingslisting]
in a Booking Calendar email template. Booking Calendar replaces it with a one-time link to the configured listing page. That link expires after seven days by default. If it has expired or has already been used, the visitor can request a verification code from the normal page.
How Visitors Verify Their Email
Step 1: Enter the booking email address
The visitor enters the email address used in the Booking Form and selects Send verification code.
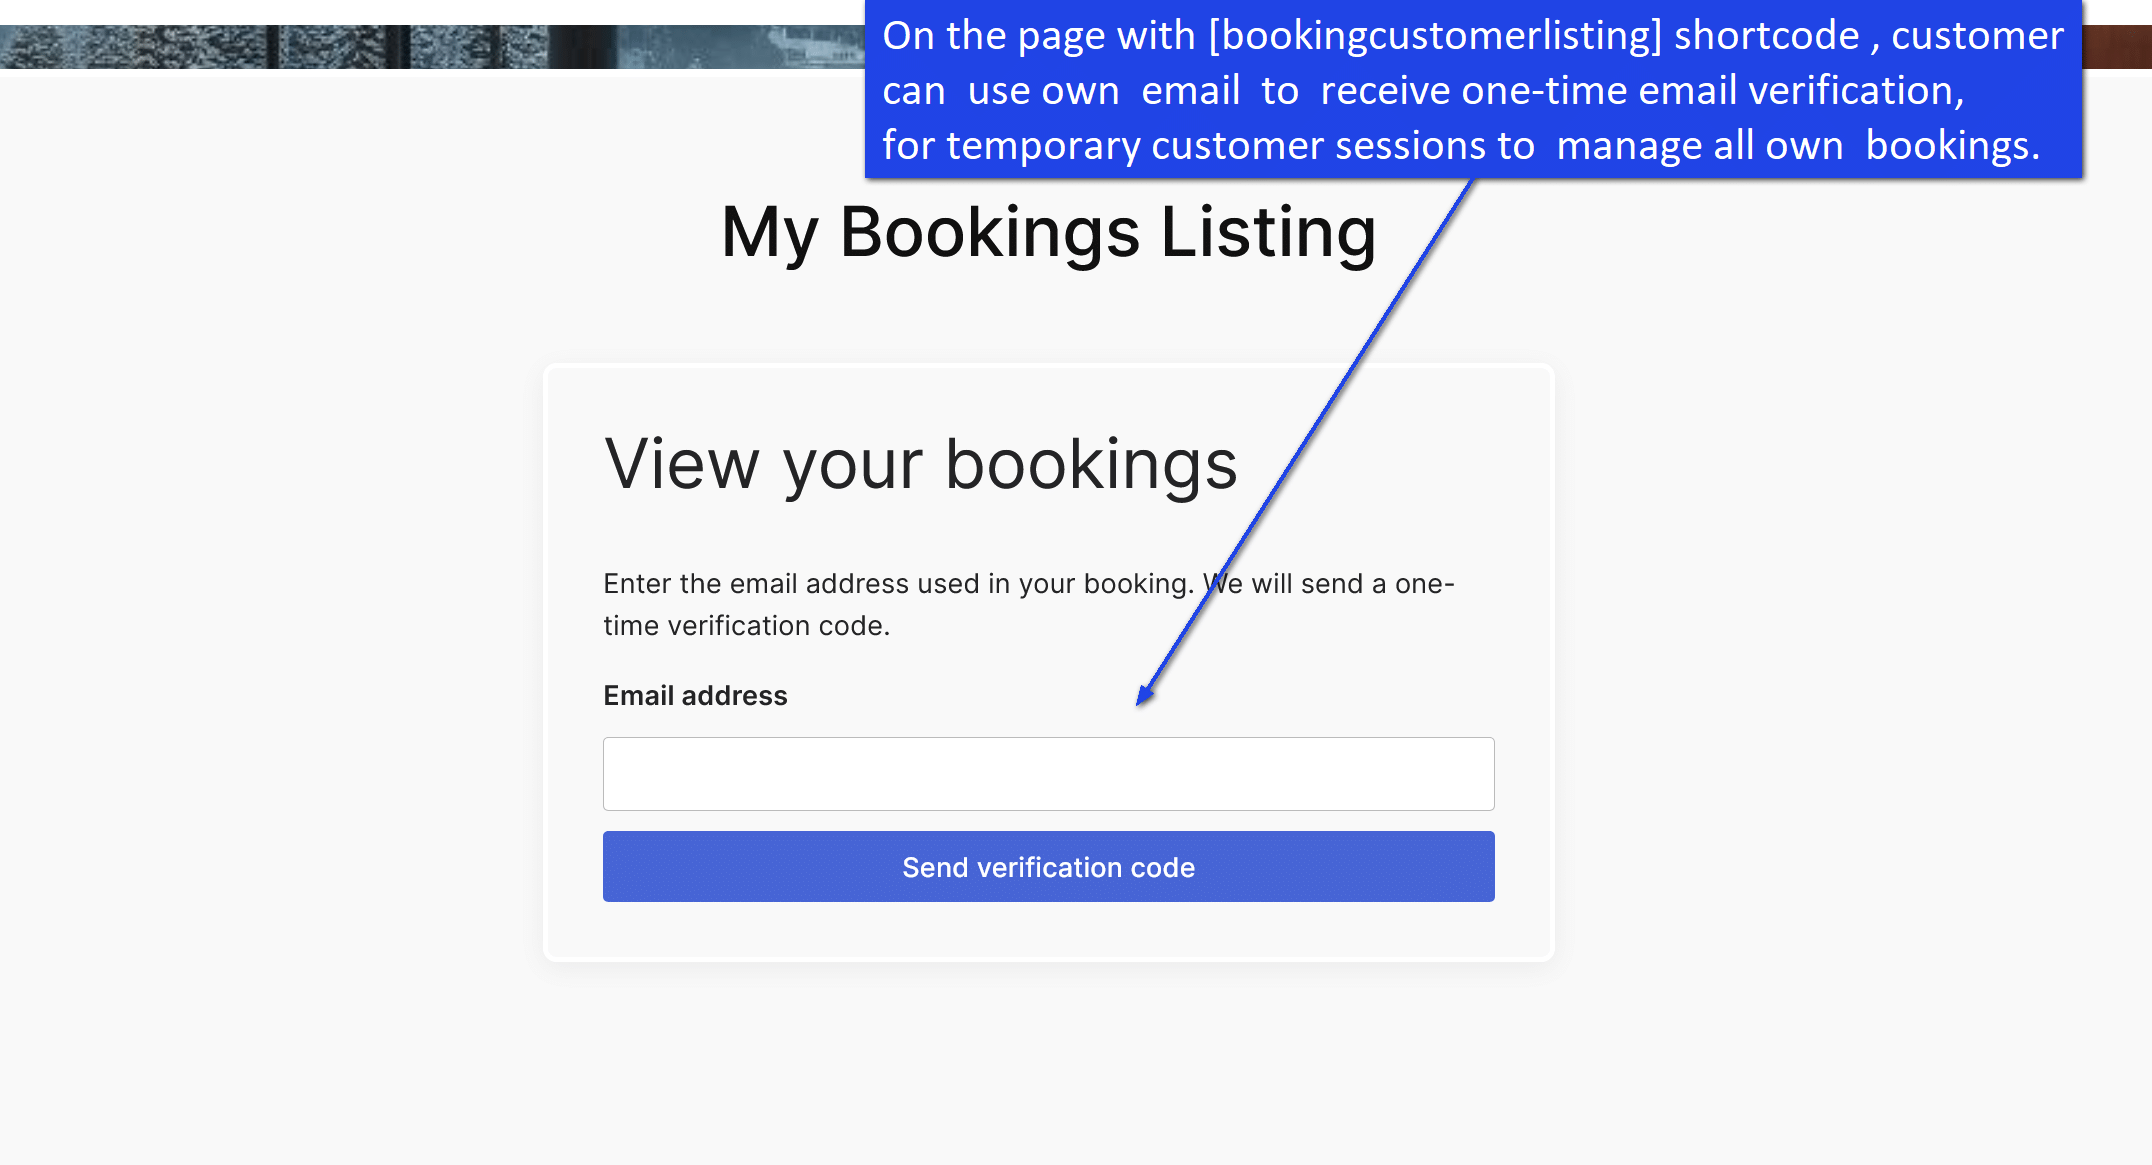
For privacy, the page always displays the same message after a valid request: If bookings exist for this email, a verification message has been sent. It does not reveal whether an email address has bookings.
The visitor must use the exact address stored in the standard Email field of the Booking Form. Bookings made with another address are not included in the same verified session.
Step 2: Enter the verification code
The visitor copies the six-digit code from the email, enters it in the Verification code field, and selects Verify and show bookings.
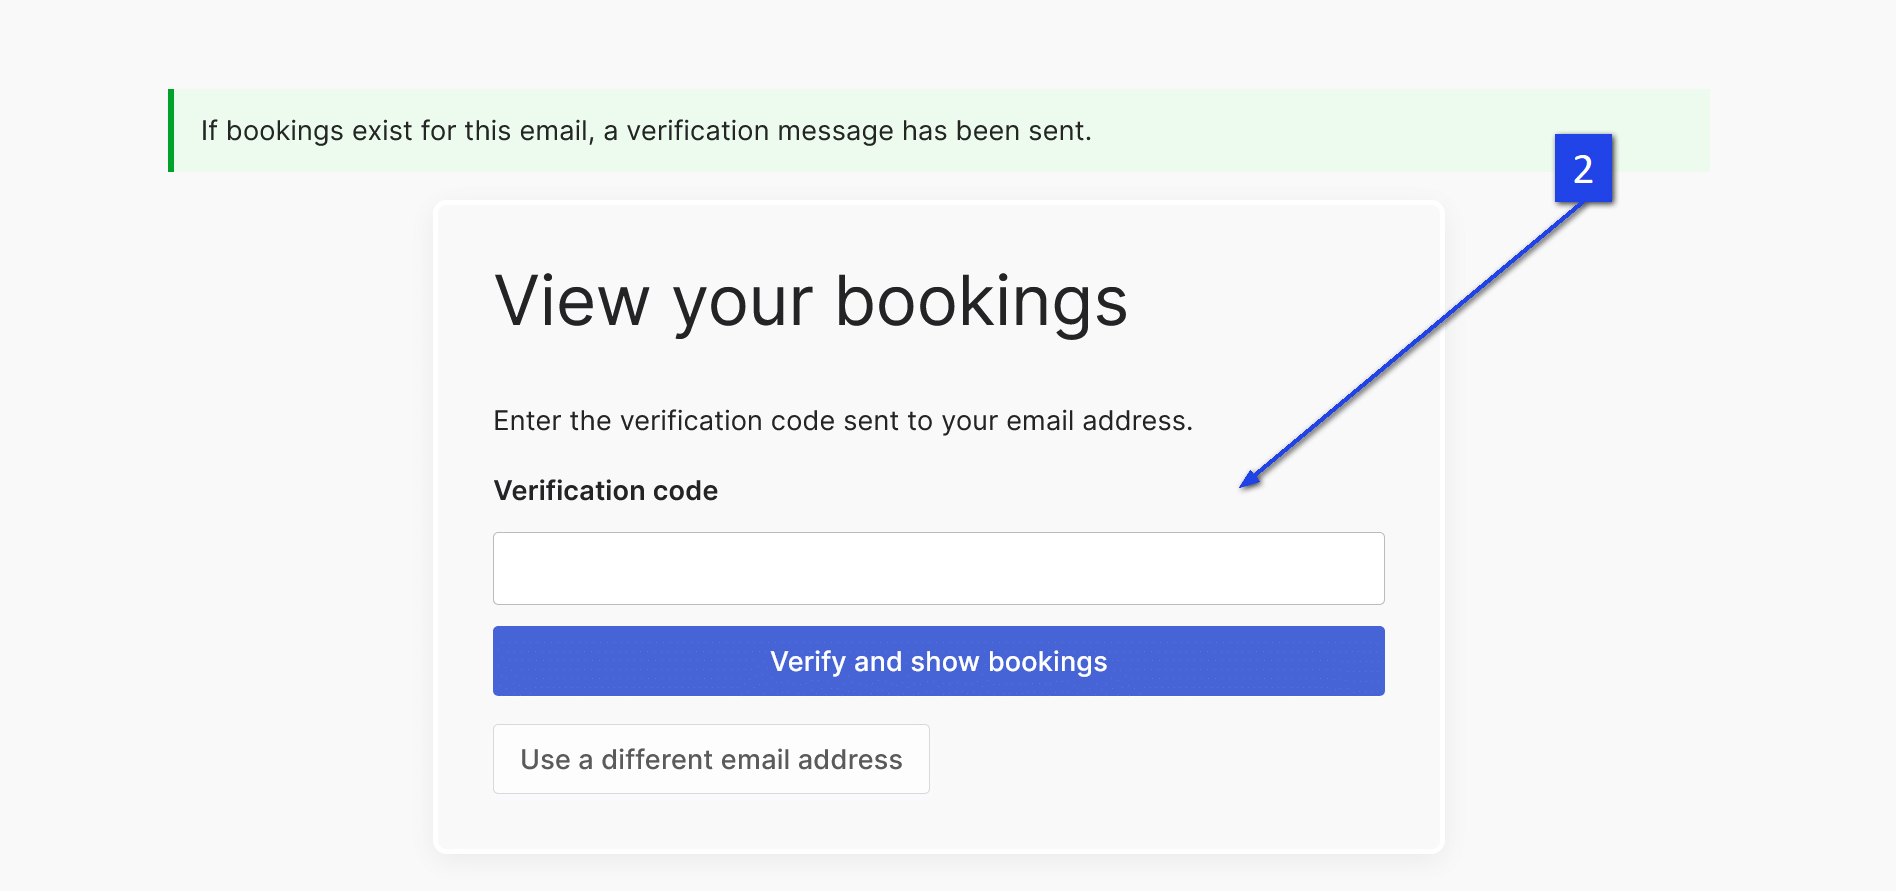
Select Use a different email address to return to the email form. If a code is invalid or has expired, return to that form and request a new code.
Successful verification starts a temporary session that lasts one hour by default. The visitor must use the same browser with first-party cookies enabled. No WordPress login is created.
Review the Booking List
The verified page shows all non-trashed bookings on the current website that use the verified customer email. This includes upcoming and past bookings. The newest booking dates appear first, and the default page size is ten bookings.
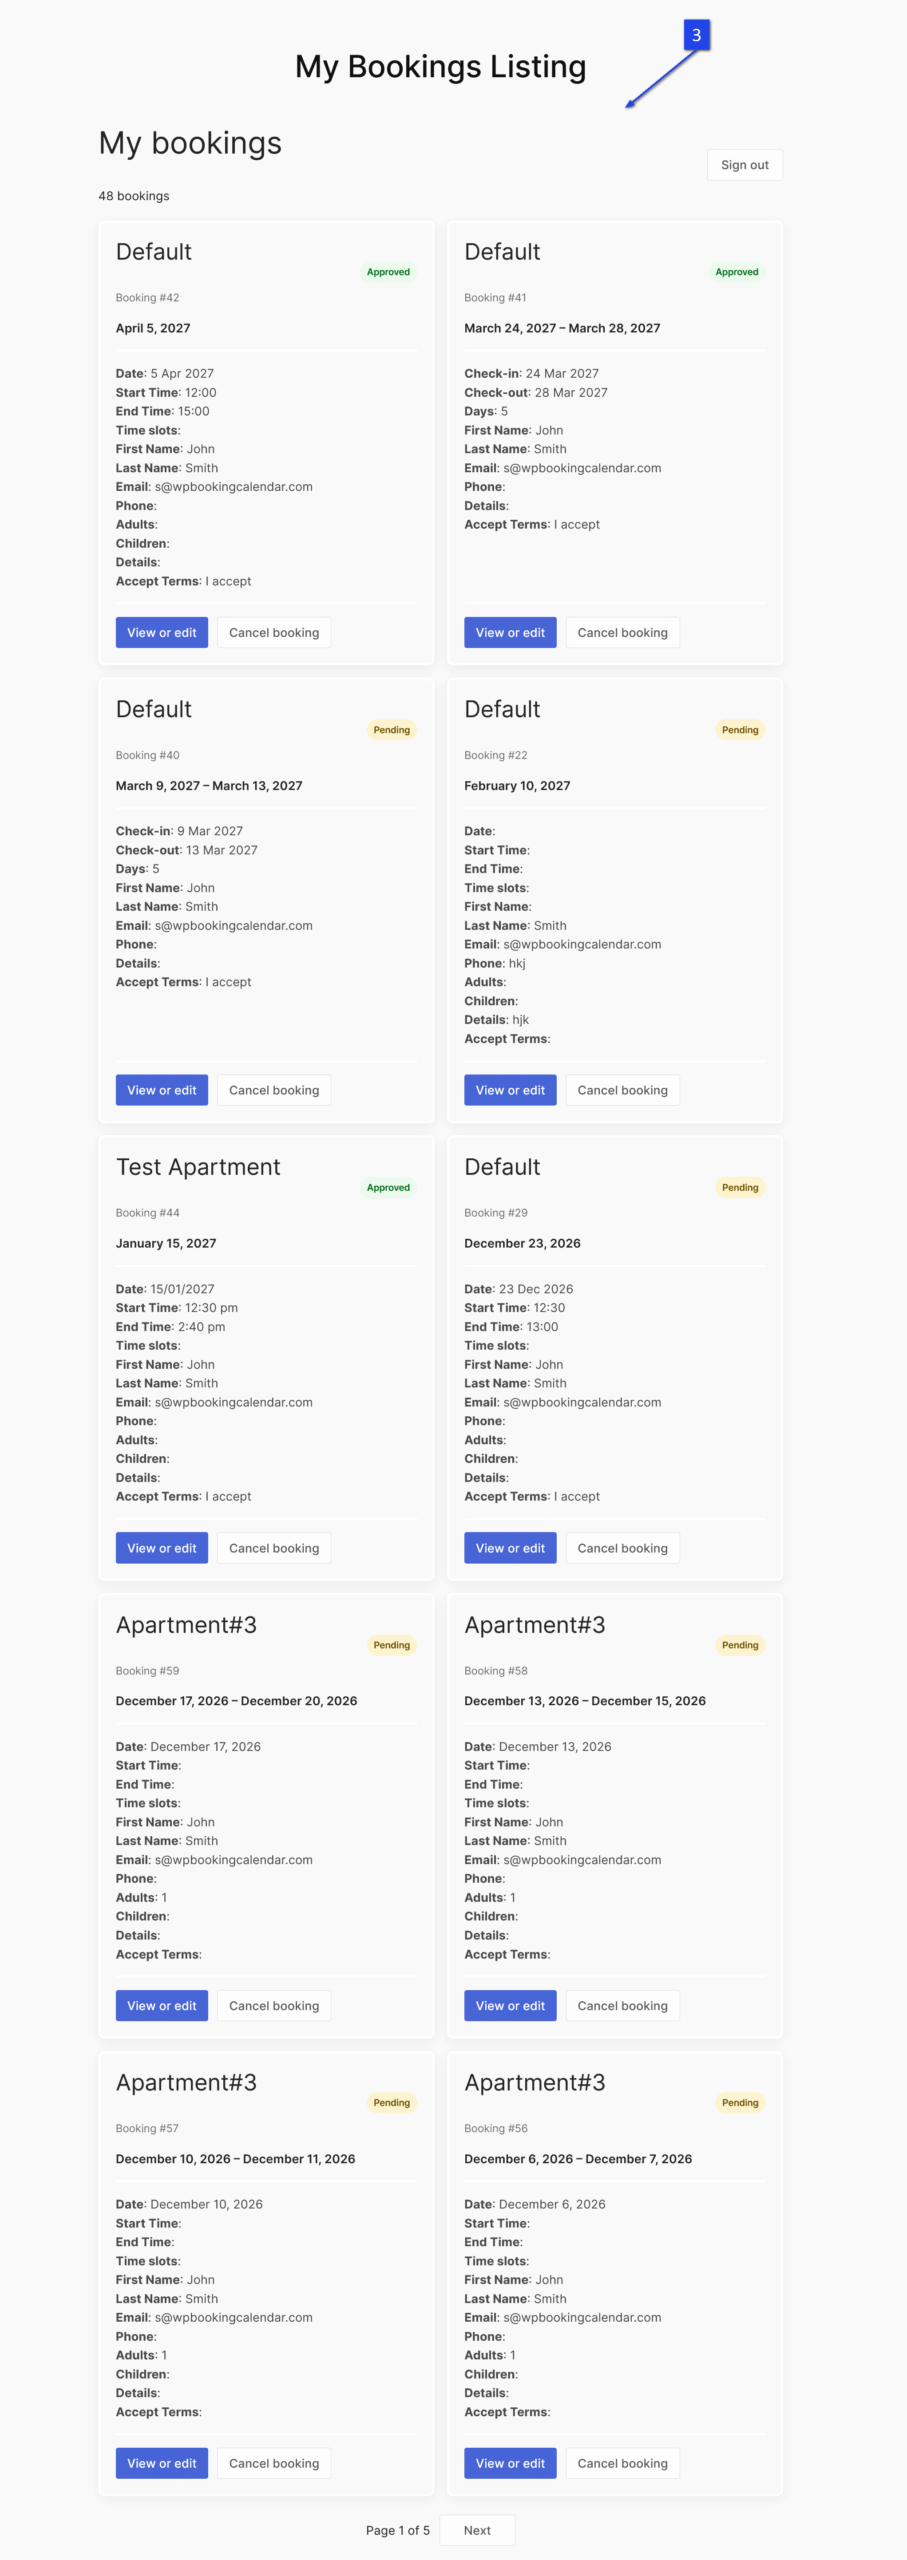
Each card can show:
- The Booking Resource title and Booking ID.
- Approved or Pending status.
- The booked date or date range.
- The details saved with the booking.
- Management actions when the booking can still be changed.
Use Previous and Next when the list has more than one page. Select Sign out when finished, especially on a shared device. Signing out ends the current customer session but does not change any booking.
View, Edit, or Cancel a Booking
View or edit
Select View or edit to open the configured visitor-edit page for that booking. The available fields and dates depend on the site's Booking Form, availability, and visitor-edit configuration.
The action is available only while the booking's final booked date is today or in the future. Past bookings remain in the list for reference but do not show edit or cancellation actions.
Cancel booking
Select Cancel booking to open a confirmation screen containing the Booking Resource, Booking ID, status, dates, and booking details. Nothing is canceled until the visitor selects Confirm cancellation. Keep booking returns without changing it.
After confirmation, Booking Calendar moves the booking to Trash, rotates its visitor link, and removes it from the customer list. The site's configured cancellation or trash notification can also be sent. This action is not self-service reversible; an administrator must restore the booking if the cancellation was a mistake.
Cancellation is available only through the booking's final booked date. A past, missing, trashed, or invalid booking cannot be canceled from the public page.
Privacy, MultiUser, and Multisite Behavior
- Verification grants temporary access only to bookings with the exact verified customer email. A booking ID supplied by the browser does not expand that access.
- Verification responses do not disclose whether a submitted email has any bookings.
- One-time codes, one-time email links, and customer sessions expire.
- In MultiUser installations, the verification email uses the settings of the owner of the customer's most recent matching Booking Resource.
- Multisite installations keep customer bookings, settings, and verification sessions within the current site. Configure the page separately on each site where visitors need self-service access.
Keyboard and Accessibility
The email field, code field, buttons, booking actions, Sign out, and pagination use standard keyboard-operable controls. Visitors can move through them with Tab and Shift+Tab, then activate the focused control with Enter or Space as supported by the browser. Approved and Pending states are written as text and do not rely on color alone.
The active WordPress theme should preserve visible keyboard focus and readable contrast. At 200% zoom and on mobile screens, verify that booking details and actions remain readable without horizontal scrolling.
Troubleshooting
The verification email does not arrive
- Confirm the visitor entered the exact address stored in the booking's standard Email field.
- Check spam and junk folders.
- Confirm Settings > Emails > Customer Verification is enabled and still contains
[verification_code].
- Test WordPress email delivery. The public success message is intentionally generic and does not prove that a matching booking or deliverable message exists.
- Wait at least 15 minutes after repeated requests, then request a new code. Temporary email and network limits protect the form from abuse.
The code is invalid or expired
Return to the email form with Use a different email address, enter the address again, and request a new code. Use only the newest six-digit code and submit it within 15 minutes.
No bookings appear
- Confirm the booking is not in Trash.
- Confirm the Booking Form stores the customer address in its standard field named
email. Another email-type field is not used to authorize this list.
- If different bookings used different email addresses, verify each address separately.
- On a migrated or restored site, allow Booking Calendar to rebuild its secure customer index, then try again.
View or edit and Cancel booking are missing
- Past bookings intentionally have no management actions.
- Confirm URL to edit bookings points to a published page containing
[bookingedit].
- Confirm the booking still has a valid visitor link and is not in Trash.
The page returns to the email form unexpectedly
The one-hour session may have expired, the visitor may have signed out, or the browser may be blocking first-party cookies. Request another code in the same browser. If a cache plugin or CDN continues serving an old screen, exclude the My Bookings page from full-page caching and clear all caches.