


Pre-Sales Questions
It's one time cost. You can use your purchased version of Booking Calendar as long as you need on your website.
Also, you can request free updates your version of Booking Calendar (if such updates ready) during 6 months after initial purchase of plugin.
If you will need to extend period of support and getting updates to next 6 months, it will cost 50% from the original cost of your Booking Calendar version (original cost - its cost of Booking Calendar version without other discounts).
Optional subscription of getting updates with discounted cost.
Please note, during initial purchase of plugin, its possible to select (or deselect) optional subscription (billing each 6 months) for getting Updates and Support for plugin with additional discount. First 6 month during initial purchase of plugin, getting of updates is for free. Possible to cancel subscription of getting updates at any time.
If you was not selected subscription of getting "Updates and Support" during initial purchase, and if you will need (in a future) to extend period of support and getting updates to next 6 months, it will cost 50% from the original cost (original cost - its cost of Booking Calendar version without other discounts).
You can request new update of Booking Calendar on this page.
If my subscription for updates has expired or is canceled, will the plugin continue to work?
Yes, the plugin will continue to function as before, but you won't receive free updates for Booking Calendar.
While the plugin should work with your current WordPress version, there is a potential risk of conflicts with future WordPress updates. We can't predict the changes in future WordPress updates, and older plugin versions may experience issues.
To ensure the best performance, prevent potential compatibility or security issues, and keep your bookings safe, we strongly recommend keeping your Booking Calendar up-to-date and maintaining an active subscription for the latest updates and support.
Upon the initial purchase of the plugin, you can request free updates for your Booking Calendar version (if updates available) within 6 months after initial purchase of plugin. Additionally, alongside this purchase for receiving the latest update, you can activate an optional subscription at a discounted rate.
Optional Subscription for Updates:
1) When purchasing the plugin initially, you have the option to select or deselect an optional subscription for updates and support, billed every 6 months. For the first 6 months after the initial purchase, updates are provided for free. You can cancel this subscription at any time.
2) If you did not select the subscription for updates and support during the initial purchase, or if your subscription was canceled or expired, and you later need to extend the period of support and updates for the next 6 months, it will cost 50% of the original cost of the Booking Calendar version, without any additional discounts applied. Additionally, the system offers further discounts for subsequent subscription charges every 6 months.
However, the initial charge for this update is 50% of the original Booking Calendar cost ( without any additional discounts applied ).
You can request the latest update of the Booking Calendar on this page.
Yes, its possible to make upgrade from lower version to the higher versions of the same editions (for example from the Booking Calendar Personal single site usage version to the Booking Calendar Business Small single site usage version).
But its does not possible to make upgrade from the single site usage version to the "developer" or multi site usage versions or from the "developer" to the multi site usage versions.
The cost of upgrade from the lower to higher versions, usually higher than difference in cost between 2 versions.
The cost of upgrade from the lower to higher versions of single site usage versions higher on $5 than difference in cost between 2 versions.
The cost of upgrade from the lower to higher versions of "developer" edition versions higher on $10 than difference in cost between 2 versions.
The cost of upgrade from the lower to higher versions of multi site usage versions higher on $15 than difference in cost between 2 versions.
Booking Calendar offers a range of versions and editions to suit different needs. It's important to distinguish between the versions, which determine the functionality, and the editions, which specify the number of websites on which you can use the plugin.
Editions:
Each version can be obtained in different editions, which dictate how many websites you can use the plugin on. The editions include:
Single Site Usage: This edition allows installation and activation on a single, specific website. It's suitable for those who have only one website to manage.
Developer Edition: With the developer edition, you can install and activate the plugin on up to 2 different websites. This is useful for testing on a developer server and a live website.
Multi-Site Usage: The multi-site usage edition enables installation and activation on a maximum of 5 different websites, making it suitable for businesses with multiple online platforms.
You can check overview of different Booking Calendar versions.
You can also check all available features for different versions of Booking Calendar.
Also you can test live demo of specific versions (both client and admin sides) to be sure in functionality and do not have misunderstanding.
Booking Calendar "Free" - this version is free, you can download it from WordPress directory.
It's very easy in use and powerful version for the creating reservation of one resource.
At this version is possible to make reservation for the one resource, like a room or car, or some service... etc. You can insert into the post or page the standard booking form with fixed number of fields and availability calendar, where visitor can select single or multiple days. Administrator and visitor can receive the standard email notifications about different actions, like a "new booking", "approve/decline/... of booking", etc... Administrator can make the booking at admin panel at the "Add new booking" menu page and configure the different settings of the booking form and availability calendar at the general booking settings menu page.
Booking Calendar Personal - it's paid version, where is possible to have booking availability calendar for the each of multiple booking resources (like a room, cars or any services, etc…). You can add new and configure exist fields in the booking form. Also you can configure the email templates for the different booking actions. You can able to edit the exist bookings, add comments to the bookings, print and export bookings to the CSV format, etc… Please check at the feature list and live demo of this version, full list of features of this version.
Booking Calendar Business Small - it's paid version, where is possible all actions from previous versions, plus you can receive the bookings for the specific time of date, set the cost of booking resource and integrate the online payment form of supported payment systems. Your visitors can make the rage days selection using the one mouse click in calendar, or setting minimum or sets of fixed number of days selection using 2 mouse clicks (check in and checkout dates), all middle dates will be selected automatically. Also here is possible to use the same date as check in/out date for the different bookings by activating the fixed time at the settings page.
Please note, if you will use the fixed time slot list selection (and not the time entering using the text fields) in the booking form, the timeslot list will be the same for the any date of week, in other words the fixed time slot list is not depend from the week of day. Also if some visitor will reserve the specific time slot at selected date at specific booking resource (calendar), this timeslot become unavailable for the other visitors at this selected date in this booking resource.
And much more... Please check at the feature list and live demo of this version, full list of features of this version.
Booking Calendar Business Medium - it's paid version, where is possible all actions from previous versions, plus you will have more advanced cost and availability management of the bookings. At this version is possible to set the rates, which will depend from the season filters, plus you can set the more advanced cost for the booking, where cost is depend from the number of selected dates. Also you can set additional cost for the option selection at selectboxes or checkboxes at your booking form. this additional cost can be fixed sum or percent from the final cost of booking. You can even activate and configure for the resources the deposit payment feature, what is mean that visitor will pay at the payment form, the part of the final cost of the booking. This version is also support settings availability per each booking resource, which is depend from the season filters. Also you can able to configure the several customization of booking form fields, it's mean that different resources can have different form fields. You can send the payment requests to visitors for the specific booking by email. And much more.... Please check at the feature list and live demo of this version, full list of features of this version.
Booking Calendar Business Large - it's paid version, where is possible all actions from previous versions, plus you can make the several reservations per the same FULL date (not a time slot) for the same booking resource (availability calendar). At this version is possible to set the capacity of the booking resource, it's mean that your visitors can make the several reservations per the same date, in other words, the date(s) in calendar will be available until lumber of reservations per these full dates is less than capacity of the booking resource. Please note, if you will use the timeslot selection for the booking resource with capacity higher than one, so then this timeslot will be simply record as a data into DB according this booking, but will not impact to the time availability. Also at this version you will be able to search the available booking resources in your pages or posts for the specific check in/out dates and specific number of visitors. This version is also support the coupon codes for getting discounts of bookings. And much more.... Please check at the feature list and live demo of this version, full list of features of this version.
Booking Calendar MultiUser - it's paid version, where is possible all actions from previous versions, plus each registered WordPress user of your site can have independent, individual, own booking admin panel. It's mean that each regular registered WordPress user can see only OWN booking resources and bookings and can configure the own booking form fields and email templates, own payment form integration data and costs of booking resources as some other settings... In this version is exist also the "super booking admin users", which can see and manage the bookings and booking resources from the all users and manage the status of other bookings users. And much more.... Please check at the feature list and live demo of this version, full list of features of this version.
Unfortunately we can not make personal customization or custom development on customer demand. But we can add features, that you need to our TODO list for implementing them in a future updates. You can add your request of specific feature at this page.
Please note, we can not specify some approximate time for implementation of the specific feature.
Thank you for understanding.
Please watch the video guides, check the FAQ, and review previously answered solutions in the plugin support forum before submitting a new question.
If you still have questions about configuring the plugin, you can contact us via support email or through the support forum. Support is available only through email or the support forum. We do not offer assistance via phone or video/audio calls.
Please note that you will receive a response within 24 hours. Typically, our response time is 2-3 hours during working hours (10:00 AM - 6:00 PM UTC+2). If you don’t see a response, please check your SPAM folder, or ensure you contacted us from a valid email address.
We can help with specific questions related to configuration or troubleshooting.
When reaching out, please provide detailed information about your issue. Avoid vague descriptions like "it doesn't work." We can't assist with general questions. Instead, explain the exact issue you're facing or the specific configuration you need help with.
We expect all support requests to be kind, helpful, and respectful. Any violation of this may result in the discontinuation of support for that individual.
Do not send "bumb" emails. Sending "bumping" emails can be reason of delay of responding to such emails. Kindly wait for an answer to your original email before submitting new questions.
Please note that we cannot use login credentials to access your website for testing or configuration purposes. Instead, please provide screenshots or videos of the issue you are experiencing, along with a detailed explanation of how to reproduce the problem.
What support do we NOT provide:
- We do not provide full configuration on the customer's website.
- We do not provide any customization of source code.
- We do not provide HTML, CSS, JavaScript, PHP coding for the Booking Calendar files or any forms in the plugin settings. This is the responsibility of your web developer.
- We do not provide WordPress usage training/teaching, configuration of WordPress websites, or server configuration.
- We do not provide training/teaching on HTML, CSS, JavaScript, PHP, or other programming languages.
- If you have custom code and experience issues, we cannot debug your code or search for mistakes. This is the responsibility of your web developer.
- We cannot assist with questions related to the functionality or configuration of other services or systems. Please seek help from the relevant support team for those services. Our support is focused on the "Booking Calendar" plugin only.
Please be sure to check the terms and conditions for the plugin usage and the support we provide.
We may discontinue support and cancel the active subscription (if applicable) for "support and updates" if the customer violates the plugin's terms and conditions or our support policy, or for other reasons, such as dishonesty, making accusations, or engaging in aggressive or disrespectful communication, among others.
You will receive support and the ability to request free updates for 6 months after initial purchase. After this period, if you do not have active subscription for support and updates and you need it for the next 6 months, it will cost 50% of the original Booking Calendar version cost (original cost – it is cost of Booking Calendar excluding any discounts).
Updated 2025-02-09
Installation / Update / Upgrade
Starting from version 10.12.0, the Booking Calendar Pro now requires the Booking Calendar Free version to be installed first. This guide walks you through downloading, installing, and updating the paid version properly.
1. Where to Download the Latest Update
If you’ve purchased a paid version of Booking Calendar:
- You should receive a download link in your confirmation email.
- If you need to request a new download link or update, please use the Update Request Page.
Before updating, please review the conditions for receiving updates here.
2. First-Time Installation of the Paid Version
If you're installing the Booking Calendar Pro version for the first time, please follow these steps carefully:
2.1 Install the Free Version (if not already installed)
The Pro version requires the Free version to be installed first.
If you skip this step, the system will prompt you to install the Free version before activating the Pro version.
- Go to WordPress Admin > Plugins > Add New
- Search for “Booking Calendar by wpdevelop”, click Install, then Activate

- Go to Plugins > Add New > Upload Plugin
- Choose the .zip file of your Pro version and click Install Now

- Once installed, click Activate
- If the Free version is not yet installed, the system will provide a link to install it before activation.
- The Pro version will automatically extend the Free version.
Troubleshooting.
- If you're seeing a folder full of files instead of the .zip archive, check out this troubleshooting guide.
- If you receive a message like this: 'The uploaded file exceeds the upload_max_filesize directive in php.ini', please refer to this troubleshooting instruction.
- If you prefer to upload the booking zip archive via FTP, refer to "point A" of this article for guidance.
3. Updating the Paid Version (Newer Update of Same Edition or Upgrading to Higher Edition)
3.1 Before You Update - Important Tips:
- Preserve Data Settings:
- Navigate to WP Booking Calendar > Settings > General > Uninstall / Deactivation section.
- Make sure "Delete booking data when plugin deactivated" is unchecked. This prevents your booking data from being deleted.

- Custom Code Warning: If you’ve modified any plugin files (PHP, CSS, JS), those changes will be overwritten during the update. Back up your changes or reapply them afterward.
- Backup Recommended: Back up your WordPress database and the folders: /wp-content/plugins/booking/, /wp-content/plugins/booking-calendar-com/. Note: In older paid versions, the folder name may differ, e.g. booking.bs.10.11.4

After downloading the updated .zip file of your paid version:
- Navigate to Plugins > Installed Plugins.
- Click Deactivate under the current paid Booking Calendar version.
- Then click Delete to remove the old version.
- If you were using Booking Calendar version 10.11.4 or older, you will likely see only the old paid version without the Free version. In this case, you must deactivate and delete the old version before installing the new Pro version.
- Follow step 2.2 Install the Pro Version above, or proceed with the following:
- Go to Plugins > Add New > Upload Plugin page.
- Upload the new .zip archive you downloaded.
- Click Install Now, then Activate.

Troubleshooting.
- If you're seeing a folder full of files instead of the .zip archive, check out this troubleshooting guide.
- If you receive a message like this: 'The uploaded file exceeds the upload_max_filesize directive in php.ini', please refer to this troubleshooting instruction.
- If you prefer to upload the booking zip archive via FTP, refer to "point A" of this article for guidance.
Clear your browser cache after activation to avoid interface issues.
What's Next?
- Read the general instructions on using paid versions of Booking Calendar.
- Create different booking resources (unique calendars) for your properties or services at the Booking > Resources page. Check more here.
- Learn how to insert booking forms or availability calendars for specific booking resource on your pages here.
- Explore the main features and configuration options here.
- For additional information, refer to our FAQ.
If you're having trouble activating the new Booking Calendar Pro version after updating from the old paid version using the provided installation instruction, please follow these four troubleshooting steps:
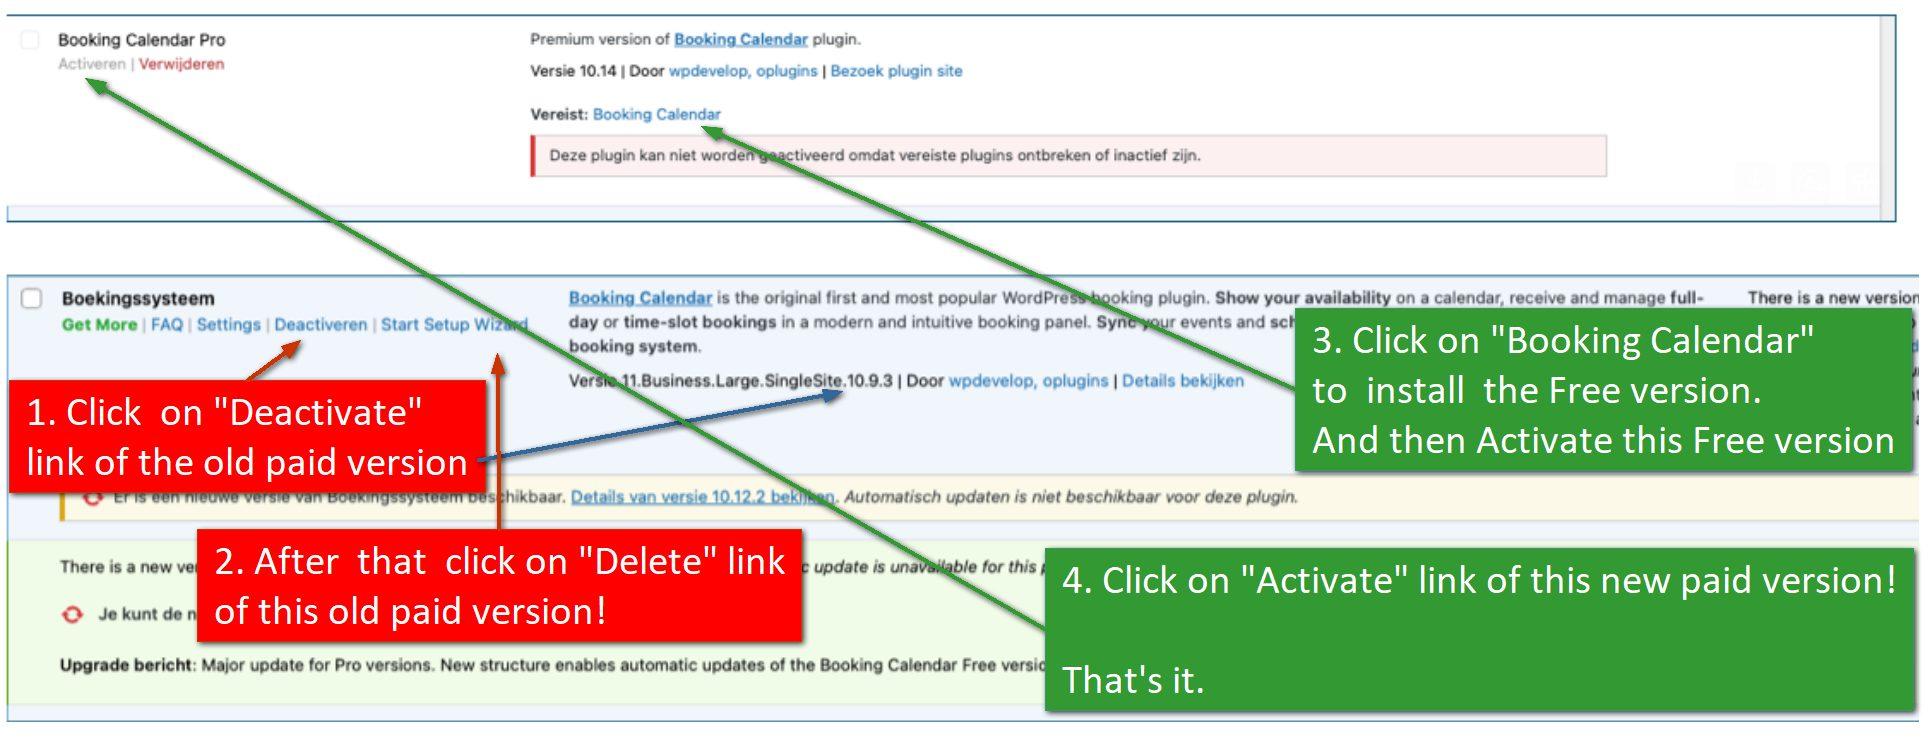
1. Deactivate the old paid version of Booking Calendar.
2. Delete the old paid version of Booking Calendar from your WordPress.
3. Install and activate the Booking Calendar Free version. You can either do this as shown in the attached screenshot, or download and install it separately from the WordPress directory.
4. Finally, activate the new Booking Calendar Pro version.
Using the WordPress Plugins menu page.
1) Open the WordPress Plugins menu, select "Add new plugin" submenu
2) In the search text field enter "booking" or "booking calendar" term and select search.
In the search results, find "Booking Calendar" (created by wpdevelop) plugin and click on "Install" link. Wait until the plugin is downloaded and installed.
3) Open the WordPress Plugins menu page and click on "Activate".
Wait for the message "Plugin is activated successfully". This is important. Otherwise not all DB tables will be created and you will have an error message.
The plugin is now ready for use.
Installation using the uploading of plugin zip archive.
1) Open the WordPress Plugins menu page, select the "Add New" plugin sub-menu and then click on "Upload Plugin" button at top of page. Click on the "Choose File" button and select the booking zip archive. Click on "Install Now" button and wait for the plugin to be uploaded.
If you will receive message like this: "The uploaded file exceeds the upload_max_filesize directive in php.ini", then please check this troubleshooting instruction.
If you want to upload the booking zip archive via FTP, then you need to extract the archive content. You have to get at result the booking folder with plugins files. Then upload entire this folder to ../wp-content/plugins/ folder at your server.
2) Now open the WordPress Plugins menu page and "Activate" that plugin.
Wait for the message "Plugin is activated successfully".
The plugin is now ready for use.
Please note, you can request the new update of Booking Calendar on this page.
A) Probably at your computer was set properties for the archive files to show as folder and that's why you see it as a folder.
Please check in your explorer to show the extension of the files. Then try to download it again and make upload to your website.
Check more helpful info here or here.
B) Or you can upload entire folder (not zip file) to your serve by FTP (skip 2 first points) :
1) Please download the archive of the Booking Calendar to your desktop.
2) Extract it from archive. You have to get the "booking" folder.
3) Please upload this folder, using the FTP manager to your server, to the folder ../wp-content/plugins/
If you do not have access to your server through FTP, then please contact support of your hosting company about this details.
4) Now open admin panel of your WordPress site at the Plugins menu, you have to see there Booking Calendar plugin. (If you was having previous free version, there, please deactivate it).
Please click at the "Activate" link of your new paid version.5) Please wait until message will show that the plugin is activated successfully.
Now you have to be able to use Booking Calendar plugin.
Here is 2 solutions.
A) Upload using FTP manager. It's can be any ftp manager for uploading files to your server. If you do not have FTP access, so then please contact support of your hosting. Also they can recommend to you FTP manager that can be good for your server to upload these files.
1) Please download the archive of the Booking Calendar to your desktop.
2) Extract it from archive. You have to get the "booking-calendar-com" folder.
3) Then upload this folder, using the FTP manager (like FAR or some other) to your server, to the folder
../wp-content/plugins/4) Now open admin panel of your WordPress site. At Plugins menu, you have to see "Booking Calendar Pro" plugin.
Click at the "Activate" link of your new paid version.
5) Please wait until message will show that the plugin is activated successfully. Now you can use the Booking Calendar plugin.
B) Or you can ask your serve administrator or support of hosting company to extend max file-size limit at your server.
Thank you.
Booking Resources - setup new calendars
Such functionality available in all paid versions of Booking Calendar. In the Booking Calendar Free version supported only one default booking resource (calendar).
1) After installation paid version of Booking Calendar, you will see the new menu WP Booking Calendar > Resources page.
Booking resources - it's your objects (like rooms, cars, tables...) or services, that can be booked. Each booking resource is the unique calendar with own availability and own bookings.
 .
.
2) To create a new booking resource, please enter the name of the booking resource (calendar) at the text field in top toolbar and click on "Add New" button.

3) Now you can publish the booking form for this new booking resource (calendar). There are several ways, how to do this.
You can make automatic publishing of the booking form for this booking resource into exist or new page, by clicking on "Publish" button near this booking resource:

Or you can create a new page or open the page for editing, and insert the Booking Calendar shortcode for this new booking resource manualy. the detailed description about how to insert / publish booking forms you can find in this FAQ guide.
Booking admin menu page path: Booking > Resources (available in paid versions only).
Booking Calendar Personal
Booking resources - it's your objects (like rooms, cars or tables) or services, what can be booked by visitors of your sites. You can add/delete/modify the booking resources at the Booking > Resource page.

You can define the calendar (booking form) to the specific booking resources, at the popup configuration dialog, during inserting the booking form into post or page.
Terms: Personal, Business Small, Business Medium, Business Large, MultiUser, resource configuration.

Booking Calendar Business Small / Medium
In additional, at the Resource menu page at these version, you can configure the cost per booking resource. You can set the cost at the specific field near each specific Booking Resource. At the same page (as at the general booking settings page, also) you can set the settings of cost calculation: per day, per night, per hour and fixed cost.
Cost per day - is mean that the cost, which you are set near your booking resource will be apply for the each selected day in calendar, when the visitor will make the reservation.
Cost per night - is mean that the cost, which you are set near your booking resource will be apply for the each night (the number of nights is equal number of days selected in calendar minus one day), when the visitor will make the reservation. If the visitor is select only one day, it's still mean one night selections. If visitor select 2 days, it's also mean the one night selection. If visitor select 3 days, it's mean 2 nights selections. If visitor select N days, it's mean N-1 nights selections, etc...
Cost per hour - is mean that the cost, which you are set near your booking resource will be apply for the each hour, if you are use the time selections/entering in booking form, when the visitor will make the reservation. If the visitor select several days, so then one full day calculated as 24 full hours, first and last day will be check in/out days and cost will be calculated depending from the check in/out (start/end) times (based on the 24 hours in a day).
Fixed cost - is mean that the cost, which you are set near your booking resource will be fixed and will not depend from number of days selections or time selections/entering in booking form, when the visitor will make the reservation.
Terms: Business Small, Business Medium, Business Large, MultiUser, cost configuration, resource configuration.
Booking Calendar Business Large
In Booking Calendar Business Large or higher version, you can configure the capacity for the specific booking resource.
The Capacity feature in Booking Calendar Business Large / MultiUser versions provide for you ability to set and manage the capacity for specific resources: properties or services.

Resource-Specific Capacity:
Define the maximum number of bookings or appointments that a specific resource or service can handle simultaneously. For example, if you manage a hotel with a particular number of room types or a meeting room, set its capacity to, say, 10, indicating it can accommodate up to 10 bookings simultaneously. This feature works for full dates or time slots on selected dates.
Real-time Availability Updates and Efficient Resource Management:
As bookings are made, the system automatically updates the available capacity in real-time. If the maximum capacity is reached, the system prevents additional bookings for that resource during the specified date(s) or time slot.
This feature enhances resource management by preventing overbooking and ensuring that each resource operates within its defined capacity limits.
Useful for Various Scenarios:
Ideal for businesses or services with limited capacity for specific resources, such as hotel rooms, specific property types, meeting rooms, tours, classes, or any other bookable items.
Improved User Experience:
Users can quickly see the remaining capacity for a resource when making a booking. You can display available slots in mouse-over tooltips when hovering over a specific date or use [capacity_hint] in the booking form to show available slots on selected dates in real-time.
Example Scenario:
Imagine running a workshop space with a capacity for 20 people. With the capacity feature, you can ensure that once 20 bookings are made for a particular time slot, additional bookings for that time will be prevented.
Alternatively, if you have 10 standard rooms and 5 double rooms in your hotel, you can display two separate booking forms—one for "standard rooms" with a capacity of 10 and another for "double rooms" with a capacity of 5.
How to Use:
Configure the capacity feature in the admin panel at the Booking > Resources page. Set the capacity for each resource individually by specifying the maximum number of bookings it can handle.
1. Parent booking resource.

Open the Booking > Resources page.
Find the booking resource you want to increase the capacity for or create a new booking resource (e.g., "Resource A").
To create a new booking resource, enter the "Name of booking resource" in the top toolbar at the Booking > Resources page and click the "Add New" button.
2. Increasing Capacity:

- Click the "Expand advanced toolbar" arrow button at the bottom left side of the toolbar to reveal additional options.
- Enter the name of the child booking resource (e.g., "Child Resource A").
- Select the number of child booking resources to create (e.g., 5) to set the capacity of the original "parent booking resource" ("Resource A") to 6.
- For the option "Parent" select our parent booking resource - "Resource A".
- Click the "Add new" button in the toolbar to add 5 child booking resources to our parent booking resource "Resource A," resulting in a total capacity of 6 (including the parent booking resource itself and 5 child booking resources).
3. Structure of Booking Resources:

The structure of booking resources will look like this:
Resource A | Capacity = 6 | Priority = 0
        -  Child Resource A - 1
        -  Child Resource A - 2
        -  Child Resource A - 3
        -  Child Resource A - 4
        -  Child Resource A - 5
In other words, there are 6 available slots for each dates (or time-sltos, if in booking form exist time fields) for meeting rooms, etc.
4. Publish Booking Form

Let's say each booking resource has an ID like this:
[ID=218] - Resource A | Capacity = 6 | Priority = 0
      [ID=219]  -  Child Resource A - 1
      [ID=220]  -  Child Resource A - 2
      [ID=221]  -  Child Resource A - 3
      [ID=222]  -  Child Resource A - 4
      [ID=223]  -  Child Resource A - 5
To insert your booking form into the page, use this shortcode:
[booking resource_id=218 nummonths=3]Learn how to put the booking form or availability calendar on your pages using Booking Calendar blocks in the WordPress Block Editor or Classic Editor on this page .
Also, check the simple steps to add the Booking Form manually to your page with shortcode blocks, for example, in non-standard page editors like Elementor, Divi, or others on this page.
5. Preventing Overbookings:
When you make a booking for a specific date or time, the system will decrease the capacity of the booking resource. If the number of bookings reaches the capacity limit of the booking resource, the date or time slot on the specific date(s) will become unavailable
6. Capacity Control Field:
What if you need to book 2 or more slots on a specific date/time? Define the field that will identify how many slots will be booked during one booking process. Open the Booking > Settings General page in the "Capacity" section, enable the "Booking Quantity Control" option, and for the "Quantity field name" select one of the existing fields from your booking form. This field must be a select box with simple numbers as options. For example, configure the field at the Booking > Settings > Booking Form page like this: [select visitors "1" "2" "3" "4" "5" "6"]. In this case, for the "Quantity field name" select the "visitors" field. Save settings changes.
Now, when you select a date (and/or time) and choose the number of visitors as 3, the system will make a booking of 3 "child booking resources" (or parent and 2 child booking resources) and decrease capacity on the selected date/time by 3 items.
7. Disable Bookings in Different Booking Resources:
An additional option "Disable bookings in different booking resources" at the Booking > Settings General page in the "Capacity" section. This option disables reservations that can be stored in different booking resources. When checked and you select several dates to book, all reserved days must be in the same booking resource; otherwise, an error message will show. For example, if you make bookings for a specific property (room), it prevents changing these rooms during all selected dates. In other words, the system checks that all selected dates in child booking resource (or parent booking resource) have to be available and stores this sequence into the SAME booking resource. Otherwise (useful in some situations), the system can store a booking on DAY 1 in child booking resource A and on DAY 2 in child booking resource B (in case if DAY 2 for the booking resource A was already unavailable).
8. Priority Field:
At the Booking > Resources page, there is a "Priority field" for each of your booking resources. It is the order in which the system will check availability and save the booking into the available child booking resources.
7. Different Capacities for Different Resources:
In a scenario where some booking resources support a maximum of 2 visitors per resource and other booking resources support 4 visitors per resource, you can create 2 different custom booking forms at the Booking > Settings > Booking Form page.
In custom booking form for "Standard Rooms" (e.g., with the name "standard-rooms-form"), you can have these fields:
Visitors number: [select visitors "1" "2"]
Number of rooms to book: [select items_to_book "1" "2" "3" "4" "5" "6"]
In the custom booking form for "Family Rooms" (e.g., with the name "family-rooms-form"), you can have these fields:
Visitors number: [select visitors "1" "2" "3" "4"]
Number of rooms to book: [select items_to_book "1" "2" "3"]
The structure of booking resources at the Booking > Resources page can be like this:
Standard Rooms:
[ID=10] - Standard Room - 1 | Capacity = 6 | Priority = 0
      [ID=11]  -  Standard Room - 2
      [ID=12]  -  Standard Room - 3
      [ID=13]  -  Standard Room - 4
      [ID=14]  -  Standard Room - 5
      [ID=15]  -  Standard Room - 6
Family Rooms:
[ID=18] - Family Room - 1 | Capacity = 3 | Priority = 0
      [ID=19]  -  Family Room - 2
      [ID=20]  -  Family Room - 3
And at the Booking > Settings General page in the "Capacity" section, you can activate the "Booking Quantity Control" and for the option "Quantity field name," select the field "items_to_book."
In the page for booking Standard rooms, you can use this shortcode:
[booking resource_id=10 nummonths=2 form_type='standard-rooms-form']In the page for booking Family rooms, you can use this shortcode:
[booking resource_id=18 nummonths=1 form_type='family-rooms-form']Watch a legacy video guide on configuring capacity in old versions of Booking Calendar (older than 9.7.7 versions).
Check about configuration of capacity in previous versions of Booking Calendar (versions 9.7.7 or older) on this page.

1. Please open the WP Booking Calendar > Resources page.
2. Select specific booking resource(s)
3. Select "Delete" option at the bottom of the page.
4. Click on Delete button.
Please note, before this action you need to move the bookings from this booking resource(s) to other booking resource(s).
In Booking Calendar Business Large or higher versions possible to define capacity for booking resources (calendars), for ability to receive several bookings for the same date(s)/times in the same calendar (booking resource).
Please read more about it here.
Configuration. Set capacity of booking resources at WP Booking Calendar > Resources page. You can read more info about configurations of booking resources, capacity and availability at this page.
You can test it in the live demo.
Its means that during the booking process, user can book several "child booking resources" and deduct availability for selected date on number of booked "child booking resources". This number (how many items to book), can depend only from one field, that you defined at the WP Booking Calendar > Settings General page in "Capacity" section as the option for "Quantity field name", after enabling this toggle: "Booking Quantity Control".

Usually it is field from the booking form (configured at WP Booking Calendar > Settings > Booking Form page), such as this:
Visitors: [select visitors class:visitors "1" "2" "3" "4" "5" "6"]It is often require to make deduction of availability based on 2 parameters - selection of "adults" and "children" number.
In this case possible to make this JavaScript customization in the booking form, for automatic selection of specific number of visitors, depend from the selection of number of "adults" and "children" in booking form.
Example of configuration:
<r>
    <c> <l>Adults:</l><br />[select adults class:adults "1" "2" "3"]</c>
    <c> <l>Children:</l><br />[select children class:children "0" "1" "2" "3"]</c>
</r>
<r>
    <c>
        <l>Total number of visitors:</l><div class="visitors_num">1</div>
        <div class="total_visitors_count">[select visitors class:visitors "1" "2" "3" "4" "5" "6"]</div>
    </c>
</r>
<style type="text/css"> .total_visitors_count select { visibility:hidden;} </style>
<script type="text/javascript">
    (function() { var a = setInterval( function() {  if ( ( 'undefined' === typeof jQuery ) || ! window.jQuery ) { return; } clearInterval( a ); jQuery( document ).ready( function (){
        jQuery( 'select.adults').on( 'change',  wpbc_set_visitors_number );
        jQuery( 'select.children').on( 'change',  wpbc_set_visitors_number );
    } ); }, 500 ); })();
function wpbc_set_visitors_number() {
    var s_adults   = jQuery('select.adults option:selected').val();
    var s_children = jQuery('select.children option:selected').val();
    var s_visitors = parseInt(s_adults) + parseInt(s_children);
    console.log( s_visitors );
    jQuery('select.visitors option[value=' + s_visitors + ']').prop({selected: true});
    var resource_id = jQuery( "input[name^='bk_type']" ).val();
    jQuery('.visitors_num').html(s_visitors);
    if (typeof(showCostHintInsideBkForm) == 'function') {
        showCostHintInsideBkForm( resource_id );
    }
}
</script>
In case, if you select adults and children than available slots for the booking, system does not allow to submit the booking and show warning.

Shortcodes for Pages
1. Using WordPress Block Editor (Gutenberg):
Watch the video below for a step-by-step guide on embedding the booking form via WordPress blocks:

2. For WordPress "Classic Editor" or Older Versions:
If you're using the Classic Editor plugin or an older WordPress version, then you can use popup dialog for inserting the Booking Calendar shortcode.
Watch the video below for a step-by-step guide on inserting the booking form via WordPress "Classic Editor":
3. Auto creation page with booking form:
In the Booking Calendar Free version, you can configure and publish booking form, availability calendar or timeline automatically from the WP Booking Calendar > Publish page into existing or new page.

In the paid versions of Booking Calendar you can configure and publish booking form for each specific booking resources from the WP Booking Calendar > Resources page.

4. Elementor:
Full Elementor Support! Design and customize your booking forms directly inside the Elementor editor—with real-time form previews and a built-in skin selector. No more shortcode guesswork—just drag, configure, and save!
Change theme (calendar skin) in Elementor.
5. Divi Theme, and other Non-Standard WordPress Block Editors:
If your theme uses Divi Theme, or another non-standard block editor, add a shortcode block to your page (you can do this with Elementor, as well). Configure the shortcode manually. Check all Booking Calendar shortcodes and parameters, which you can configure on this page.
Watch the video below for a step-by-step guide on inserting the booking form in "Elementor".
6. Manual Shortcode Configuration:
Alternatively, manually configure shortcodes in your posts or pages, especially if you switched from "Visual editor" to "Code editor" (Ctrl+Shift+Alt+M). You can also add a shortcode block (as mentioned in the previous point). Find all Booking Calendar shortcodes and parameters in the FAQ page.
4.2) Add the Shortcode Block: Go to the page where you want to insert the Booking Calendar form. Look for the shortcode block in your WordPress editor.
4.3) Insert the Shortcode: Once you've located the shortcode block, simply paste the shortcode you found in the FAQ page into the block.
4.4) Publish Your Page: After you've added the shortcode, click the "Publish" button to make your page live on your website.
And that's it! Your Booking Calendar form is now successfully inserted into your page.

7. Insert Booking form via WordPress Classic block:
Watch the video below for a step-by-step guide on inserting the booking form via "Classic Block" in WordPress.

8. Integrating Booking Calendar Shortcodes in DIVI Builder:
To add Booking Calendar shortcodes to your pages in DIVI Builder using the "Code" module, please follow these steps:
- Edit the page where you want to add the Booking Calendar shortcode in the DIVI Builder.
- Add a new section or row where you want the Booking Calendar to appear.
- Within the section or row, add a new module and select the "Code" module.
- In the Code module settings, paste the Booking Calendar shortcode.
- Customize the settings of the Code module as needed, such as adjusting the alignment or size.
- Save or update the page.
By following these steps, you'll be able to seamlessly integrate Booking Calendar shortcodes into your DIVI Builder pages using the "Code" module.

Booking Form
[booking resource_id=1 nummonths=2]In version 9.7.7 or older name of this parameter - type instead of resource_id
[booking resource_id=1]Example #2 (booking resource (calendar) with ID = 5):
[booking resource_id=5]Booking Calendar version 9.7.7 or older have different name for this parameter - type.
Example #3 for update 9.7.7 or older:
[booking type=5]Available in Paid versions
If "nummonths" is skipped the calendar is show 1 visible month.
[booking resource_id=1 nummonths=3]Example of showing 6 months via 3 columns and 2 rows with 100% calendar width and date cell heights 50px:
[booking resource_id=1 nummonths=6 options='{calendar months_num_in_row=3 width=100% cell_height=50px}'][booking resource_id=1 startmonth='2025-3'][booking resource_id=1 calendar_dates_start='2025-01-01' calendar_dates_end='2025-12-31' startmonth='2025-3'][booking resource_id=1 calendar_dates_start='2025-01-01' calendar_dates_end='2025-12-31'][booking resource_id=1 form_type='my-custom-form-name']Example #2:
[booking resource_id=1 form_type='another_form_name']Available in Business Medium / Large versions
[booking resource_id=3 aggregate='3;4' options="{aggregate type=bookings_only}"]This feature do not work for booking resources with specific capacity in Booking Calendar Business Large version. Available in Paid versions.
Specify the full calendar width (one or several months in a row), the height of date cell (so its possible to configure the height of entire calendar by that (just divide the entire calendar width to 7 and you will get approximate date cell height), the number of months in one row (its useful, if you want to show several months in several rows, for example 4 months in 2 rows or 6 months in 2 rows etc).
Example 1:
[booking resource_id=1 nummonths=2 options='{calendar months_num_in_row=2 width=568px cell_height=30px}']Example 2:
[booking resource_id=1 nummonths=4 options='{calendar months_num_in_row=2 width=100% cell_height=40px}']The general structure of the configuration calendar parameter is following:
{calendar months_num_in_row="{NUMBER OF MONTHs IN ONE ROW}"
width="{ENTIRE WIDTH OF CALENDAR IN px or %}"
cell_height="HEIGHT of CALENDAR DATE CELL, only in px"}Parameters:
calendar - name of the parameter. Its always the same (Its required for the future extend functionality).
months_num_in_row - number of months on one row. Its can be any number.
width - the entire width of the calendar. This width can be in "px" (for example: "400px") or in percentage (for example "100%). In CSS "300px" defined as: "width: 100%; max-width:300px;". In situation, if you need to use exact calendar width, instead of "width=300px" use "strong_width=300px"
strong_width - the exact width of the calendar. Use this parameter instead of "width" parameter. This width can be in "px" for (example: "400px") or in percentage (for example "100%). In CSS "300px" defined as: "width: 300px;" Parameter available since update 9.4.
cell_height - height of calendar date cell. The height can be only in "px" (example "30px").
Available in Business Medium / Large, MultiUser versions

Specify that during certain seasons (or days of week), the specific minimum number of days must be booked, for example: visitor can select only 3 days starting at Friday and Saturday, 4 days - Friday, 5 days - Monday, 7 days - Saturday, etc...
Important! Please note, this feature is working only, if you activated the "Range days" selection at the General Booking Settings page.
Example 1:
[booking resource_id=1 options='{select-day condition="season" for="High season" value="7-14,20"},
{select-day condition="season" for="Low season" value="2-5"}']
Example 2:
[booking resource_id=1 options='{select-day condition="weekday" for="1" value="4"},
{select-day condition="weekday" for="5" value="3"},
{select-day condition="weekday" for="6" value="2,7"}']
The general structure of the configuration one condition rule are following:
{select-day condition="{season|weekday}"
for="{Name of season filter|Number of week day}"
value="Number of days selection"}, ...Parameters:
select-day - name of the rule. Its always the same (Its required for the future extend functionality).
condition - type of the condition. There are 2 types of the condition: "weekday" and "season". "weekday" - is mean that condition rule is based on the selected day of week value, like Monday, Tuesday, etc... . "season" - is mean that condition rule is based on the "season filter" name of selected date. In other words the condition is TRUE if the selected day is belong to some season filter in the Booking > Resources > Filters page.
for - value of the specific conditions. If the condition is true, so then the number of specific days selection will possible in the calendar. If the condition is set as "weekday" so then "for" can have the following numbers: 0 - Sunday, 1 - Monday, 2 - Tuesday, 3 - Wednesday, 4 - Thursday, 5 - Friday, 6 - Saturday.
value - number of specific days selection in the calendar, which can be selected by visitors. It can be simple number or several days separated by comma (example: "7,14,21,28") or by dash (example:"3-5", its the same like this: "3,4,5") or combination (example:"3-5,7,14", its the same like this: "3,4,5,7,14")
Available in Business Medium / Large, MultiUser versions
[booking resource_id=1 form_type='standard' nummonths=2
options='{select-day condition="weekday" for="1" value="4"},
{select-day condition="weekday" for="5" value="3"},
{select-day condition="weekday" for="6" value="2,7"}']
where values of the "for" parameter are mean following:
0 - Sunday, 1 - Monday, 2 - Tuesday, 3 - Wednesday, 4 - Thursday, 5 - Friday, 6 - Saturday
You can use only one number of the specific week day.
Its mean that on Monday is possible to select only 4 days,
on Friday is possible to select only 3 days,
on Saturday is possible to select only 2 or 7 days.
Available in Business Medium / Large, MultiUser versions
[booking resource_id=1 form_type='standard' nummonths=2
options='{select-day condition="season" for="High season" value="7-14,20"},
{select-day condition="season" for="Low season" value="2-5"}']
where values of the "for" parameter are mean following:
High season - its a name of the some Season filter on the Booking > Resources > Filters page,
Low season - its a name of the some Season filter on the Booking > Resources > Filters page
You can use only single season filter name in the one value.
Its mean that during High season is possible to select only 7, 8, 9, 10, 11, 12, 13, 14 or 20 days
and during the Low season is possible to select only 2, 3, 4 or 5 days
Available in Business Medium / Large, MultiUser versions
Description.
This configuration will allow to set the specific start day(s) selection (day(s) of week) for the specific Season Filters.
For example, in high season, you can allow start day selection only at Friday in the Low season (or any other days) to start day selection from any weekday.
1) I can suggest that you are activated the range days selection using 2 mouse clicks for the specific day(s) of week. For example for Friday.
2) So then inside of the page, where you are inserted the booking shortcode, you are need to have something like this, to allow any start day selection for the "Low season" days:
[booking resource_id=1 form_type='standard' nummonths=6
options='{start-day condition="season" for="Low season" value="0,1,2,3,4,5,6"}']
Configuration of the Options parameter:
start-day – name of the rule. Its always the same.
condition – type of the condition. For this rule is available only 1 type of the condition: “season”.
season – is mean that condition rule is based on the EXACT “season filter” name of selected date. In other words the condition is TRUE if the selected day is belong to some season filter in the Booking > Resources > Filters page.
for – value of the specific condition – EXACT Name of Season Filter.
value – day(s) of week, where we can start selection for the specific season.
It can be simple number or several days separated by comma.
0 – Sunday, 1 – Monday, 2 – Tuesday, 3 – Wednesday, 4 – Thursday, 5 – Friday, 6 – Saturday
Available in Business Medium / Large, MultiUser versions
{select-day condition="date" for="2023-10-01" value="20,25,30-35"}[booking resource_id=3 options='{select-day condition="date" for="2023-10-01" value="20,25,30-35"}']Available in Business Medium / Large, MultiUser versions
In update 6.1 or newer you can use new condition variable: options='{parameter name="my_param" value="value"}'
This option parameter can transfer custom value from this booking form shortcode into the content of booking form.
[booking resource_id=1 form_type='standard' nummonths=3
options='{parameter name="my_param" value="value"},{parameter name="other_param" value="other value"}']
Example of booking form customization:
[text some_field_name "my_param"]and
[text other_field_name "other_param"]Important. Parameter name must be unique and exist only once in booking form.
You can now control which dates are shown in the Booking Calendar by using two new shortcode parameters:
- calendar_dates_start – sets the earliest date visible/selectable in the calendar.
- calendar_dates_end – sets the latest date visible/selectable in the calendar.
Example:
[booking resource_id=1 calendar_dates_start='2025-01-01' calendar_dates_end='2025-12-31']This will:
- Show only dates from January 1, 2025 to December 31, 2025.
- Start the calendar on March 2025 (if startmonth is omitted, it will auto-use the month from calendar_dates_start).
Available since update 11.2
You can open the booking form in a popup modal window by using the popup parameter in the [booking] shortcode.
[booking resource_id=1 popup=1 popup_button_title="Book now" popup_title="Booking Form"]This shortcode will show a button on the page. When the visitor clicks the button, the booking form will open in a popup window.
[booking resource_id=1 popup=1][booking resource_id=1 popup=1 popup_button_title="Reserve now"][booking resource_id=1 popup=1 popup_title="Reservation Form"][booking resource_id=1 popup=1 popup_button_title="Book Apartment" popup_button_class="wp-element-button my-booking-button"][booking resource_id=1 popup=1 popup_modal_class="my-booking-popup"][booking resource_id=1 popup=1 popup_size="lg"]You can also use the dedicated [booking_popup] shortcode. It works the same way as [booking popup=1].
[booking_popup resource_id=1 popup_button_title="Book now" popup_title="Booking Form"]The popup feature is intended for front-end pages only. It does not change the behavior of booking editing pages or the internal popup windows used in the Booking Calendar admin panel.
Availability calendar (without booking form)
[bookingcalendar type=1 nummonths=1 startmonth='2022-05']Specify the full calendar width (one or several months in a row), the height of date cell (so its possible to configure the height of entire calendar by that (just divide the entire calendar width to 7 and you will get approximate date cell height), the number of months in one row (its useful, if you want to show several months in several rows, for example 4 months in 2 rows or 6 months in 2 rows etc).
Configuration rules
Example 1:
options='{calendar months_num_in_row=2 width=568px cell_height=30px}'Example 2:
options='{calendar months_num_in_row=3 width=100% cell_height=40px}'The general structure of the configuration calendar parameter is following:
{calendar months_num_in_row="{NUMBER OF MONTHs IN ONE ROW}"
width="{ENTIRE WIDTH OF CALENDAR IN px or %}"
cell_height="HEIGHT of CALENDAR DATE CELL, only in px"}Parameters:
calendar - name of the parameter. Its always the same (Its required for the future extend functionality).
months_num_in_row - number of months on one row. Its can be any number.
width - the entire height of the calendar. This width can be in "px" (example: "400px") or in percentage (example "100%).
cell_height - height of calendar date cell. The height can be only in "px" (example "30px").
Timeline
Month View mode (30):
[bookingtimeline type='1' header_title='All Bookings' scroll_day=4 scroll_start_date='2016-11-17']
3 Months View mode (90):
[bookingtimeline type='1' view_days_num=90 header_title='All Bookings' scroll_day=5 scroll_start_date='2016-11-17']
Year View mode (365):
[bookingtimeline type='1' view_days_num=365 header_title='All Bookings' scroll_month=3 scroll_start_date='2016-11-17']
Available in Paid versions
Day View mode (1):
[bookingtimeline type='1,5,6,7' view_days_num=1 header_title='All Bookings' scroll_day=4 scroll_start_date='2016-11-17']
Week View mode (7):
[bookingtimeline type='1,5,6,7' view_days_num=7 header_title='All Bookings' scroll_day=4 scroll_start_date='2016-11-17']
Month View mode (30):
[bookingtimeline type='1,5,6,7' header_title='All Bookings' scroll_month=2 scroll_start_date='2016-11-17']
2 Months View mode (60):
[bookingtimeline type='1,5,6,7' view_days_num=60 header_title='Bookings' scroll_month=2 scroll_start_date='2016-11-17']
[bookingtimeline type='3,4' options='{resource_link 3="/resource-apartment3-id3/"},{resource_link 4="/resource-3-id4/"}' header_title='All Bookings']Available since update 7.0.1
Example 1:
[bookingtimeline type='1' limit_hours='9,22']Example 2:
[bookingtimeline type='1,5' view_days_num=1 limit_hours='10,21']Available since update 7.0.1
Selection of booking resource
Available in paid versions. You can check example of using this shortcode at this page.
[bookingselect label='Please select the resource:' form_type='standard' nummonths=1 type='17,16,15'][bookingselect type='17,16,15' selected_type='15' first_option_title='' label='']Specify the full calendar width (one or several months in a row), the height of date cell (so its possible to configure the height of entire calendar by that (just divide the entire calendar width to 7 and you will get approximate date cell height), the number of months in one row (its useful, if you want to show several months in several rows, for example 4 months in 2 rows or 6 months in 2 rows etc).
Configuration rules
Example 1:
options='{calendar months_num_in_row=2 width=568px cell_height=30px}'Example 2:
options='{calendar months_num_in_row=3 width=100% cell_height=40px}'The general structure of the configuration calendar parameter is following:
{calendar months_num_in_row="{NUMBER OF MONTHs IN ONE ROW}"
width="{ENTIRE WIDTH OF CALENDAR IN px or %}"
cell_height="HEIGHT of CALENDAR DATE CELL, only in px"}Parameters:
calendar - name of the parameter. Its always the same (Its required for the future extend functionality).
months_num_in_row - number of months on one row. Its can be any number.
width - the entire height of the calendar. This width can be in "px" (example: "400px") or in percentage (example "100%).
cell_height - height of calendar date cell. The height can be only in "px" (example "30px").
Edit Booking
System shortcode for ability to edit or cancel exist booking by visitor, who made this booking. Or show payment form, after sending payment request.
[bookingedit]Available in Paid versions
Search Availability Form
Search availability form - search availability for selected check in and check out dates (using date-picker fields), among several booking resources (properties or services). Possible to search only for full dates. Check more about this feature here. Read more in this FAQ guide about how to configure search availability. You can check example of using this shortcode at this page.
Available in Business Large / MultiUser versions
[bookingsearch searchresults='https://mysite.com/search-results/']
Available in MultiUser versions
For example:
[bookingsearch users="1,2"]where 1,2 – its a ID list of users.
Search Results
Showing search results at separate page, different from page with search availability form (more info about search availability form shortcode [bookingsearch], check at this page ).
You can search availability for selected check in and check out dates (using date-picker fields), among several booking resources (properties or services). Possible to search only for full dates. Check more about this feature here. Watch it in this video guide. You can check example of using this shortcode at this page.
[bookingsearchresults]Available in Business Large / MultiUser versions
Booking Form (without calendar)
This shortcode is useful, if you need to receive several (specific number of bookings) for specific date. It's can be event, where exist restricted number of bookings for this date. You can use this shortcode for booking resource (with specific capacity). Check more about this feature here. Watch it in this video guide.
[bookingform type=1 form_type='standard' selected_dates='24.12.2020']Available in Business Large / MultiUser versions
Showing booking resource details
Showing details about specific booking resource, like Title, Cost, Capacity or ID of booking resource.
Available in paid versions
[bookingresource type=1 show='title']Possible values:
title - show title of booking resources
cost - show default cost of booking resource (from Booking > Resources page . Its can be cost per day, per night, per hour or fixed cost depend from your settings at Booking > Settings > Payment page. Available only in Business Small/Medium/Large, MultiUser versions
capacity - show capacity of booking resource - number of "child" resources. Available only in Business Large, MultiUser versions.
[booking-manager-import url='https://calendar.google.com/calendar/ical/CALENDAR_ID/public/basic.ics' resource_id=1 from='today' until='any']Parameters:
- url - URL to ics file
- resource_id (optional) - define ID of booking resource, where to import bookings. If skipped then the default = 1. Check all your exists booking resources ID on the WP Booking Calendar > Resources > Resources page. In the Booking Calendar Free version exists only one default booking resource with ID = 1.
-
import_conditions (optional) - whether import bookings for dates, that already booked in specific booking resource
- Parameter values:
- if parameter have skipped, then import in any case
- if_dates_free - import only, if days are available.
Please note that in Booking Calendar update 9.9, there is an option called "Import if Dates Available" located at Booking > Settings > Sync > "General" page in the "Import advanced" section. This option duplicates the functionality mentioned. If you skip this parameter in the shortcode and need to import new events regardless of the availability of dates in the source calendar, be sure to deactivate the option "Import if Dates Available" in Booking > Settings > Sync > "General" page as well.
-
from (optional) - define from what date to start events listing.
- Parameter values:
- any - from any date. Default value.
- now - from current date/time, like 2017-08-27 12:00
- today - from today date, like 2017-08-27 00:00
- week - from start of current week, depending from start week day, wchich you defined at the Settings
- month-start - from start of current month, like 2017-08-01
- month-end - from end of current month, like 2017-08-31
- year-start - from start of current year, like 2017-01-01
- YYYY-MM-DD - defining specific start date in format like this 2017-08-27
-
from_offset (optional) - offset from start date of listing events. Parameter can be negative.
- Parameter values:
- Xd - number of days to offset, where X - days number, like 5d.
- Xh - number of hours to offset, where X - hours number, like 10h.
- Xm - number of minutes to offset, where X - minutes number, like 45m.
- Xs - number of seconds to offset, where X - seconds number, like 30s.
-
until (optional) - define untill what date to list the events.
- Parameter values:
- any - untill any date. Default value.
- now - untill current date/time, like 2017-08-27 12:00
- today - untill today date, like 2017-08-27 00:00
- week - untill start of current week, depending from start week day, wchich you defined at the Settings
- month-start - untill start of current month, like 2017-08-01
- month-end - untill end of current month, like 2017-08-31
- year-end - untill end of current year, like 2017-12-31
- YYYY-MM-DD - defining specific finish date in format like this 2017-08-27
-
until_offset (optional) - offset from end date of listing events. Parameter can be negative.
- Parameter values:
- Xd - number of days to offset, where X - days number, like 5d.
- Xh - number of hours to offset, where X - hours number, like 10h.
- Xm - number of minutes to offset, where X - minutes number, like 45m.
- Xs - number of seconds to offset, where X - seconds number, like 30s.
-
is_all_dates_in (optional) - show event, if all events dates or if at least one event date withing conditional paramters from / untill.
- Parameter values:
- 0 - import event, if at leat one event date in conditional interval.
- 1 - do not import event, if al least 1 day not in conditional interval. Default value.
- max (optional) - maximum number of events to show
- delete='skip' (optional) - prevent of deletion of all previous imported bookings, even if you activated option "Trash / delete all imported bookings before new import" at the Booking > Settings > Sync > "General" page.
- silence=1 (optional) - do not show message: "Imported N bookings" at the page, after import bookings.
[booking-manager-delete resource_id=1 action='delete']This shortcode move all previously imported bookings to trash or permanently delete, usually before new import bookings.
It is means that you can insert this shortcode before import shortcode to have the imported bookings always up to date. Even if you modified or deleted the bookings in external sources, like AirBnB, or booking.com websites.
Its can resolve issue of updating deleted and edited events in external sources.
Parameters:
- resource_id (optional) - define ID of booking resource, where to import bookings (default value = 1).
-
action (optional) - delete or move bookings to trash.
- Parameter values:
- trash - move bookings to the Trash (default value).
- delete - permanently delete all imported bookings of specific booking resource.
Typical configuration to have updated events in the Booking Calendar can be look like this:
[booking-manager-delete resource_id=1 action='delete']
[booking-manager-import url='https://URL_to_AIRBNB/basic.ics' resource_id=1 import_conditions='if_dates_free' from='today' until='any' silence=1]
[booking-manager-import url='https://URL_to_BOOKING_COM/basic.ics' resource_id=1 import_conditions='if_dates_free' from='today' until='any' silence=1]
[booking-manager-listing url='https://server.com/feed.ics' from='2025-07-01' until='week' until_offset='4h' max=500]Parameters:
- url - URL to ics file
-
from (optional) - define from what date to start events listing.
- Parameter values:
- any - from any date. Default value.
- now - from current date/time, like 2017-08-27 12:00
- today - from today date, like 2017-08-27 00:00
- week - from start of current week, depending from start week day, wchich you defined at the Settings
- month-start - from start of current month, like 2017-08-01
- month-end - from end of current month, like 2017-08-31
- year-start - from start of current year, like 2017-01-01
- YYYY-MM-DD - defining specific start date in format like this 2017-08-27
-
from_offset (optional) - offset from start date of listing events. Parameter can be negative.
- Parameter values:
- Xd - number of days to offset, where X - days number, like 5d.
- Xh - number of hours to offset, where X - hours number, like 10h.
- Xm - number of minutes to offset, where X - minutes number, like 45m.
- Xs - number of seconds to offset, where X - seconds number, like 30s.
-
until (optional) - define untill what date to list the events.
- Parameter values:
- any - untill any date. Default value.
- now - untill current date/time, like 2017-08-27 12:00
- today - untill today date, like 2017-08-27 00:00
- week - untill start of current week, depending from start week day, wchich you defined at the Settings
- month-start - untill start of current month, like 2017-08-01
- month-end - untill end of current month, like 2017-08-31
- year-end - untill end of current year, like 2017-12-31
- YYYY-MM-DD - defining specific finish date in format like this 2017-08-27
-
until_offset (optional) - offset from end date of listing events. Parameter can be negative.
- Parameter values:
- Xd - number of days to offset, where X - days number, like 5d.
- Xh - number of hours to offset, where X - hours number, like 10h.
- Xm - number of minutes to offset, where X - minutes number, like 45m.
- Xs - number of seconds to offset, where X - seconds number, like 30s.
-
is_all_dates_in (optional) - show event, if all events dates or if at least one event date withing conditional paramters from / untill.
- Parameter values:
- 0 - show event, if at leat one event date in conditional interval. Default value.
- 1 - do not show event, if al least 1 day not in conditional interval.
- max (optional) - maximum number of events to show
Payment Setup & Pricing Configuration
This guide is applicable to Booking Calendar version 9.9 or newer.
Setting Up PayPal for the Booking Calendar Plugin:

a) Navigate to Booking > Settings > Payment, then select the "PayPal" tab. Ensure you choose the new "PayPal" tab, not the old "PayPal (Legacy)" tab. Toggle the switch to enable the payment system and choose "Sandbox" under "Choose payment account" for testing purposes before going live.
b) Obtain the PayPal "Client ID" and "Secret Key" parameters by following these steps:
1. Log in to your PayPal account Dashboard.
2. Click on "Apps & Credentials."
3. Click the "Create App" button, enter the name of your application, and click "Create App."
4. Under "API credentials," copy the "Client ID" and "Secret Key" fields.
5. Paste these values into the appropriate fields at Booking > Settings > Payment > PayPal.
c) If you wish to automatically approve bookings after a customer makes a payment, activate the "Automatically approve/cancel booking" option and configure the URLs for "Return URL after a Successful order" and "Return URL after a Failed order."
d) Important Note: This PayPal integration requires correct configuration of the [bookingedit] shortcode. Learn how to configure the [bookingedit] shortcode here.
Please note a certificate needs to be generated first (with just a few clicks), as shown in the attached screenshot. Without a valid certificate, an error message will persist, even if the correct API keys have been entered.

Then you can find the "Merchant ID" and "Merchant Key" for integration with Buckaroo (iDeal) payment gateway as in this screenshot:

Defining Cost Per Night/Days/Hour or Fixed Cost
To set the cost per night instead of per day or a fixed cost, follow these steps:
- Navigate to WP Booking Calendar > Settings > Payment Gateways page.
- Scroll down to the Payment Options section and select "for 1 night" for the "Set the cost" option.
- Click on the "Save Changes" button.

Additionally, you can choose from the following variants of defining costs: "per 1 night", "per 1 day", "per 1 hour", or a fixed cost.
Difference in Costs Per 1 Night Instead of Cost Per Day
Here's an example to illustrate the difference:
Let's say a visitor selects 4 dates in the calendar: 2025-04-01, 2025-04-02, 2025-04-03, 2025-04-04.
For the booking resource (calendar), you've defined the cost as $100 at the WP Booking Calendar > Resources page.
If you define the cost per 1 day, the total cost will be $100 + $100 + $100 + $100 = $400.
If you define the cost per 1 night, the total cost will be $100 + $100 + $100 + $0 = $300.
If you define a fixed cost, the cost for all those dates will be a fixed sum: $100.
Relative Cost Per Hour
The cost per hour system calculates the cost based on 24 hours in a day. In our case, it would be:
4 days * 24 hours * $100 = 4 * 24 * 100 = $9600.
At the Business Small and higher versions of Booking Calendar are supported several payment systems integrations.
1) Each payment system support own list of currencies.
So you can change and check the list of the currency at the Booking > Settings > Payment page at the each section of payment system integrations.
2) Also at the Booking > Settings > Payment > General page you can select the currency that is showing in the Booking admin panel and at front-end side (in hints) of the Booking Calendar plugin.
3) In the Booking Calendar Business Medium or higher versions at the Booking > Settings General page in Calendar section, if you have activated this option "Showing cost in date cell", then you can select currency symbol that will be showing in the calendar day cells.
The process of updating payment status of the bookings depends on whether or not the user is redirected to your website after making a payment. Here's how it works with different payment systems:
1. Payment Systems that Automatically Redirect (like Stripe or PayPal):
- If a payment is successful or fails, these systems will automatically redirect the user back to your website.
- In this case, the booking status will update automatically, and if needed, the booking can be canceled automatically.

- To ensure this works properly, make sure you have configured the [bookingedit] shortcode correctly. You can follow these instructions in our FAQ: Configuring Booking Edit Shortcode.

2. Payment Systems that Require the User to Click "Continue" (like Redsys):
- Some payment systems, such as Redsys, do not automatically redirect users back to your site. Instead, the user must click a "Continue" button after making a payment.
- If a user doesn’t get redirected (e.g., due to internet issues or forgetting to click the "Continue" button), the Booking Calendar won’t know the payment status and therefore cannot update the payment status of the booking and auto-cancel or approve the booking.
- This can lead to issues with bookings being automatically canceled. For example:
- If you have set up automatic cancellation of unapproved bookings after 15 minutes (at the WP Booking Calendar > Settings General page in "Auto Cancellation / Auto Approval" section), and a customer makes a payment through Redsys but doesn’t click "Continue," the booking payment status will not be updated and booking will not be approved.

- After 15 minutes, since the booking hasn't been approved, the system will automatically cancel it (move it to trash).
- If you have set up automatic cancellation of unapproved bookings after 15 minutes (at the WP Booking Calendar > Settings General page in "Auto Cancellation / Auto Approval" section), and a customer makes a payment through Redsys but doesn’t click "Continue," the booking payment status will not be updated and booking will not be approved.

Important Note: Please be aware of this issue if you have automatic cancellation settings enabled and if the payment system requires users to click “Continue.”
A booking must be created before payment for several important reasons:
- Prevent Double Bookings: By creating the booking first, the system can immediately reserve the dates or times, preventing other visitors from booking the same slot until the payment is made. If the payment is not completed, the reserved dates or times will be released, making them available for other potential customers.
- Booking Identification: Creating the booking beforehand allows the system to generate a unique booking ID and capture other necessary details for managing the reservation and payment process effectively.
Customizing the Booking and Payment Process
Here are some options to manage the booking and payment notifications and approvals:
Disable Booking Notifications
To prevent visitors from receiving booking notifications before making a payment:
- Go to WP Booking Calendar > Settings > Emails page.
- Disable the "New booking (visitor)" email template. This ensures that the visitor will not receive a notification about the booking until the payment is made.
Automatic Booking Approval
To automatically approve bookings once the payment is made:
- Go to Booking > Settings > Payment page.
- In the Stripe or PayPal section, activate the "Automatically approve/cancel booking" option. This setting will automatically approve the booking and send a confirmation email to the visitor after the payment is successfully processed.
Auto-Cancel Pending Bookings
To automatically cancel pending bookings that are not paid after a specific period:
- Go to Booking > Settings General page.
- In the "Auto cancellation / approving" section, configure the settings to auto-cancel bookings that do not have a successfully paid status after a set time.
---
When Does Auto Cancellation Start Working?
Auto cancellation starts working when someone visits the front end of your website. It's important to ensure your timezone configuration is correct in the WordPress > Settings > General page, as incorrect time settings can cause issues with auto-cancellation.
How Auto Cancellation Works
Auto-cancellation can execute every hour (or another configured period) if you have set up a CRON job on your website, or if a visitor accesses your website and the cancellation time exceeds the specific auto-cancellation duration since the last cancellation.
- If no one visits your website within the configured period (e.g., one hour), the system will not initiate the script to check for auto-cancellations or other scheduled tasks.
- In this case, you need to configure a CRON job on your server. Learn more about configuring a CRON script.
Understanding WordPress Cron
WordPress Cron operates as a "pseudo-cron system," which works differently from a typical UNIX cron system.UNIX Cron:
- A scheduled time triggers an action.
- Cron executes the action tied to that time.
WordPress Cron:
- A visitor accesses any page on your WordPress website.
- WordPress Cron checks each cron event to see if the scheduled time has passed.
- If the scheduled time for an event has passed, WordPress Cron executes any actions tied to that event.
This system ensures that scheduled tasks, such as auto-cancellations, run when there's activity on your site, or through a configured server-side CRON job.
If you need to set different daily costs for different seasons or weekdays, the Booking Calendar Business Medium or higher versions allow you to do just that.
Set different daily rates for different seasons or weekdays to optimize your pricing strategy to seasonal demand or specific days of the week.
For example, you may want to charge higher rates during peak seasons or weekends.
You can set rates as a fixed cost per day (night) or as a percentage of the original cost of the booking resource.

Seasonal Pricing Configuration:
- Navigate to WP Booking Calendar > Prices > Daily Costs page.
- Click on the "Seasonal Pricing" button to access the seasonal pricing configuration.
Seasons Setup:
To adjust days within specific seasons or create new seasons, navigate to WP Booking Calendar > Prices > Seasons page. Here, you can create conditional seasonal filters based on days conditions, or use the Days Season filter to easily select the necessary days.

If you need to set different costs for different lengths of bookings, the Booking Calendar Business Medium or higher versions allow you to do just that.
For instance, you might want to offer a discount for longer stays, like two weeks or more.
You can configure this feature under "Duration-Based Costs" in the WP Booking Calendar > Prices > Daily Costs page.
To learn more about this feature, check out the Valuation Days Overview.
You can also watch a video guide here: Valuation Days Cost Video Overview.
"Duration-Based Costs" work for any day on the calendar, regardless of the season or weekday. However, if you'd like to apply them only to a specific season, you can base it on the check-in day. In simpler terms, this feature lets you offer discounts or adjust costs based on the length of a booking. For example, if a guest books seven or more days, they could receive a 10% discount.
In case if you need to apply it to a specific season, then it can depend only on the belonging "check-in day" to a specific season. It means that, if you select 2 weeks, the "Duration-Based Costs" can apply costs only depending on the check-in day belonging to a specific season, even if some other days belong to another season. In other words, if you will have the days selected with season intersections, then you can have an issue with "Duration-Based Costs".
Let's explore some examples to better understand how to configure this:
Example #1

Let's say the standard daily cost is $100 per day. But if a guest books six or more days, all future days have a cost of $75 per day.
    1st day = $100
    2nd day = $100
    3rd day = $100
    4th day = $100
    5th day = $100
    6th day = $75
    7th day = $75
    ..
    99th day = $75
Configuration:
    From 1st to 5th day = $100 per day
    From 6th to 99th day = $75 per day
Example #2 - Understanding the "Together" Term

If the standard daily cost is $100 per day, and a guest books one week or more, they get a 10% discount. Importantly, this discount applies to all days, not just the seventh day.
For example, if a guest books six days:
		1st day = $100
		2nd day = $100
		3rd day = $100
		4th day = $100
		5th day = $100
		6th day = $100
But if they book seven days:
		1st day = $90
		2nd day = $90
		3rd day = $90
		4th day = $90
		5th day = $90
		6th day = $90
		7th day = $90
Configuration:
    From 1st to 6th day = $100 per day
    Together 7 days = 90% for all days
    From 8th to 99th day = 90% of the cost of 1 day
Example #3 - Costs per Nights
If you're charging per night instead of per day, the configuration from Example #2 would be adjusted accordingly:
    From 1st to 6th day = $100 per night
    Together 7 days = 90% for all days
    From 8th to 99th day = 90% of the cost of 1 night
    For LAST day = $0 per night
Where "LAST" - it's a reserved term that defines the last selected day.
This FAQ guide explains step by step how to set up partial payments/deposits, allowing customers to pay a portion of the booking cost upfront. Later, you can request the remaining balance from customers by sending "payment requests." This functionality is available in the Booking Calendar Business Medium or higher versions.
1. Setup Partial Payments.
To configure partial payments for a specific booking resource, navigate to WP Booking Calendar > Prices > Daily Costs page. Click on the "Partial Payments" button next to the specific resource. Then, enable the "Deposit" payment option and configure the amount of the partial payment. It can be a fixed amount or a percentage of the total booking cost. Partial payments can also depend on the booking's check-in date for specific seasons or the difference between today and the check-in dates.

2. Publish page with booking form.
Now, follow this guide to publish the booking form for your booking resource.
3. Submitting booking and processing partial payment.
In our example from point #1, we have set the cost for the booking resource at $100 per day and defined the deposit cost as 30% of the total booking cost. Let's say we are making a booking for 5 days, with a total cost of $500. In this case, the "Deposit Payment" would be 30% of $500, which equals $150. Check out the example below to see how a visitor makes a booking and submits a deposit payment (partial payment) for it.

4. Booking Notes with Payment Breakdown.
When an administrator checks "Notes" of this booking in the Booking Listing page in the admin panel, they will see the payment breakdown as follows:
  Total Cost: $500.00
  Deposit Due: $150.00
  Balance Remaining: $350.00
Additionally, they will find other details related to "Automatically calculated total cost and deposit", "Displaying Payment section", and the response from the "Payment system" in case the user has successfully made a payment.
Important to note! The booking cost field displays the last cost shown in the payment form. In our case, it was the deposit cost of 30%, which is $150.
 Please note, the booking was auto-approved due to the enabled "Auto-approve booking" option at WP Booking Calendar > Settings > Payment Gateways > Stripe page. This occurs when a visitor successfully makes a payment. The same option is available for PayPal and some other payment systems.
5. Emails.
Which emails were sent to users during this time?
It depends on the activated "emails" at WP Booking Calendar > Settings > Emails page.
Visitors may receive the following emails:
- Email notification about the creation of a new booking ("New (visitor)" email template).
- If you activated the "Auto-approve booking" option at WP Booking Calendar > Settings > Payment Gateways > "Specific Payment Gateway" page, the system sends an email confirming the booking approval ("Approved" email template).
6. Sending Payment Requests to Pay the Specific Sum.
To send payment requests, ensure you've set up the [bookingedit] shortcode correctly. Refer to our detailed guide for step-by-step instructions on configuring the [bookingedit] shortcode.
To send payment requests for paying (in our case) the remaining balance, edit the booking's cost in the "cost field" and click on the "Save cost" button. In our example, we changed the cost from $150 to $350. This is a manual process.
At this point, the system can send a "Modified" email to the user. After changing the cost for a booking, the plugin can automatically send a notification email to the visitor if the following conditions are met:
- Ensure that the "Emails sending" option is enabled under the Filter toolbar.
- Activate the "Send email on cost changes" option at WP Booking Calendar > Settings > Payment Gateways page.
If both conditions are met, the plugin will send a "Modified" booking email to the visitor. You can customize the content of the "Modified" booking email template at WP Booking Calendar > Settings > Emails page.

Sending Payment Request.
When you click on the "Payment request" button, a popup window will appear where you can enter the payment reason.
The entered "Payment Reason" can be included in the payment request email by using the [paymentreason] shortcode at the WP Booking Calendar > Settings > Emails > Payment Request email template page. 
After Visitor Receives the Payment Request Email
When a visitor receives the payment request email and clicks on the payment link, they will be redirected to the payment request page. This page will display the cost corresponding directly to the amount specified in the cost field for the respective booking at the Booking Listing page. 
7. Summary about Payment Requests.
Upon completion of the payment by the visitor, administrators can review the booking details within the Notes section associated with the specific booking on the Booking Listing page. This section provides a detailed log of various events related to the booking, including payment system responses, payment section displays, payment request details, and updates to booking costs. Administrators can utilize this information to ensure accurate tracking and management of bookings.
[2024-04-21 17:09] Payment system response. -- STRIPE -- | approve | Total: EUR 350.00 | Status: paid | Payment: complete |
[2024-04-21 17:08] Payment section displayed | Amount to pay: $350.00
[2024-04-21 16:46] Payment request for Booking  ( ID = 297 ) has been sent. Cost for payment: 350.00. Send by: John Smith (s@wpbookingcalendar.com)
[2024-04-21 16:45] Cost for Booking  ( ID = 297 ) has been updated from 150.00 to 350. Changed by: John Smith (s@wpbookingcalendar.com)
[2024-04-21 15:05] Payment system response. -- STRIPE -- | approve | Total: EUR 150.00 | Status: paid | Payment: complete |
[2024-04-21 15:04] Payment section displayed
-----------------------------------------
Total cost: $500.00
Deposit Due: $150.00
Balance Remaining: $350.00
-----------------------------------------
[2024-04-21 15:04] Automatically calculated deposit cost 150
[2024-04-21 15:04] Automatically calculated cost 500
It's important to note that the process of changing payment costs and sending payment requests is MANUAL.
Administrators are responsible for updating costs and initiating payment requests as needed.

Such configuration possible in the Booking Calendar Business Medium or higher versions.
1) You need to add the "hidden" checkbox option, which checked by default to the booking form at WP Booking Calendar > Settings > Booking Form page. Please note, you need to edit the booking form in Advanced mode (not simple mode for the booking form configuration).
Example of the checkbox shortcode and HTML code to hide this checkbox:
<div style="display:none;">[checkbox my_tax default:on ""]</div>
2) Now you can open the WP Booking Calendar > Prices > Form Options Costs page and configure additional cost for our option. If we need to set tax as 6%, then we need to set value as 106 and selection option "% of total cost" in the selectbox.

This example demonstrates how to set up additional costs in WP Booking Calendar based on the selected time duration. You can use the same method to configure additional costs for any selected options in select boxes or checkboxes in your booking form.
Steps to Configure Additional Costs:
- Configure Select Boxes or Checkboxes:
Go to WP Booking Calendar > Settings > Booking Form page.
Set up your select boxes or checkboxes according to your needs. - Set Additional Costs:
Navigate to WP Booking Calendar > Prices > Form Options Costs page.
Configure additional costs for specific options in the select boxes or checkboxes. Pay close attention to whether the cost is set as a fixed amount, a cost per day, or a percentage of the total cost. - Save Changes:
After configuring the additional costs, save your changes. - Test the Configuration:
Test the booking form to ensure the additional costs are applied correctly.
For more detailed information on configuring additional costs, visit this page: Adding Additional Costs or Charges.
Note: This configuration is available in the Business Medium or higher versions of WP Booking Calendar.
Description
If you need to add additional costs, such as taxes, fees or other charges (e.g., cleaning fee, breakfast), or adjust the booking cost based on the selected option in a select box, you can easily configure this in the Business Medium or higher versions.
Configuration Steps
- Insert Checkboxes or Select Boxes into the Booking Form:
- Go to Booking > Settings > Fields page.
- Add checkboxes to the booking form. For example, to add a tax checkbox:
Tax: [checkbox* my_tax ""] - To add a hidden checkbox that is checked by default:
<div style="display:none;">[checkbox my_cleaning default:on ""]</div> - To make a checkbox required and checked by default:
Cleaning service: [checkbox* my_cleaning default:on ""] - For a select box, you can set it up like this:
Visitors: [select visitors "1" "2" "3" "4"] - For more details on booking form fields configuration, refer to this guide.
- Set Additional Costs:
- Navigate to WP Booking Calendar > Prices > Form Options Costs page.
- In the advanced cost management section, configure additional costs for the
my_taxor
visitorsoptions.
- Examples:
- For a 6% tax, set the value as
106% - To add a fixed cost for cleaning services, set it as:
my_cleaning = 50 - For visitor selections, you might configure it like this:
visitors:
                1 = 100%
                2 = 200%
                3 = 300%
                4 = 400%
For more detailed instructions, watch this video guide on How to Configure Additional Costs Based on Selected Time Duration.
Showing Inclusive Costs, without affecting cost calculations.
Please use this shortcode [total_cost] for displaying taxes or additional fees based on the total booking cost.
This shortcode is used for displaying additional cost hints without affecting cost calculations. Since the total cost has already been calculated at this stage.
For example, if you want to show the tax cost as 20% inclusive of the total booking cost, set up your booking form fields like this:
<div style="display:none;">[checkbox tax_fee default:on ""]</div> Tax: [tax_fee_hint]. Now, define the additional cost for tax_fee at WP Booking Calendar > Prices > Form Options Costs page:
tax_fee = ( [total_cost] * 0.2 ) Available since update: 10.0
If you want to offer different prices based on the day of the week and time of day (e.g., weekday mornings, weekend full days, etc.), follow these steps using the WP Booking Calendar.
Example Pricing Goals
- Full Day (Monday–Thursday): €220
- Morning or Evening (Monday–Thursday): €140
- Full Day (Friday–Sunday): €360
- Morning or Evening (Friday–Sunday): €260
Book one day of the week for the full day or two time slots, which would be from 10:00 a.m. to 2:00 p.m. and from 6:00 p.m. to 10:00 p.m.
Step 1: Add Time-Slot Selection to Your Booking Form
Go to: WP Booking Calendar > Settings > Booking Form > Booking Form Fields
Use this conditional setup to define different time-slot options for weekdays and weekends:
[condition name="weekday-condition" type="weekday" value="1,2,3,4"]
    [selectbox rangetime "Full Day@@00:00 - 23:59" "Morning@@10:00 - 14:00" "Evening@@18:00 - 22:00"]
[/condition]

[condition name="weekday-condition" type="weekday" value="5,6,0"]
    [selectbox rangetime "Full Day@@00:00 - 23:58" "Morning@@10:00 - 13:59" "Evening@@18:00 - 21:59"]
[/condition]

[condition name="weekday-condition" type="weekday" value="*"]
    [selectbox rangetime
        "Full Day@@00:00 - 23:59"
        "Morning@@10:00 - 14:00"
        "Evening@@18:00 - 22:00"
        "Full Day@@00:00 - 23:58"
        "Morning@@10:00 - 13:59"
        "Evening@@18:00 - 21:59"]
[/condition]
In this example, weekdays have time slots like `[selectbox rangetime "Full Day@@00:00 - 23:59" "Morning@@10:00 - 14:00" "Evening@@18:00 - 22:00" ]` and weekends have time slots like `[selectbox rangetime "Full Day@@00:00 - 23:58" "Morning@@10:00 - 13:59" "Evening@@18:00 - 21:59" ]`.
Please note the slight difference in end times between weekdays (e.g., 14:00) and weekends (e.g., 13:59). This allows for different options and cost settings later on.
The last section in the configuration (`[condition name="weekday-condition" type="weekday" value="*"]`) is the default section. It must include all different time selection options as shown in the example: `[selectbox rangetime "Full Day@@00:00 - 23:59" "Morning@@10:00 - 14:00" "Evening@@18:00 - 22:00" "Full Day@@00:00 - 23:58" "Morning@@10:00 - 13:59" "Evening@@18:00 - 21:59"]`. This last section will be visible on the `WP Booking Calendar > Prices > Form Options Costs` page.
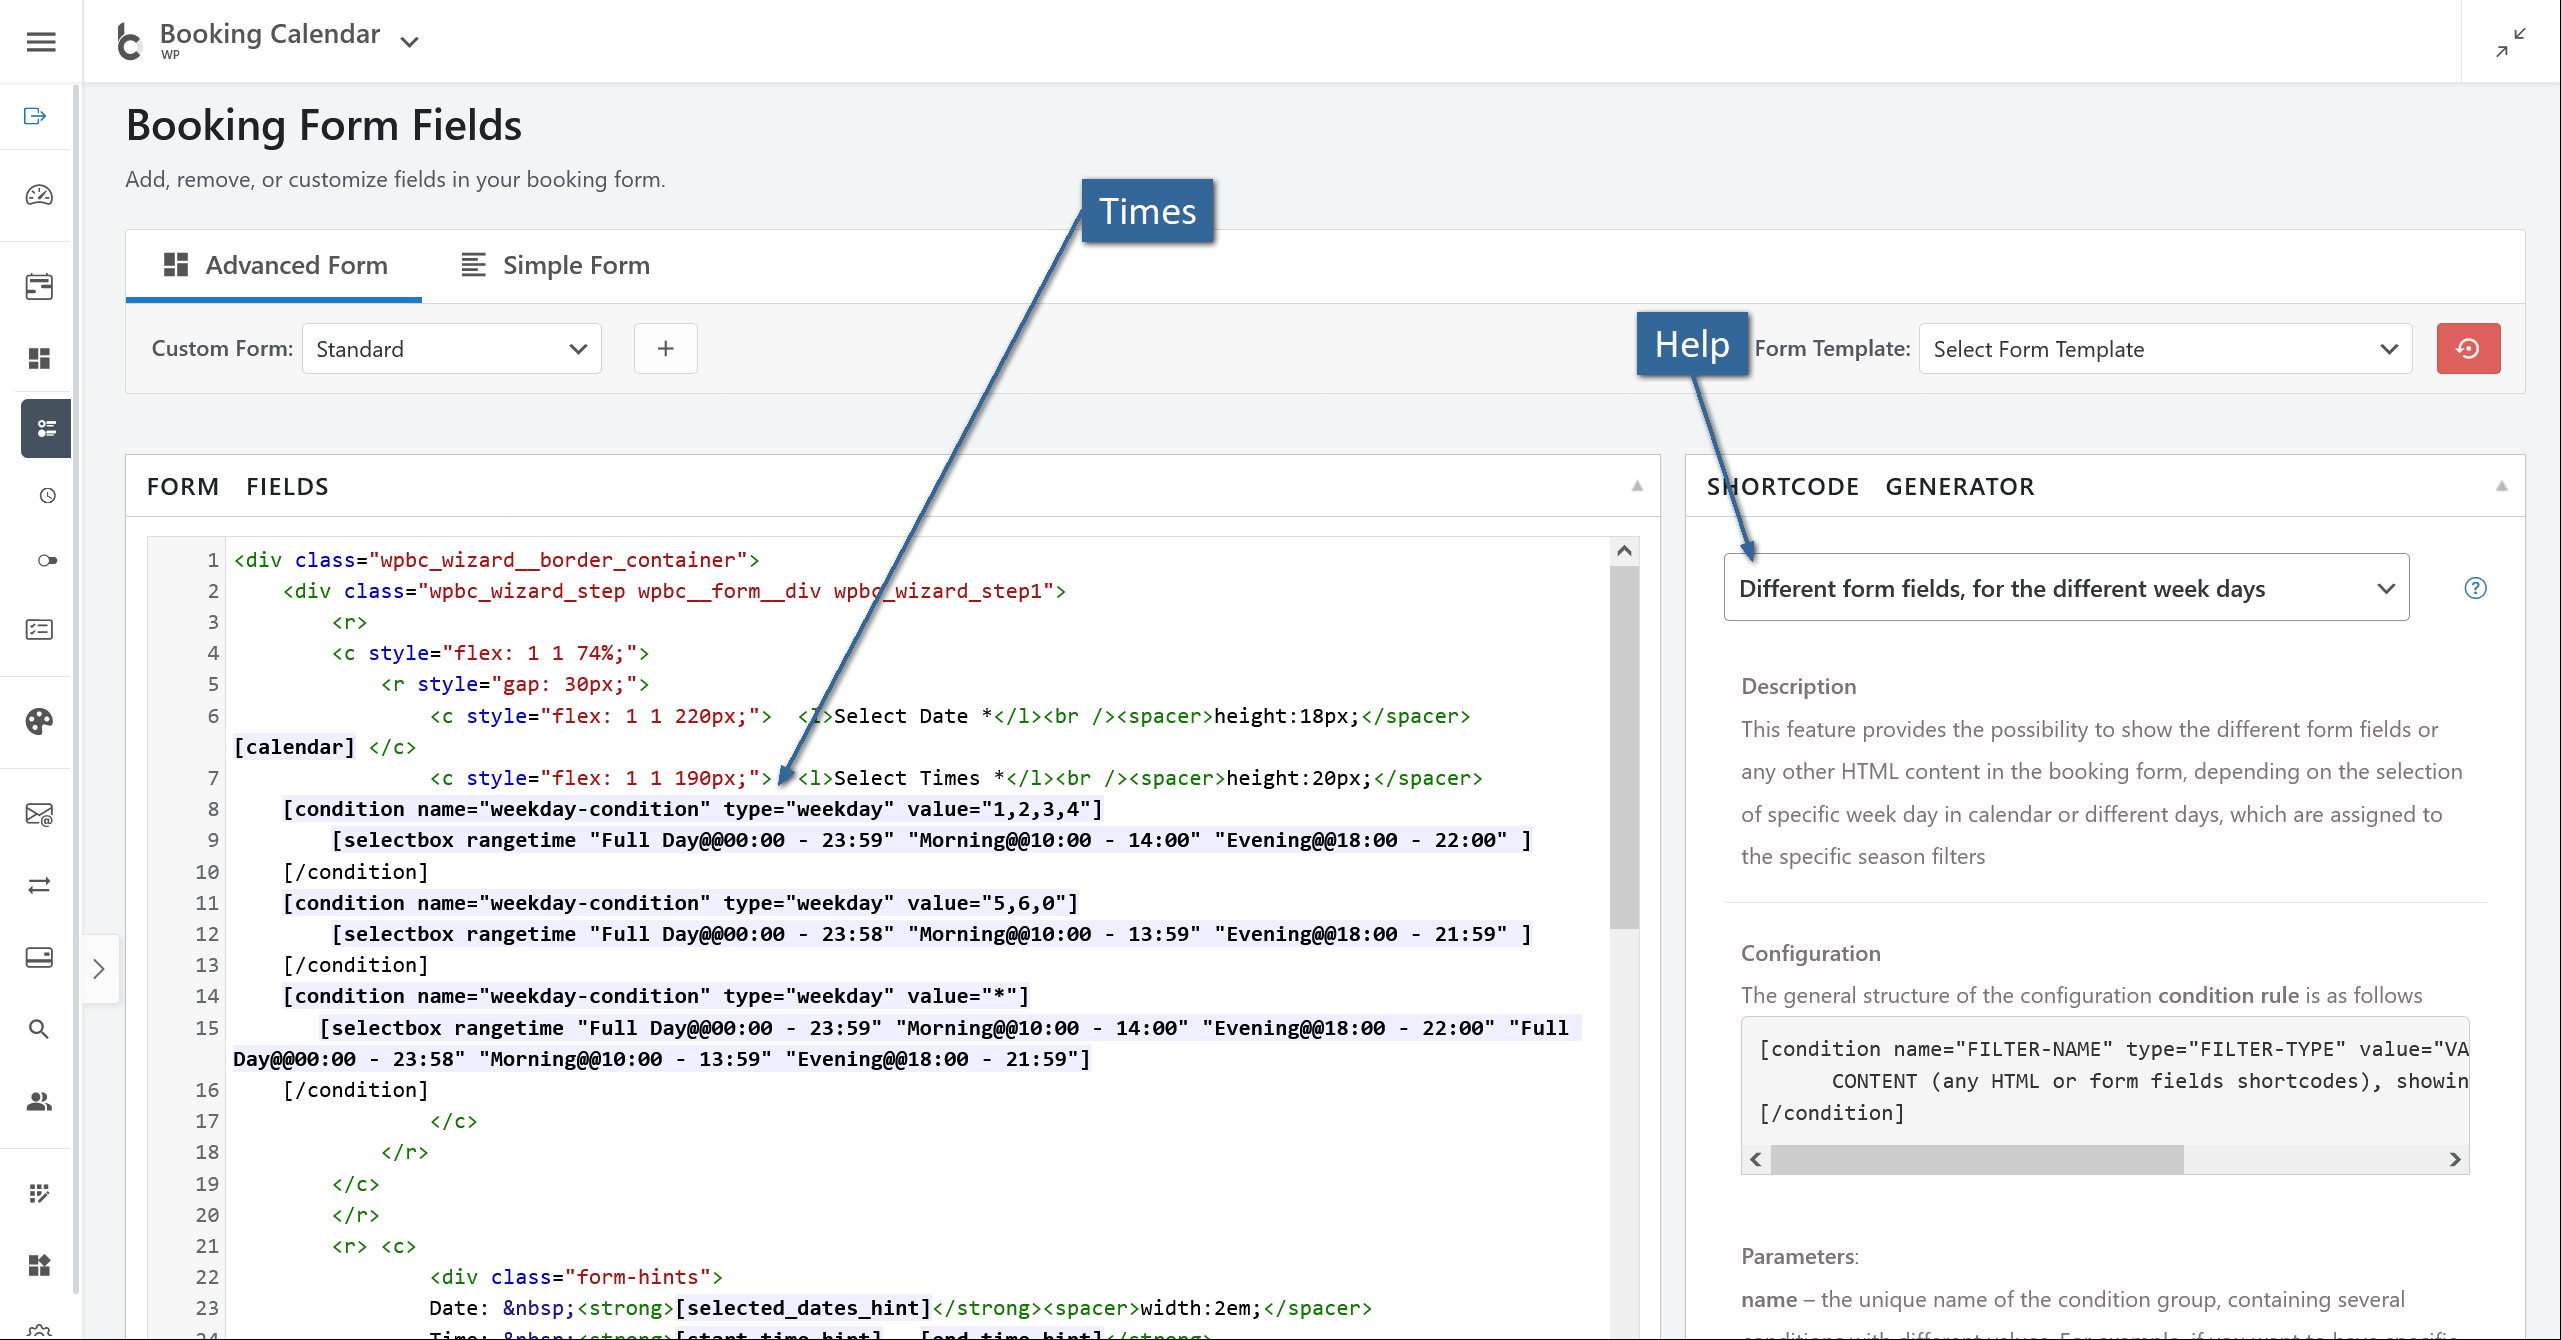
Step 2: Set Daily Costs to 0.
Go to: WP Booking Calendar > Prices > Daily Costs
Set the daily cost for the resource to 0, so the actual price will depend entirely on the selected time slot.
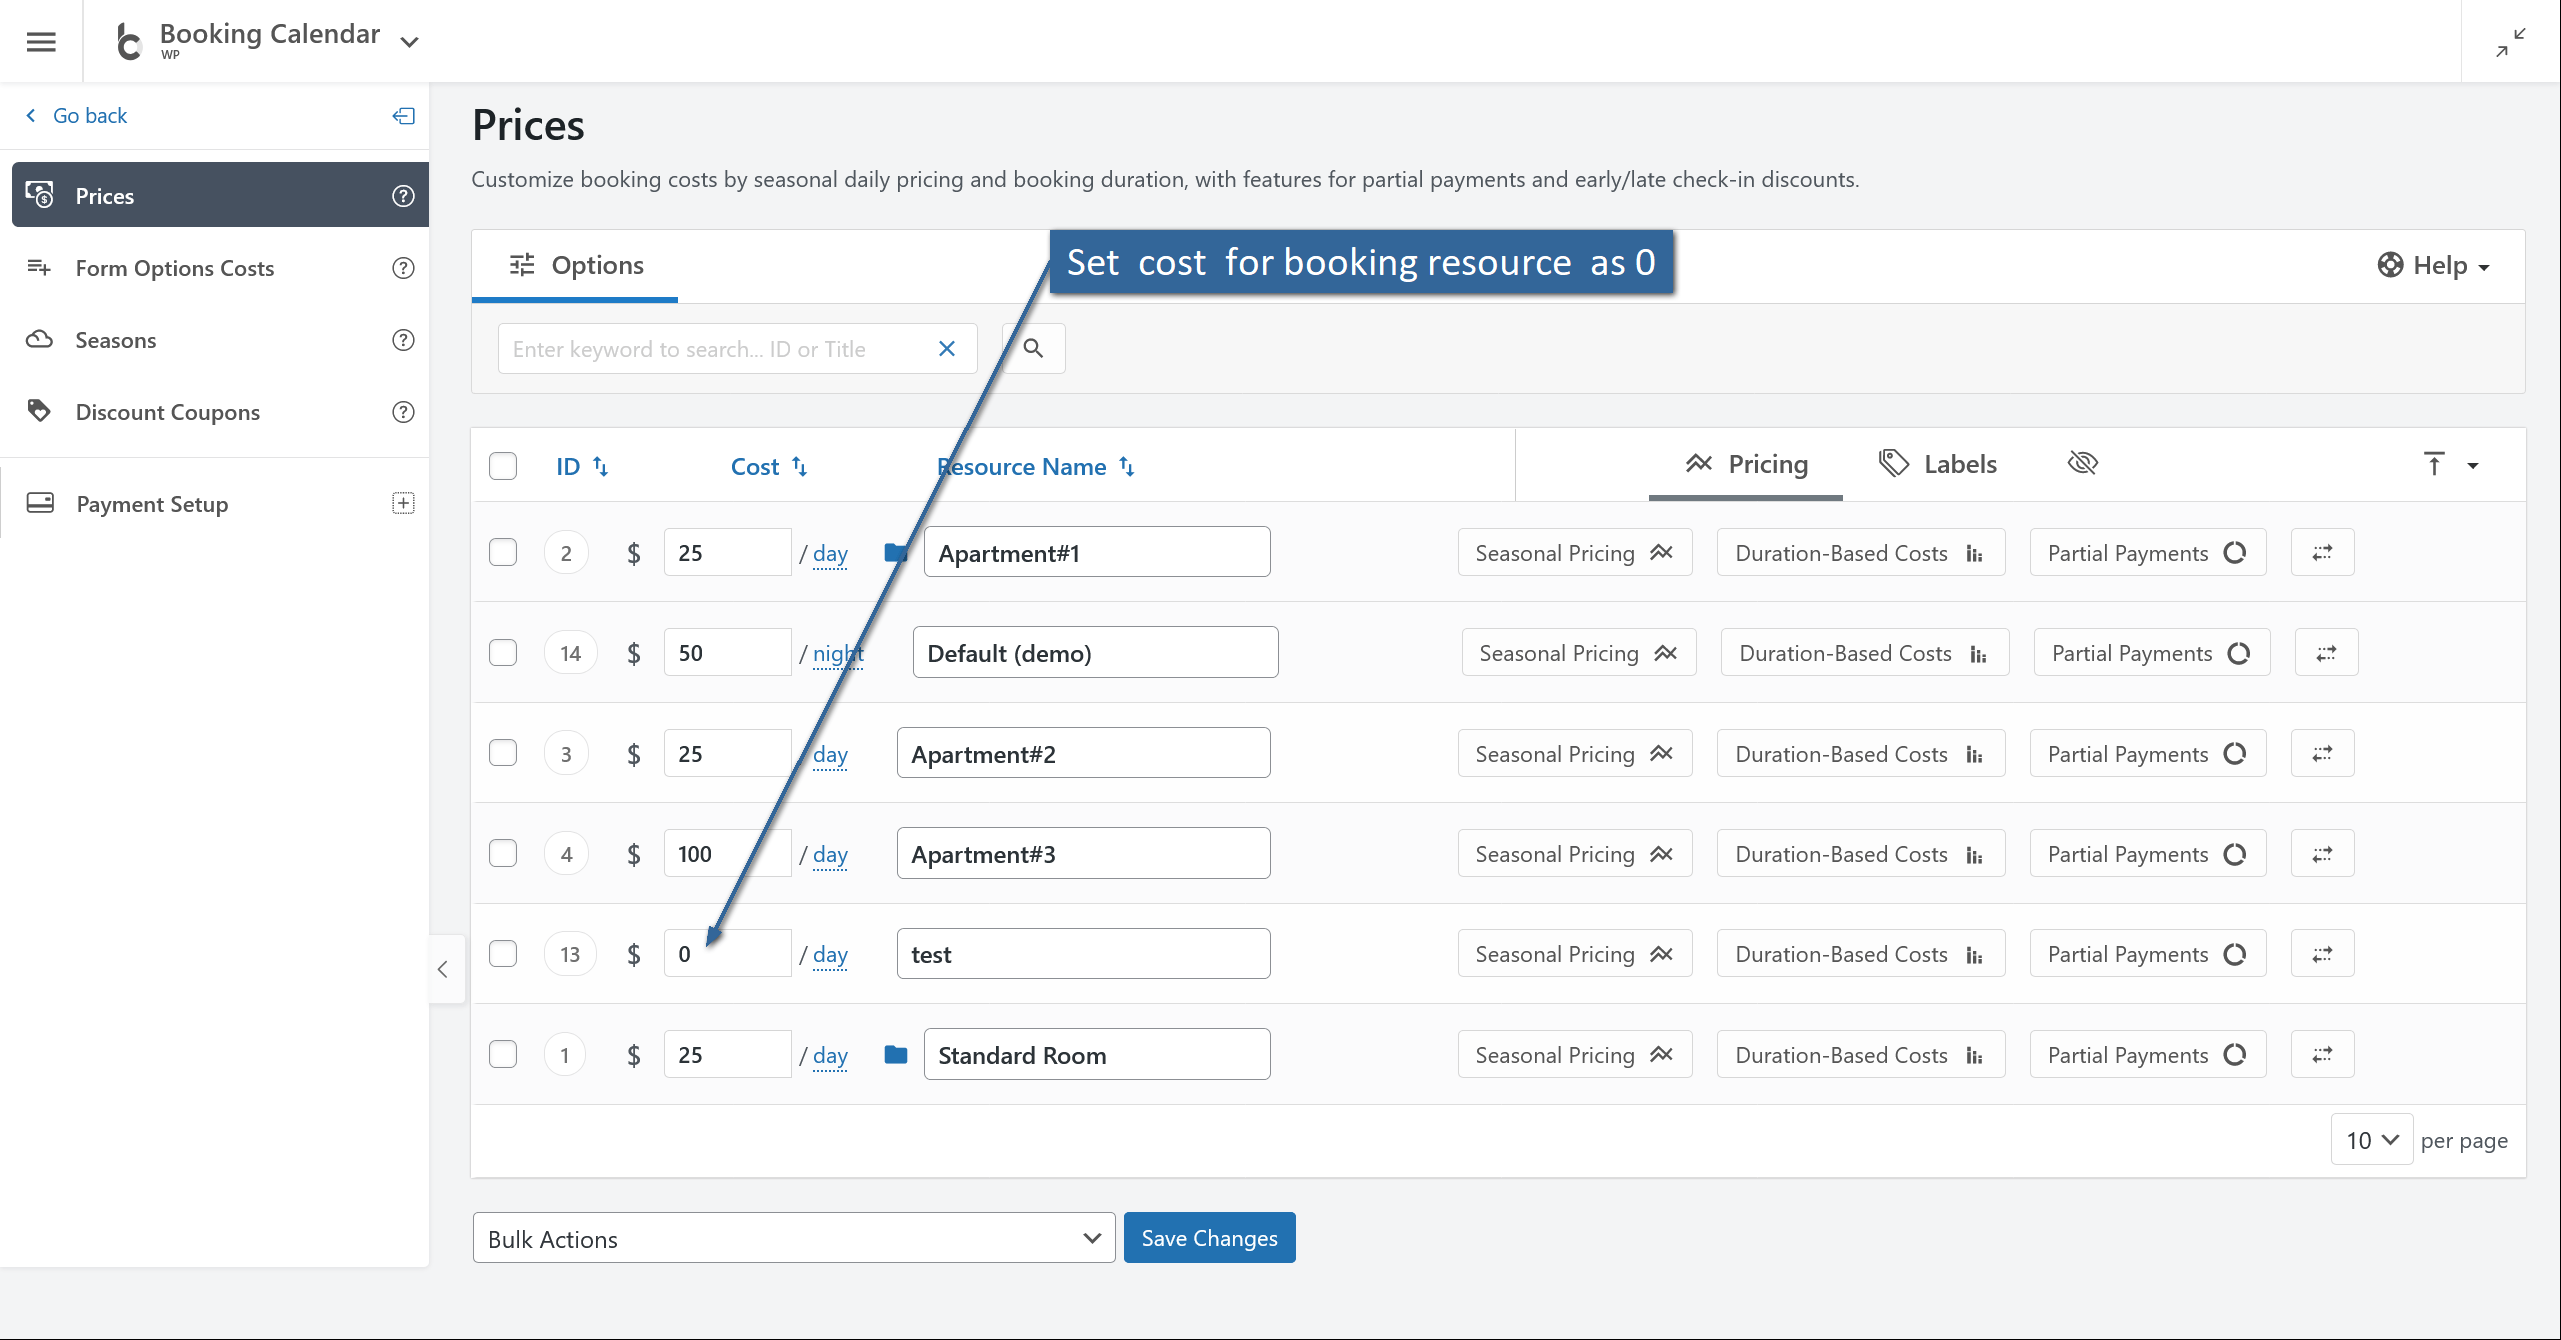
Step 3: Define Pricing for Time Options
Navigate to: WP Booking Calendar > Prices > Form Options Costs
Here you’ll assign specific prices to each time slot depending on the day (weekday or weekend). Use the labels from the form field (like "Morning", "Evening", "Full Day") and match them with the corresponding weekday group.
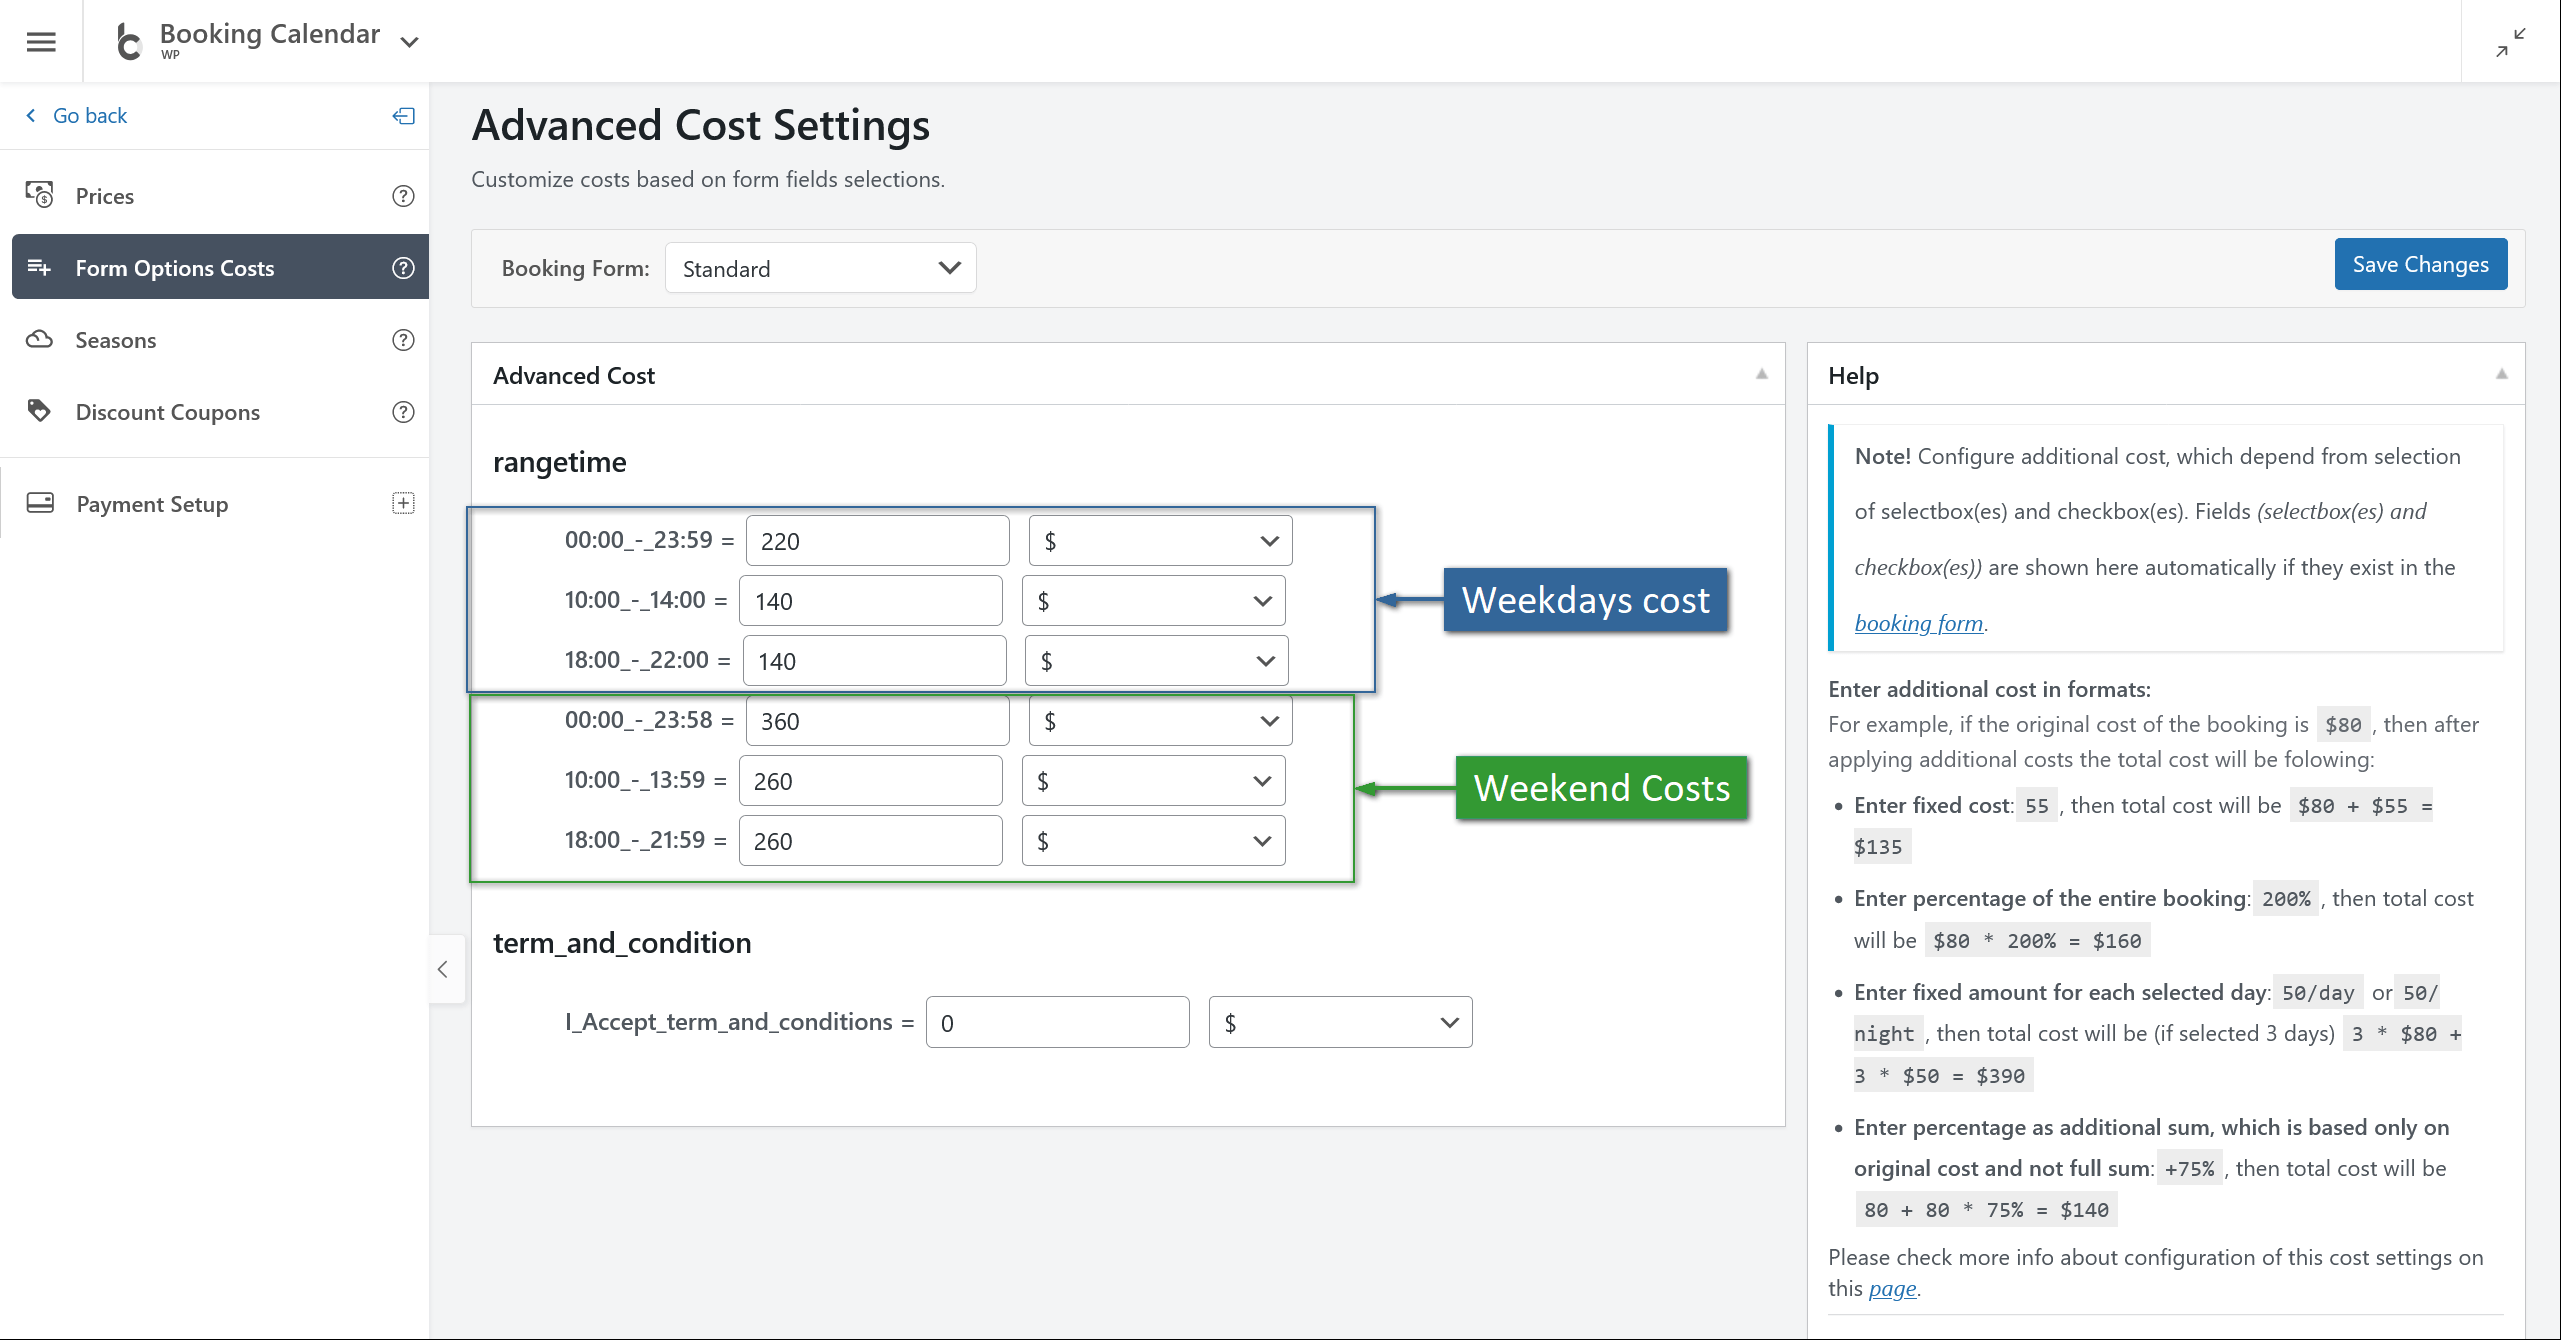
Step 4: Save and Test
After saving, test the form by selecting different weekdays and time ranges. You should see the correct price update according to your configuration.
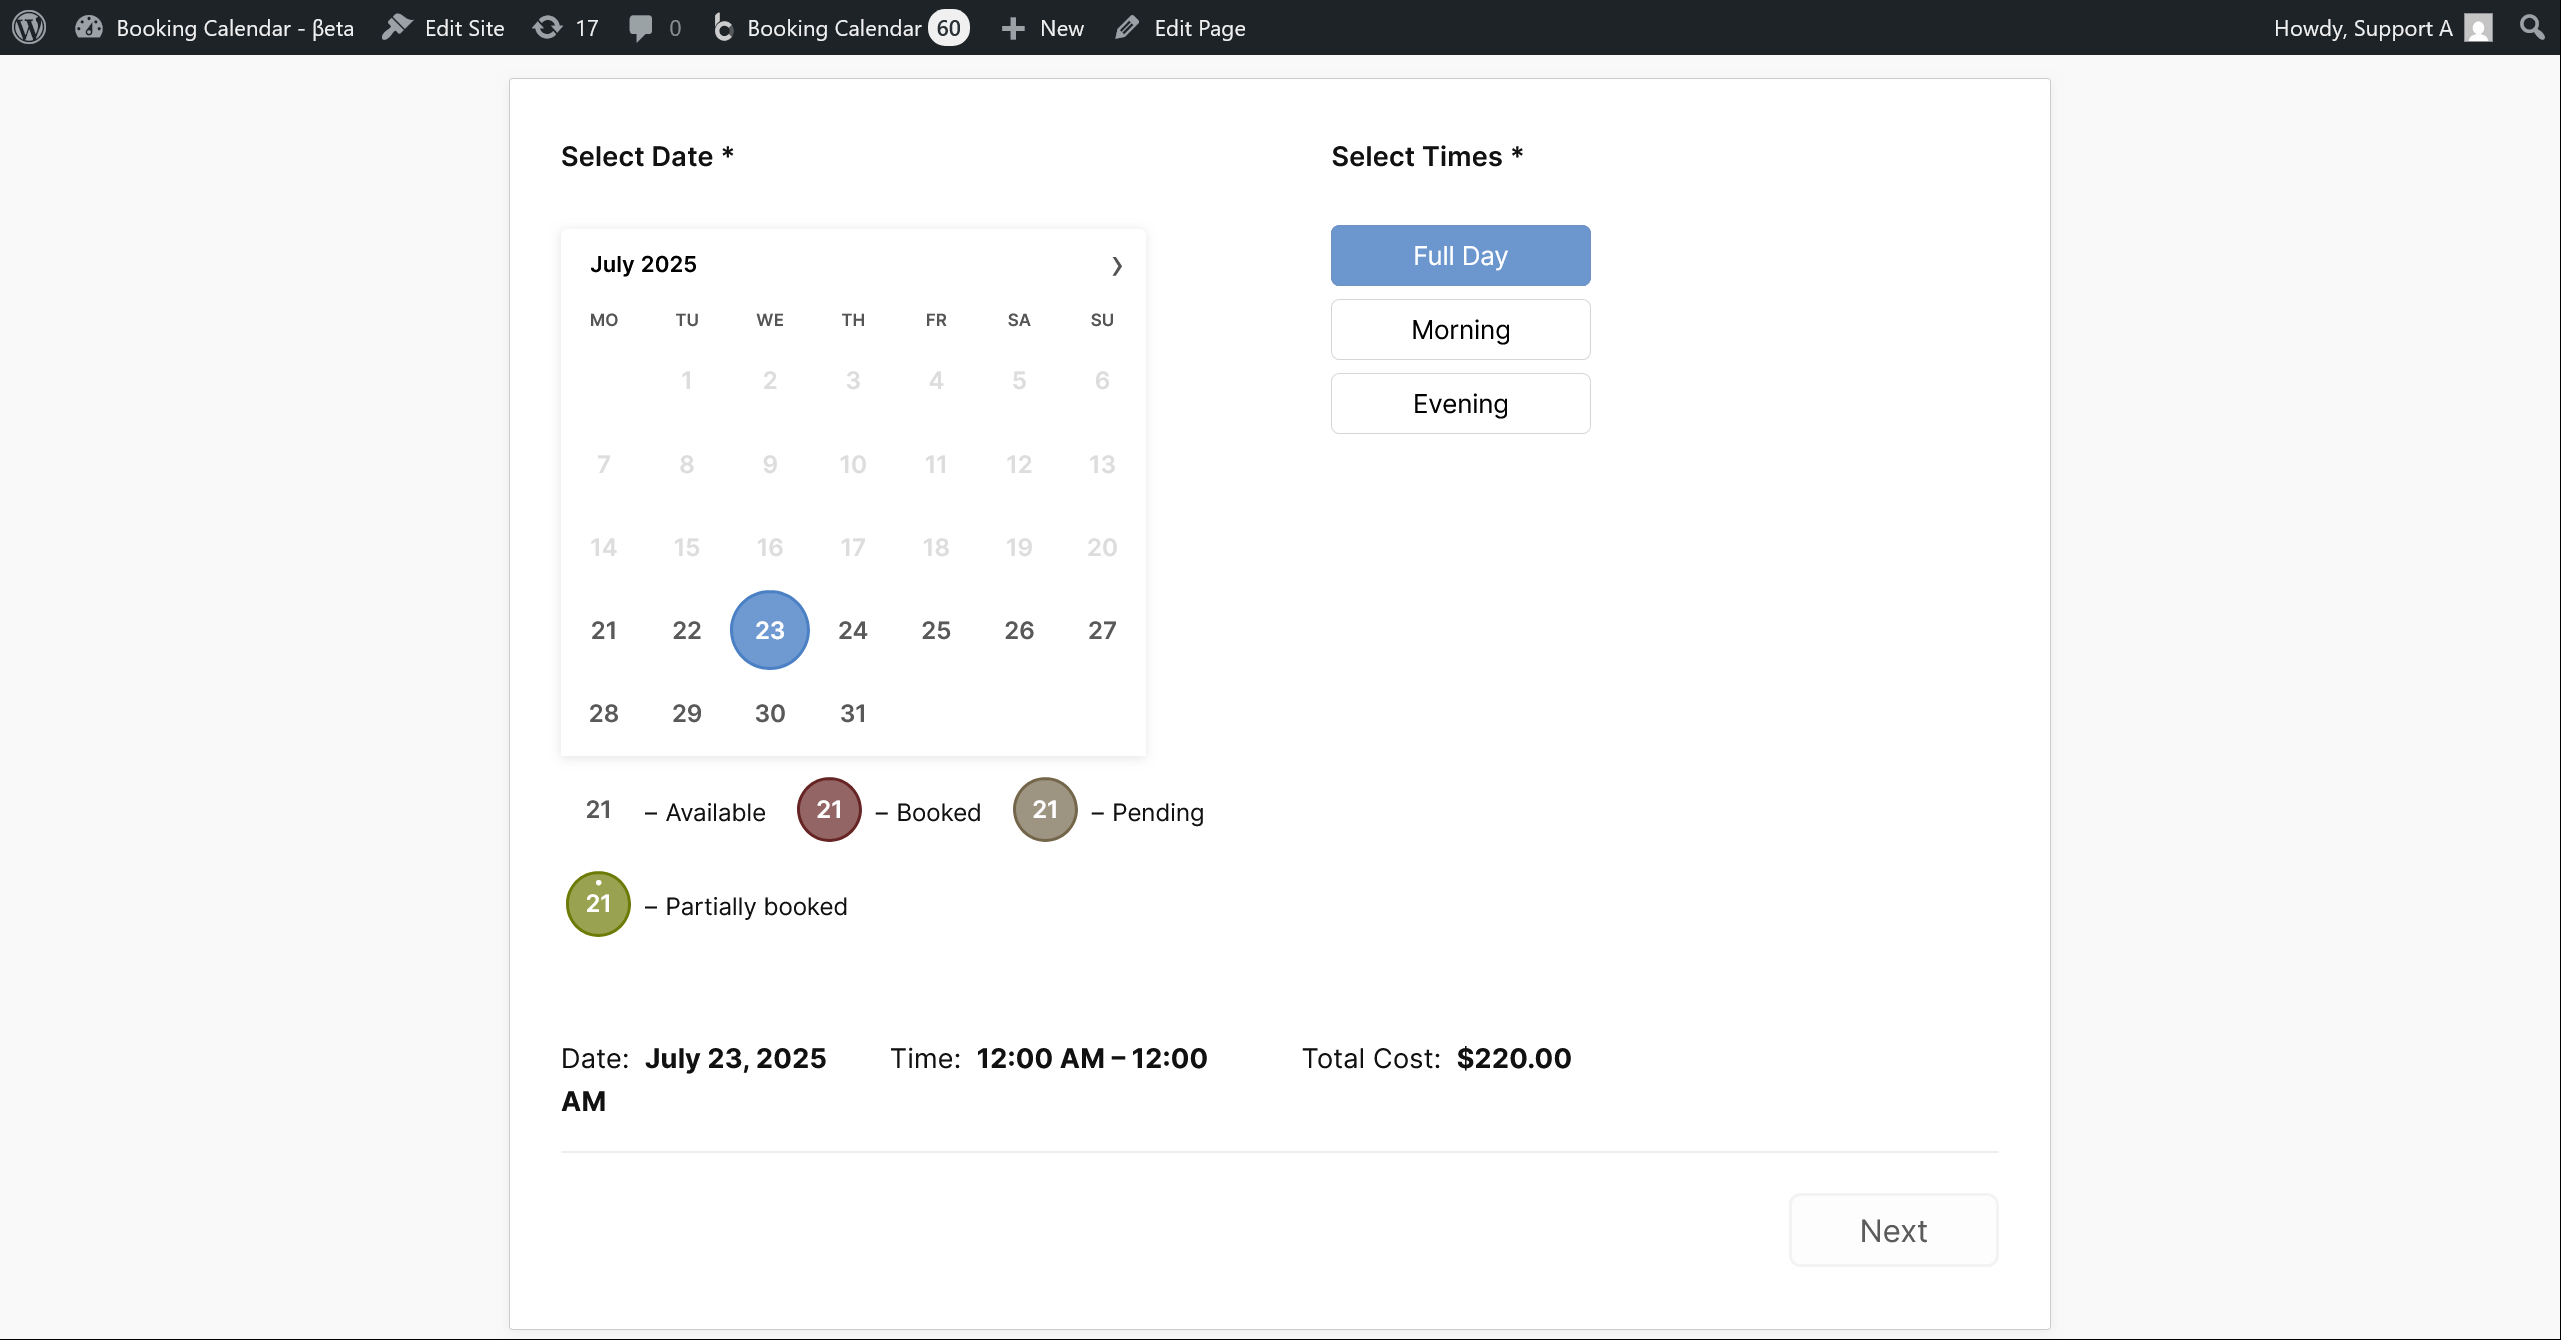
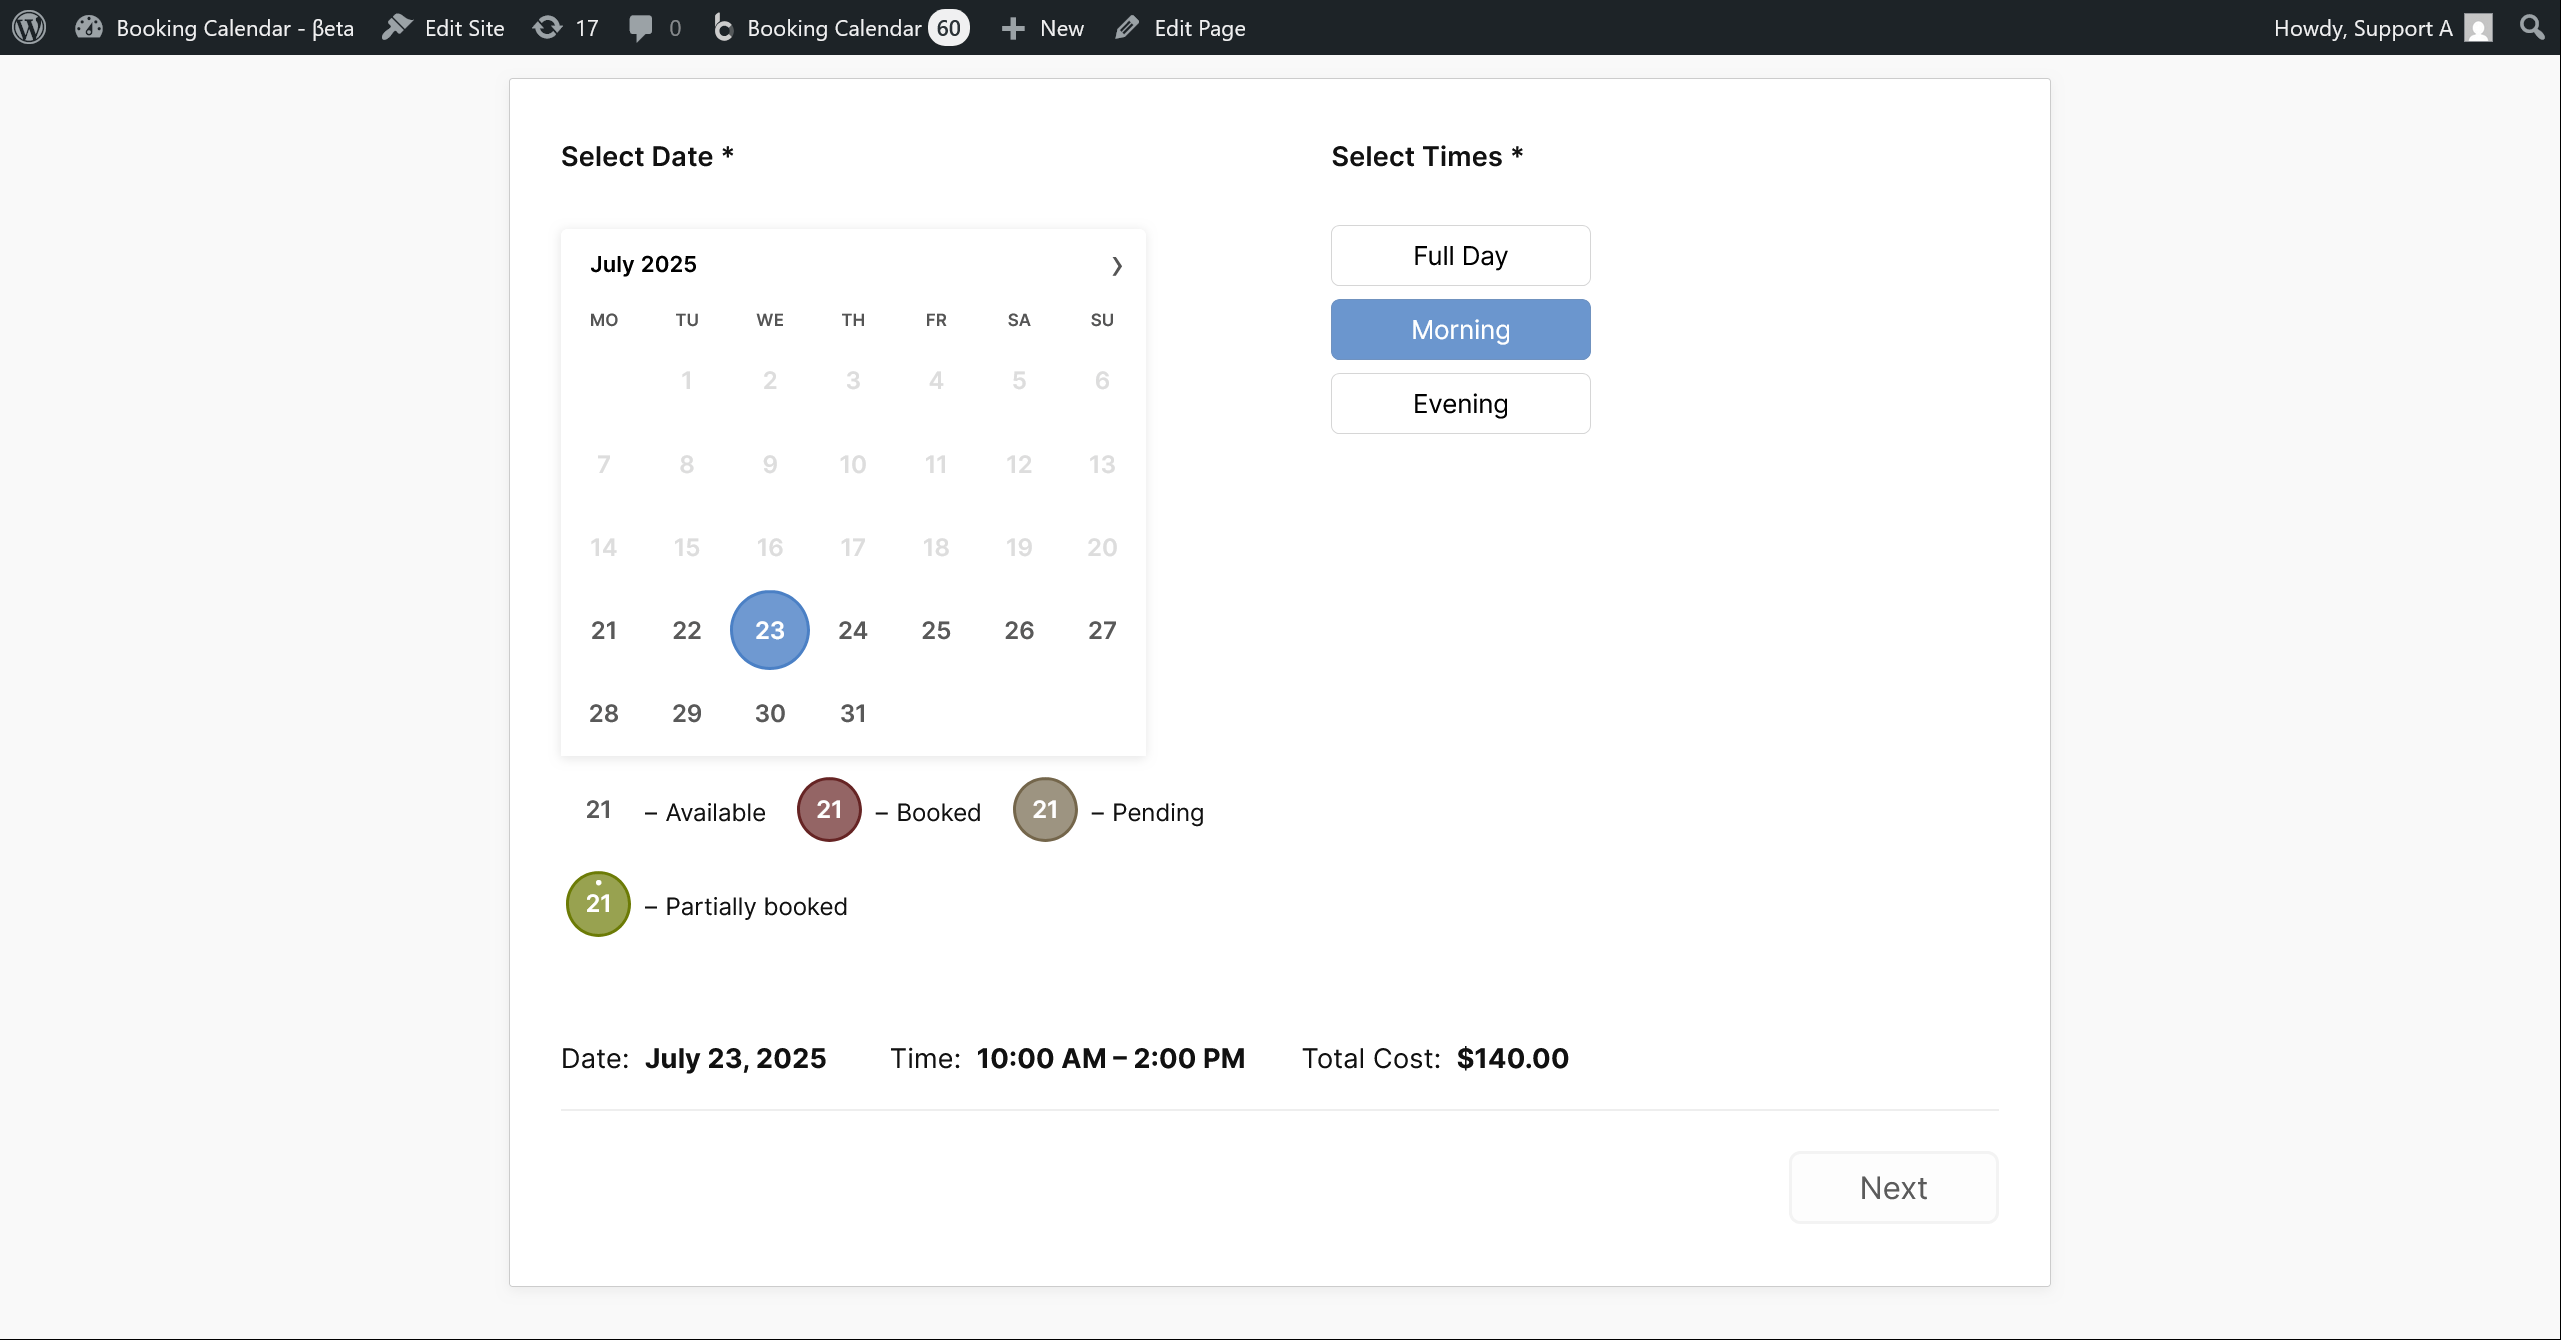
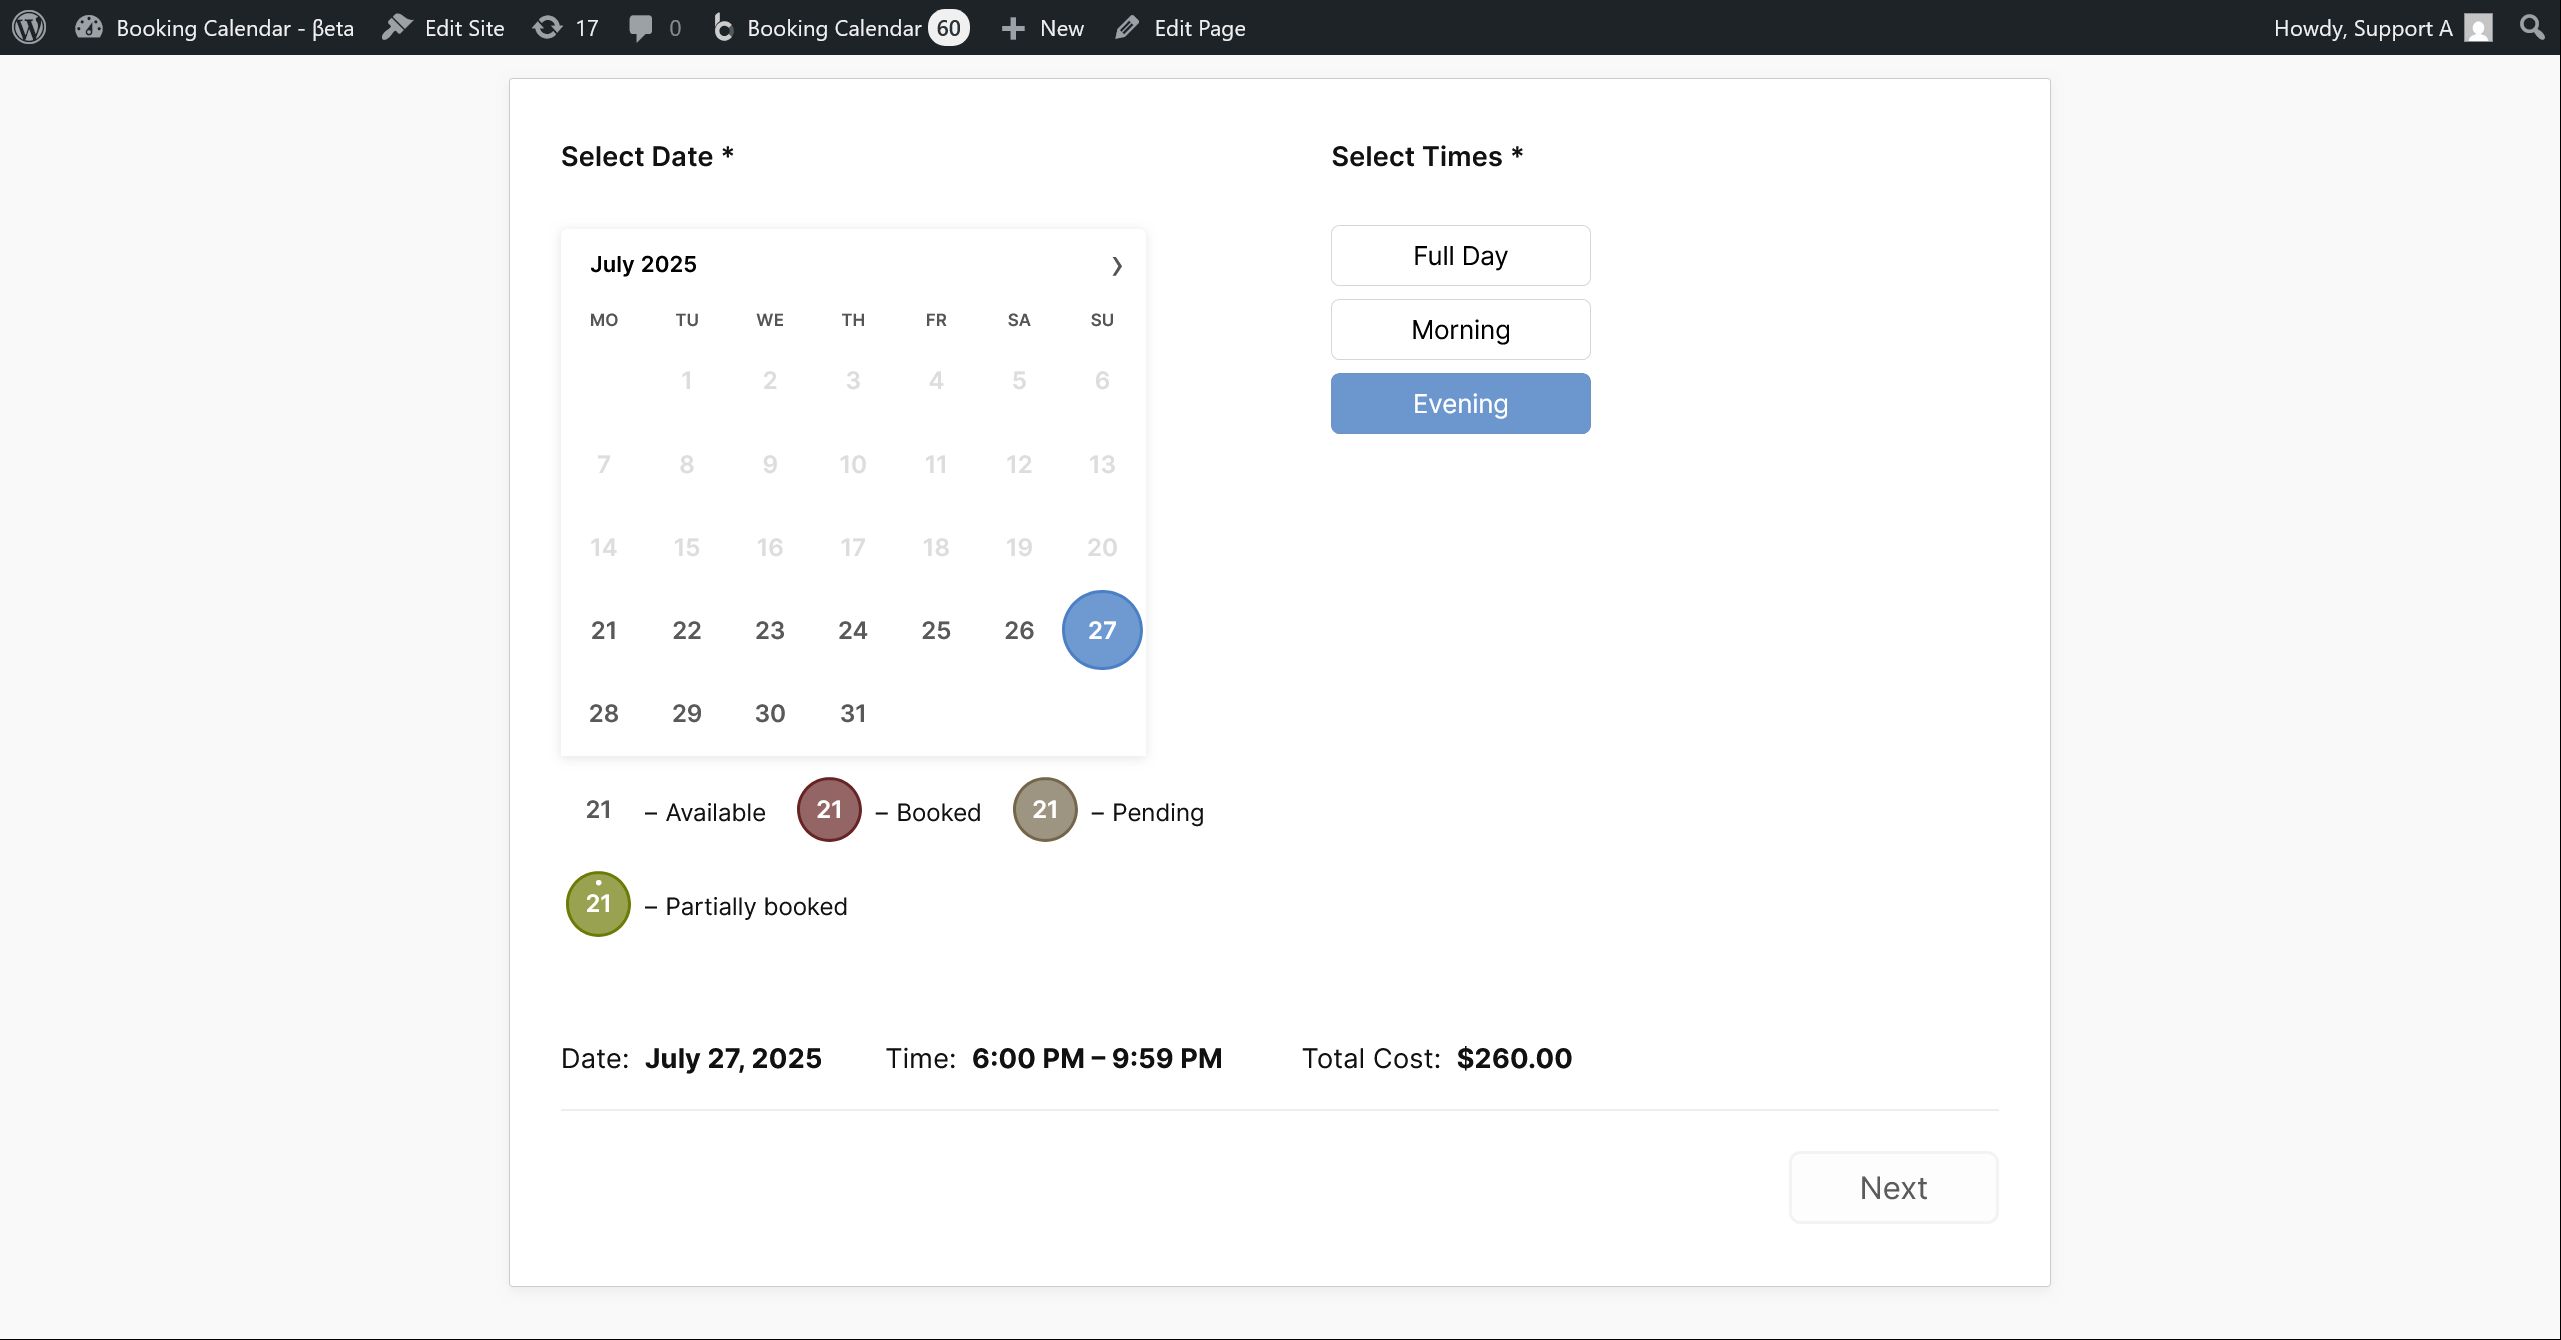

Summary: Sample Booking Form Snippet
<div class="wpbc_wizard__border_container">
    <div class="wpbc_wizard_step wpbc__form__div wpbc_wizard_step1">
        <r>
        <c style="flex: 1 1 74%;">
            <r style="gap: 30px;">
                <c style="flex: 1 1 220px;">  <l>Select Date *</l><br /><spacer>height:18px;</spacer>  [calendar] </c>
                <c style="flex: 1 1 190px;">  <l>Select Times *</l><br /><spacer>height:20px;</spacer>
    [condition name="weekday-condition" type="weekday" value="1,2,3,4"]
        [selectbox rangetime "Full Day@@00:00 - 23:59" "Morning@@10:00 - 14:00" "Evening@@18:00 - 22:00" ]
    [/condition]
    [condition name="weekday-condition" type="weekday" value="5,6,0"]
        [selectbox rangetime "Full Day@@00:00 - 23:58" "Morning@@10:00 - 13:59" "Evening@@18:00 - 21:59" ]
    [/condition]
    [condition name="weekday-condition" type="weekday" value="*"]
       [selectbox rangetime "Full Day@@00:00 - 23:59" "Morning@@10:00 - 14:00" "Evening@@18:00 - 22:00" "Full Day@@00:00 - 23:58" "Morning@@10:00 - 13:59" "Evening@@18:00 - 21:59"]
    [/condition]
                </c>
            </r>
        </c>
        </r>
        <r> <c>
                <div class="form-hints">
                Date:  <strong>[selected_dates_hint]</strong><spacer>width:2em;</spacer>
                Time:  <strong>[start_time_hint] - [end_time_hint]</strong>
                </div>
            </c>
            <c>Total Cost:  <strong>[cost_hint]</strong></c>
        </r>
        <hr>
        <r>
            <c class="wpbc_aling_right" >
                <a class="wpbc_button_light wpbc_wizard_step_button wpbc_wizard_step_2" >
                    Next</a>
            </c>
        </r>
    </div>
    <div class="wpbc_wizard_step wpbc__form__div wpbc_wizard_step2 wpbc_wizard_step_hidden" style="display:none;clear:both;">
    <r>
        <c> <l>First Name *</l><br />[text* name] </c>
        <c> <l>Last Name *</l><br />[text* secondname] </c>
    </r>
    <r>
        <c> <l>Email *</l><br />[email* email] </c>
        <c> <l>Phone</l><br />[text phone] </c>
    </r>
    <r>
        <c> <l>Details</l><spacer></spacer>
            [textarea details] </c>
    </r>
    <spacer>height:10px;</spacer>
    <r>
        <c> [checkbox* term_and_condition use_label_element "I Accept term and conditions"] </c>
        <c> [captcha] </c>
    </r>
    <r> <c>
            <div class="form-hints">
                Date:  <strong>[selected_dates_hint]</strong><spacer>width:2em;</spacer>
                Time:  <strong>[start_time_hint] - [end_time_hint]</strong>
            </div>
        </c>
        <c>Total Cost:  <strong>[cost_hint]</strong></c>
    </r>
    <hr>
    <r>
        <c class="wpbc_aling_right" >
            <a class="wpbc_button_light wpbc_wizard_step_button wpbc_wizard_step_1">
                Back</a><spacer>width:20px;</spacer>
            [submit "Send"]
        </c>
    </r>
    </div>
</div>
Its possible to use arithmetic expressions, including fields shortcodes and simple mathematics operations at the Booking > Resources > Advanced cost page.
Its useful, when you are having checkbox (or selectbox), and want to apply some additional cost depend from selected option in other selectbox or checkbox in booking form.
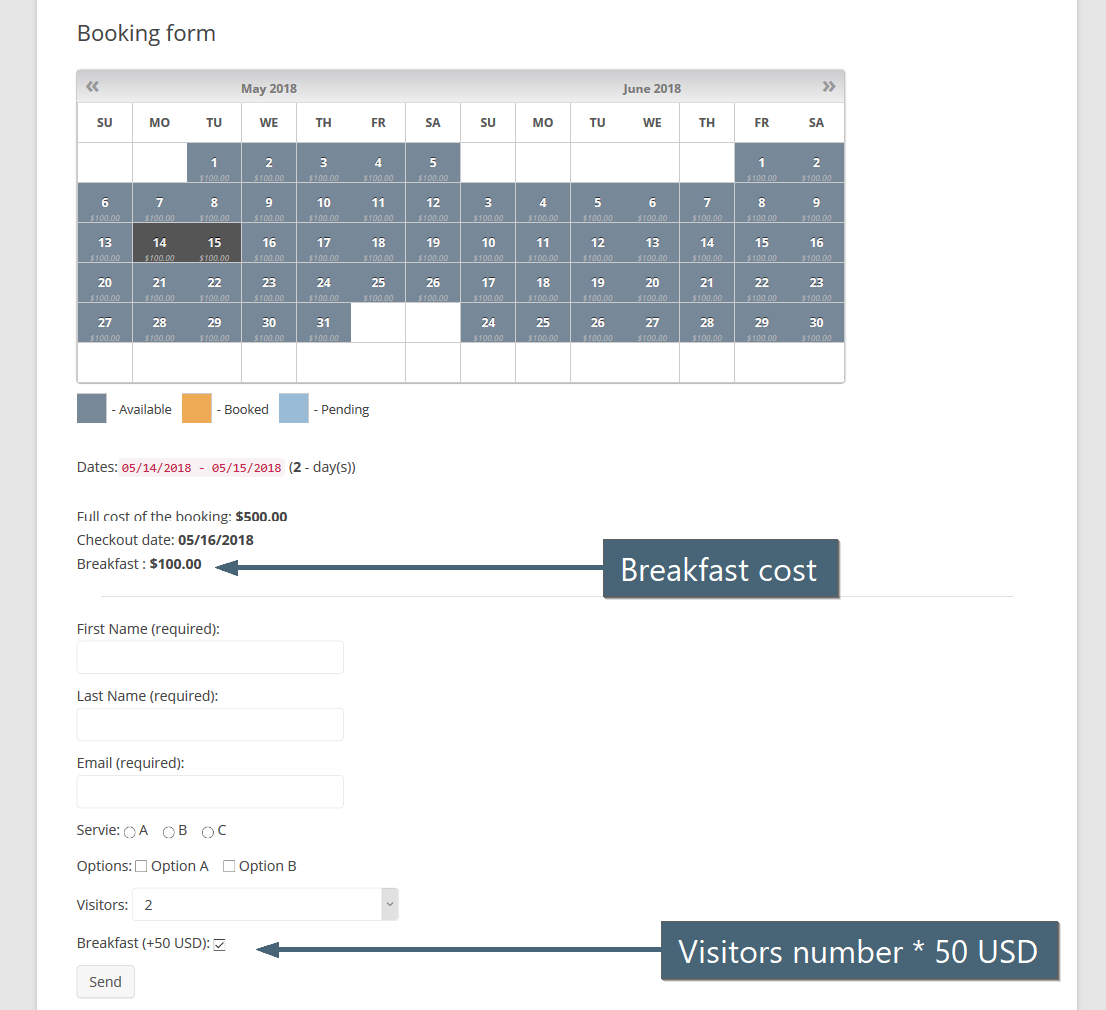
1) For example, you are having increase of booking cost depend from visitors selection ( in N times),
and also you need to add 50 USD for a breakfast per each visitor, if some checkbox is selected.
Example of configuration fields in the booking form at the Booking > Settings > Form page:
     <p>Visitors:  [select visitors "1" "2" "3" "4" "5"]</p>
     <p>Breakfast (+50 USD):  [checkbox breakfast ""]</p>

In this case you can configure at the Booking > Resources > Advanced cost page for visitors option:
[visitors]
1 = 100%  of total booking cost
2 = 200%  of total booking cost
3 = 300%  of total booking cost
4 = 400%  of total booking cost
5 = 500%  of total booking cost
And for breakfast selection you can define expressions like this:
( [visitors] * 50 )where [visitors] its shortcode of field from the Booking > Settings > Form page in "Content of booking fields data" form.
2) Shortcodes, its the names of form fields, from the "Content of booking fields data" form in Booking > Settings > Form page.
Each such shortcode will be replaced to digital number relative to selected option or checkbox.
3) In case, if the options in selectboxes or checkboxes does not have numbers (but some strings), please DO NOT use such shortcodes!
For example, if you have shortcode like this in booking form:
[select visitors "1" "2" "3" "4"]so then you can use [visitors] shortcode at the Booking > Resources > Advanced cost page.
But if you are having shortcode like this at the Booking > Settings > Form page:
[select visitors "Person 1" " Person 2" " Person 3" " Person 4"]so then you CAN NOT use shortcode [visitors] in the Booking > Resources > Advanced cost page.
4) Tip. The value of each selected checkbox = 1 and value of not checked checkbox is 0.
5) Please note, you need to use parentheses ( and ) to separate each mathematical operation.
Please use instead of expression like this
5 - 3 * 2this expression
( 5 - ( 3 * 2 ) )otherwise, the result will be 4 instead of correct -1
Supporting since update 8.2 in Booking Calendar Business Medium or higher versions.
You can configure the booking form to display only the selected payment method after the booking process. To do this, use the following shortcode in the booking form at WP Booking Calendar > Settings > Booking Form page:
Select payment method:<br/> [select payment-method "All payment methods@@" "Stripe@@stripe_v3" "PayPal@@paypal_std_co" "Authorize.Net@@authorizenet" "Opayo - Elavon@@sage" "Bank Transfer@@bank_transfer" "Pay in Cash@@pay_cash" "iPay88@@ipay88" "iDEAL Buckaroo@@ideal"]You can customize the shortcode to include only the active payment gateways that you've enabled at WP Booking Calendar > Settings > Payment Setup page.
After the visitor selects a specific payment system in the booking form, only that payment form will be displayed after the submission of the booking.
This feature is also useful in Booking Calendar Business Medium or higher versions for setting additional "Payment system fee" (commission) at WP Booking Calendar > Prices > Form Options Costs page. Check more about this feature here. Watch it in this video guide.
This instruction is explain how to start work with integration your payment gateway into Booking Calendar Business Small or higher versions of update 7.0 or newer, based on exist payment gateway.
Let say that your new payment gateway have name: loc_payment.
1) You need to create new folder, like this:
../{Booking Calendar Folder}/inc/gateways/loc_payment/,
then create new PHP file with following name:
../{Booking Calendar Folder}/inc/gateways/loc_payment/wpbc-gw-loc_payment.php2) After this you can copy/paste code from file
../{Booking Calendar Folder}/inc/gateways/stripe/wpbc-gw-stripe_v3.php (or some other, which you better like)
into your new file, and replace in content terms like "stripe" or "STRIPE" to "loc_payment" or "LOC_PAYMENT" accordingly.
3) Then check your code relative comments in this new file and configure your payment form and settings, relative to API and help info from website of your new payment gateway.
4) Additionally you need to add one new hook for ability to load the new payment gateway
// General API for Adding new gateways:
function add_my_gateway( $gateway ){ return $gateway . ',gateway_ID'; }
add_filter( 'wpbc_gateways_original_id_list', 'add_my_gateway' );
In your case you need to have something like this:
function add_my_loc_payment( $gateway ){ return $gateway . ',loc_payment'; }
add_filter( 'wpbc_gateways_original_id_list', 'add_my_loc_payment' );
5) If your payment gateway have response functionality, then you can check this function:
function wpbc_payment_response__stripe_v3( $parsed_response ) {Booking Form Setup - Builder
The Booking Form Builder in Booking Calendar helps you create booking forms visually with drag and drop. You can build booking forms, appointment forms, contact forms, and inquiry forms without manually editing form code.
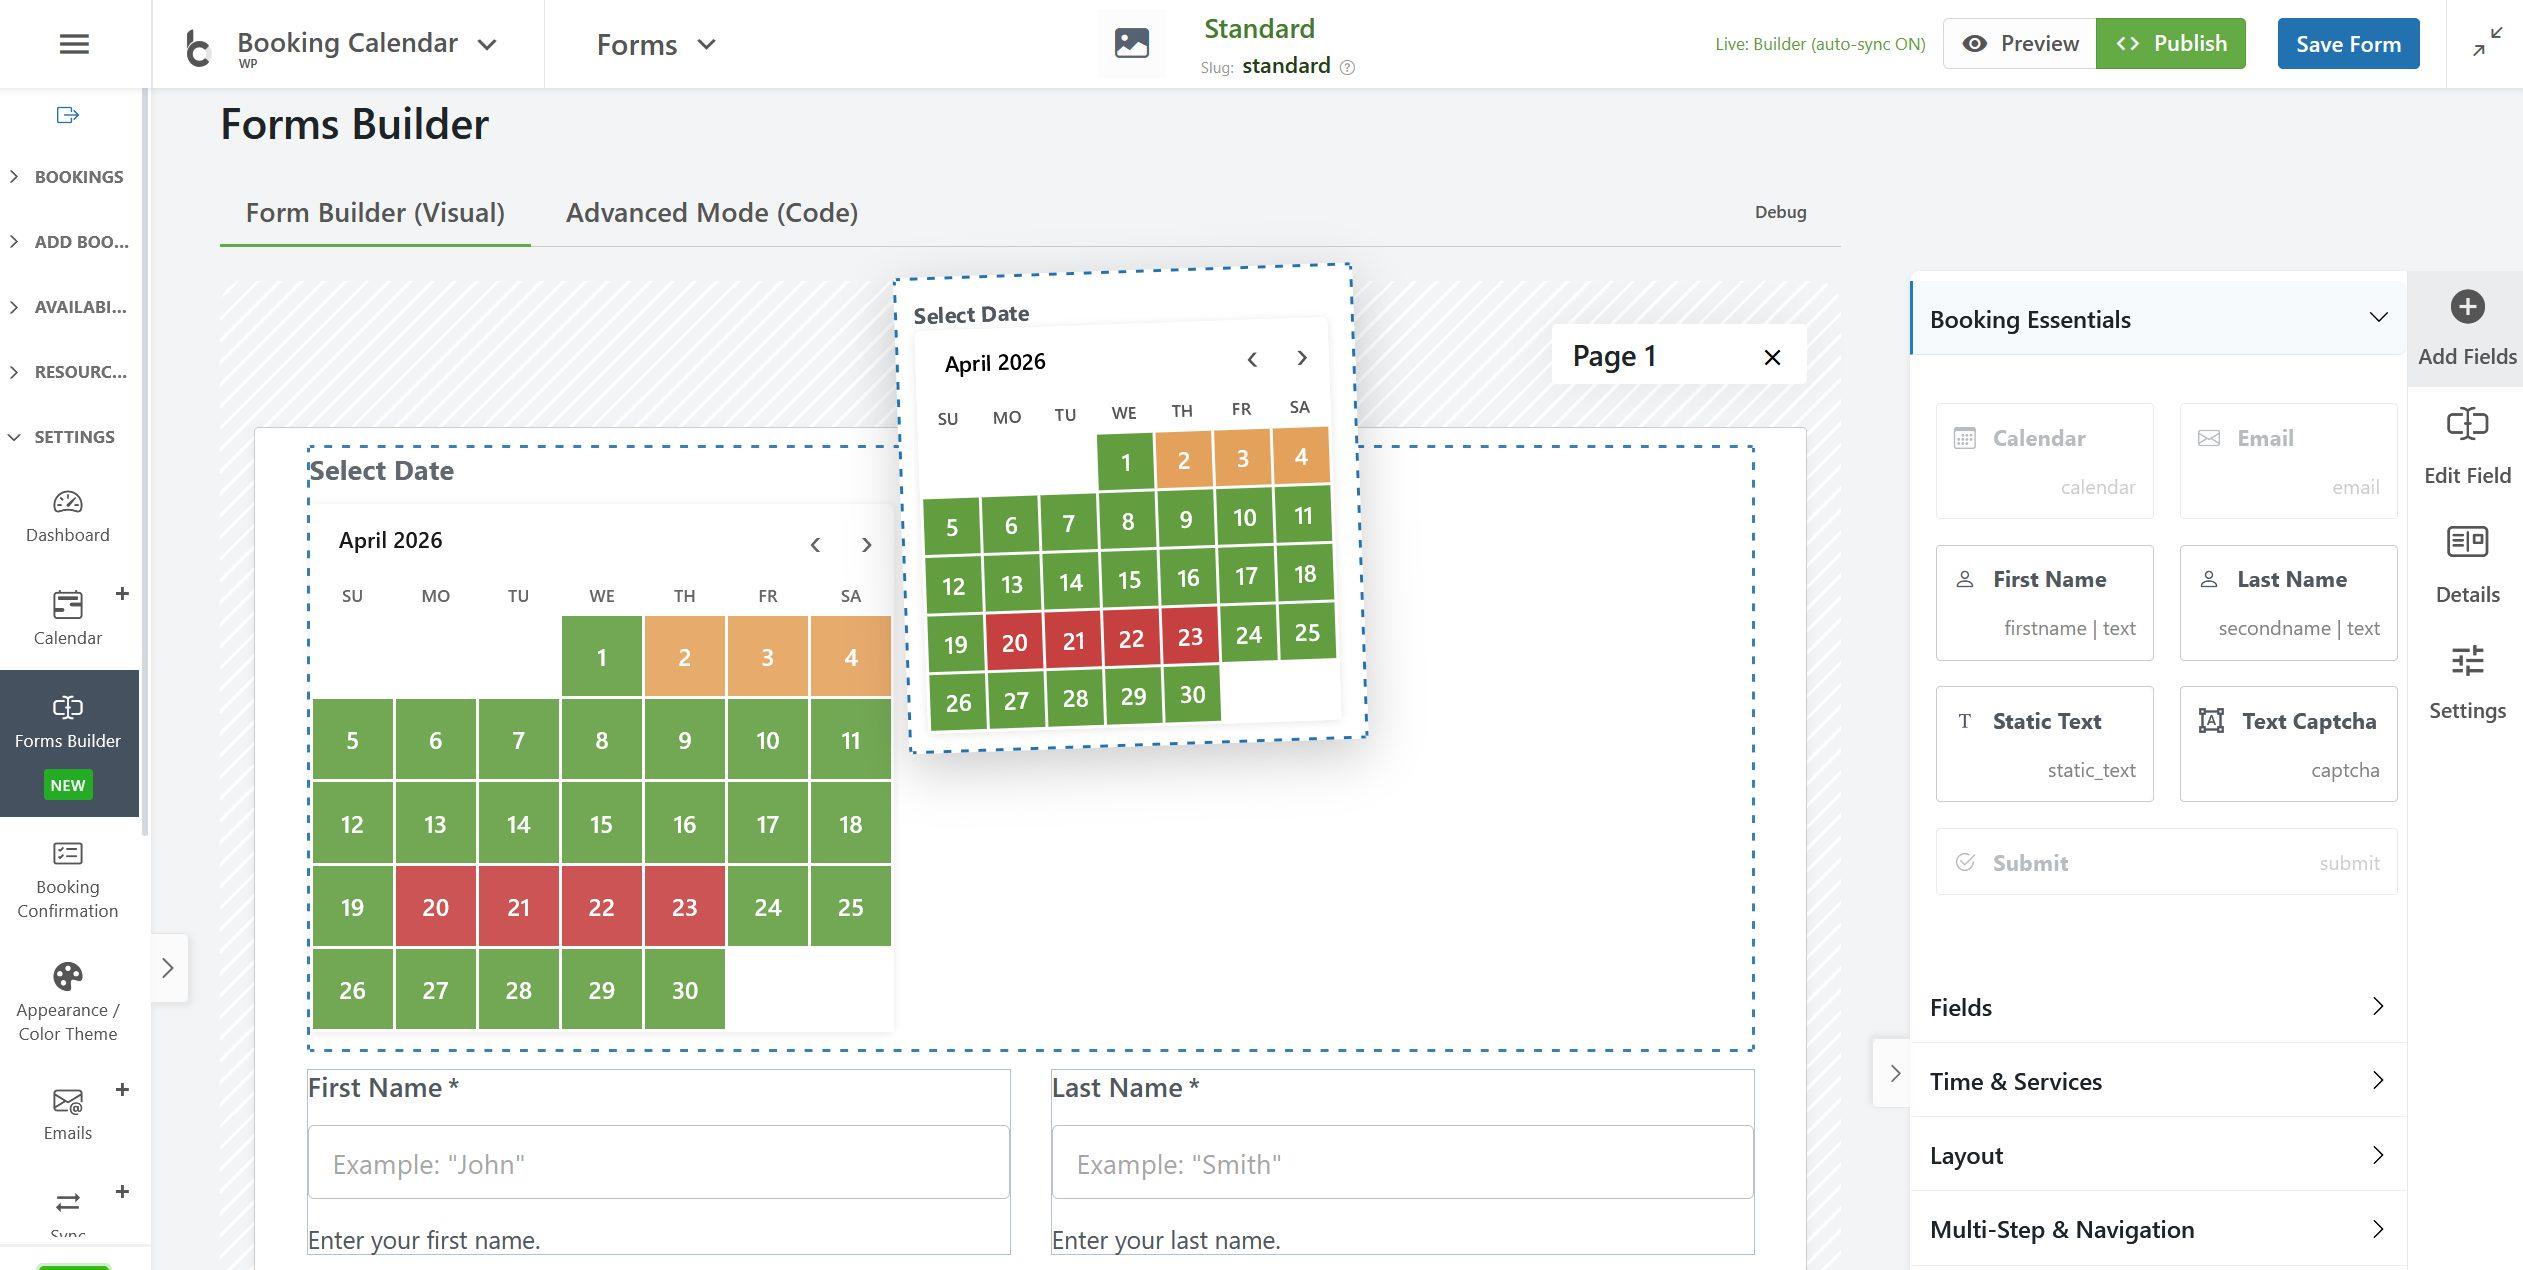
This guide gives you a simple overview of the new Booking Form Builder interface, explains what each section does, and shows how to start creating your form more easily.
Top area of the Form Builder
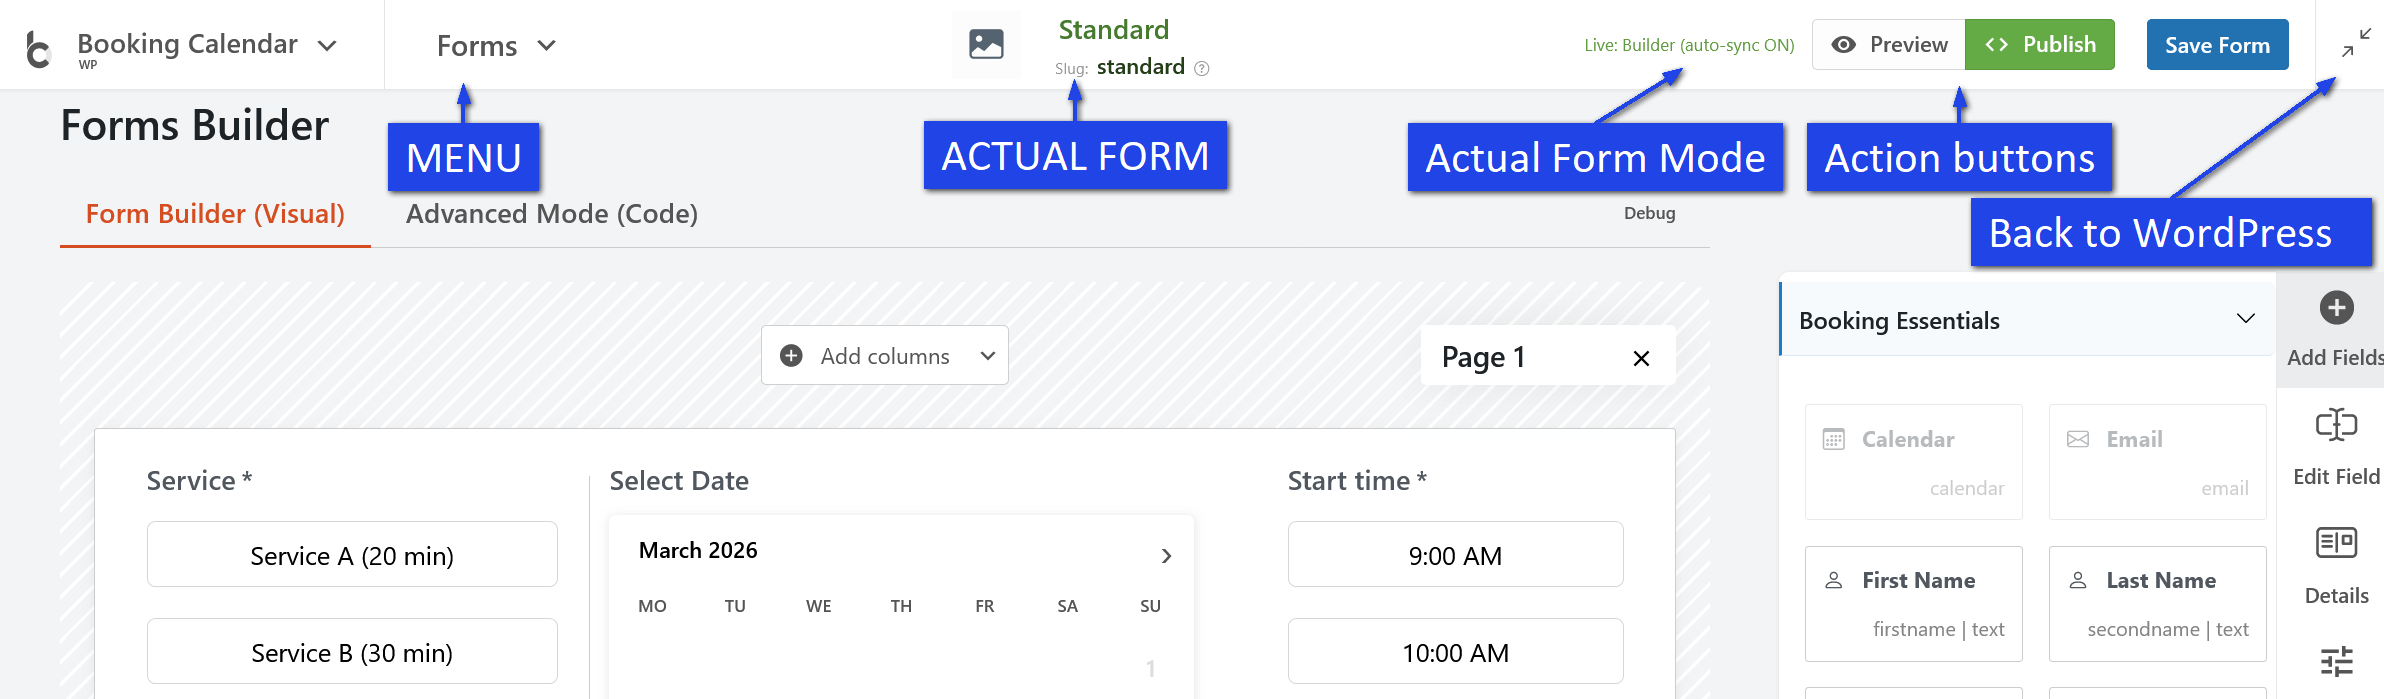
At the top of the page, you can see the current form name and form slug. This helps you identify which booking form you are editing.
On the top right side, you will usually see these main action buttons:
- Preview – opens a preview of your booking form so you can check how it looks and works.
- Publish – helps you publish or embed the form into a page.
- Save Form – saves your current form configuration.
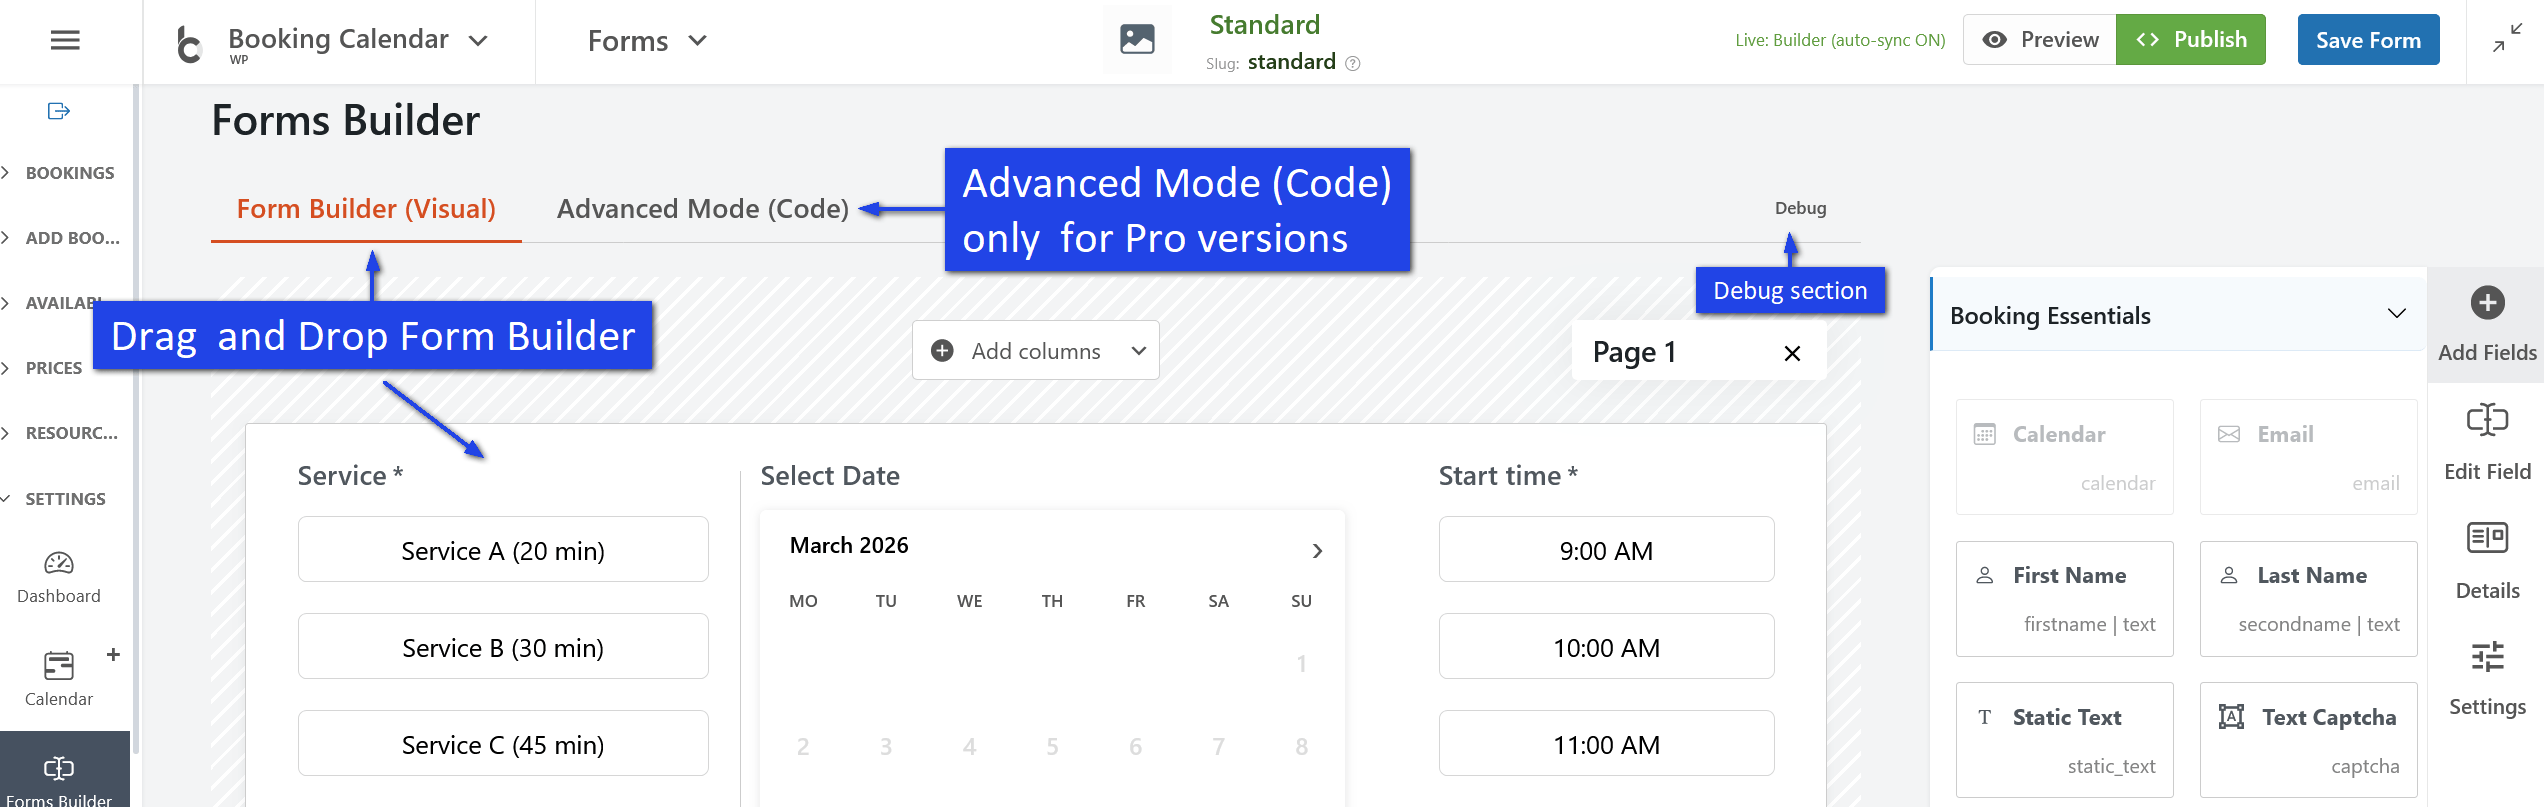
If Live Builder is enabled, some visual changes can be updated automatically while you work.
Builder modes
The Booking Form Builder usually includes several tabs or work modes:
- Form Builder (Visual) – the main drag and drop area where you build your form visually.
- Advanced Mode (Code) – for advanced users who want to work with the form code directly.
- Debug – used for technical review, testing, or checking advanced form data.
Most users will work mainly in Form Builder (Visual).
Main canvas area
The large center area is the main form canvas. This is where you build the structure of your booking form.
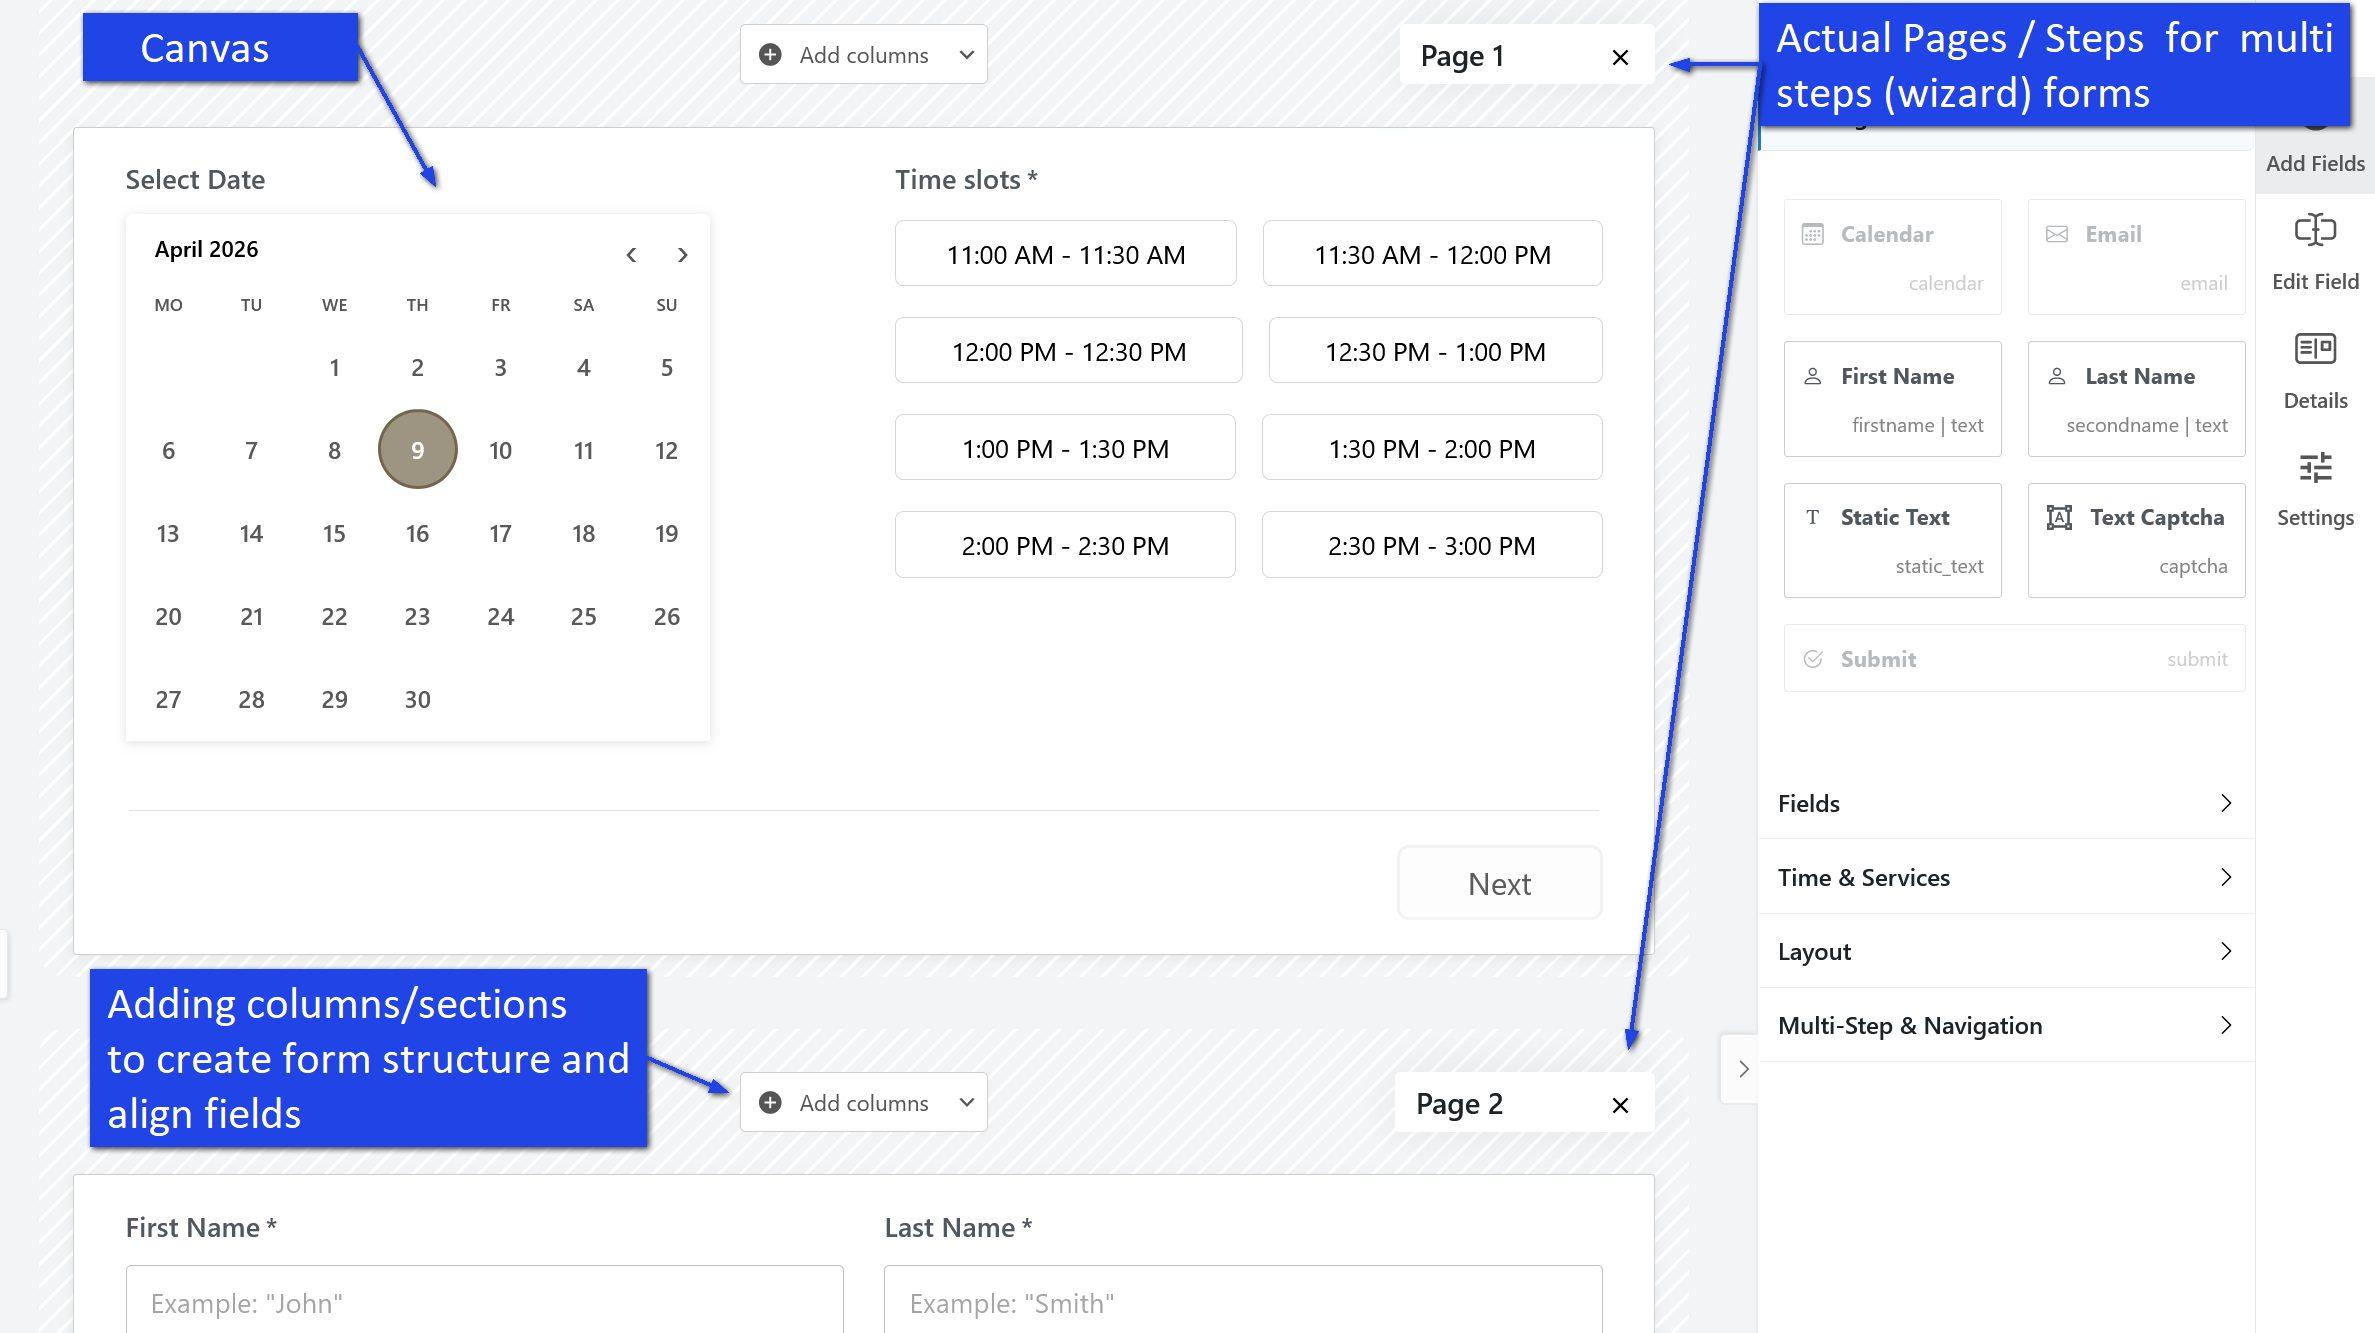
In this area, you can:
- add new fields,
- move fields to a different position,
- create form rows and columns,
- build one-page or multi-step forms,
- see a live visual layout of your form.
When you drag a field into the canvas, it becomes part of your booking form. You can then click that field to edit its settings.
Pages and sections
The new builder can work with pages and sections. This makes it easier to create simple forms or more advanced multi-step forms.
- Pages are useful for step-by-step or wizard-style forms.
- Sections help you organize fields into rows and layout blocks.
- Columns allow you to place fields side by side, such as First Name and Last Name.
This layout system gives you much more flexibility when creating modern booking forms.
Right sidebar: field library and editing tools
The right sidebar is where you add and manage form elements. It is one of the most important parts of the interface.
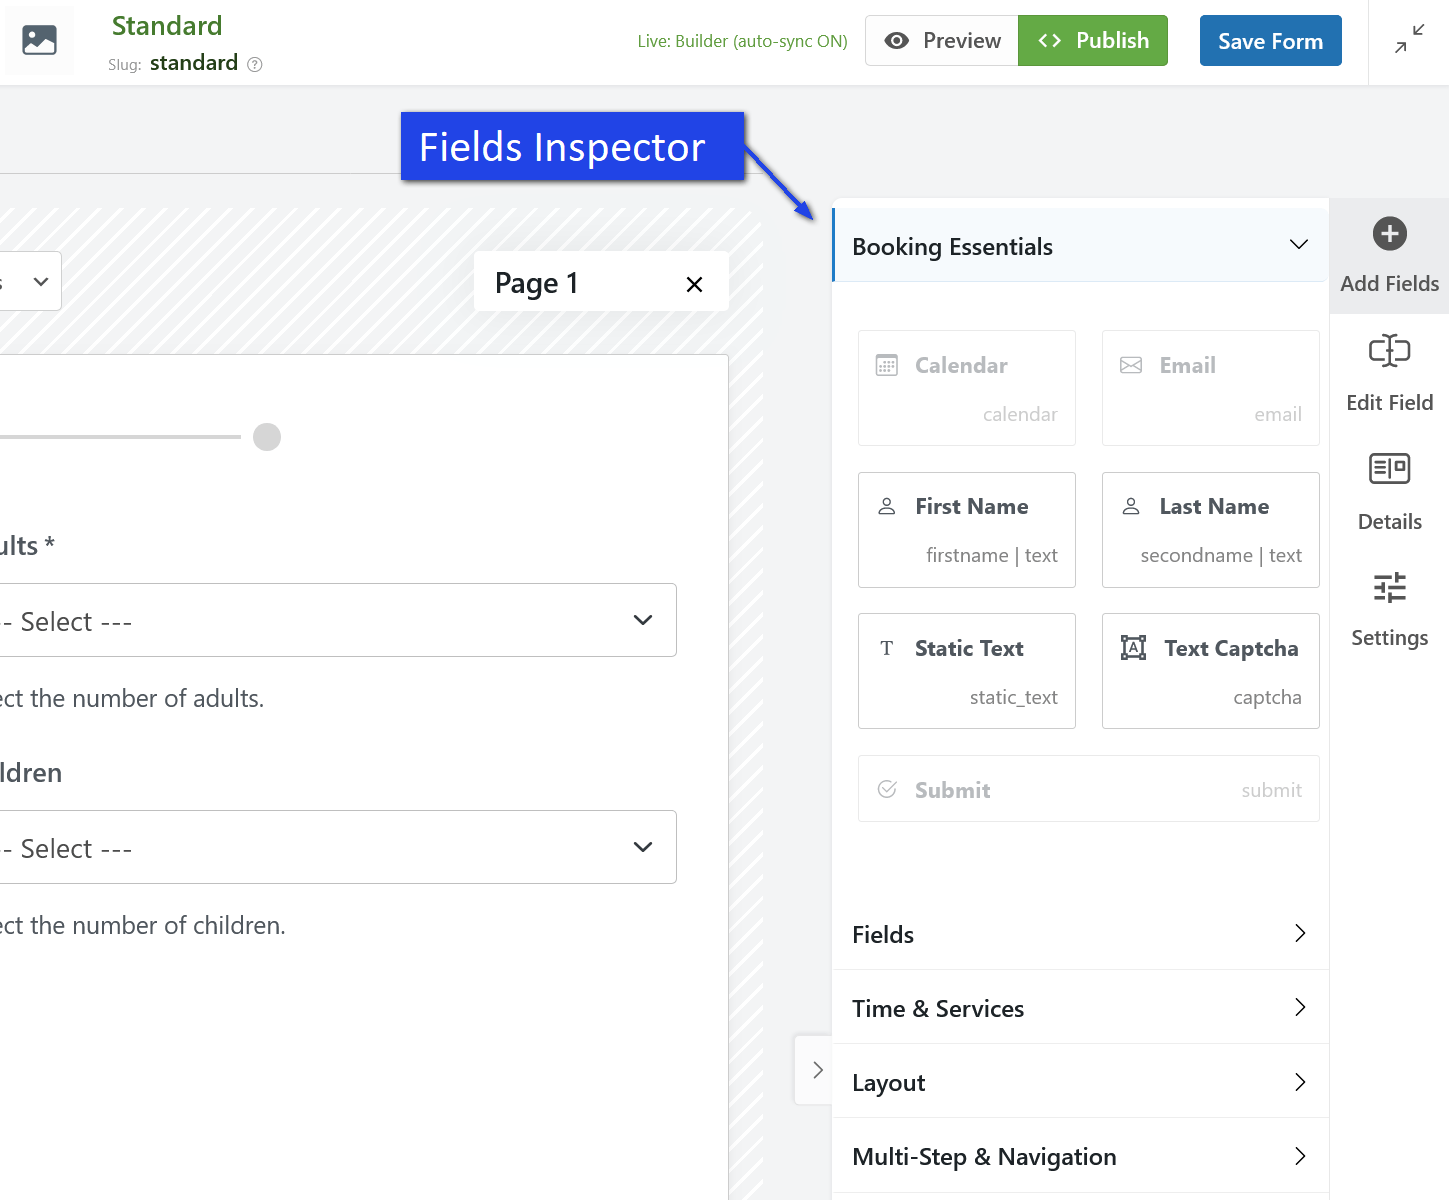
Depending on the selected tab or button, this area lets you:
- browse available fields,
- insert booking or contact fields,
- edit the selected field,
- review field details,
- change settings for the selected element.
Quick sidebar actions
You may see quick action buttons on the right side, such as:
- Add Fields – opens the field library so you can drag new items into the form.
- Edit Field – lets you change the selected field.
- Details – shows more information about the selected item.
- Settings – opens configuration options for the selected field, section, or layout element.
These tools help you build and adjust the form without leaving the visual builder.
Field groups in the sidebar
The available fields are usually organized into groups, so it is easier to find what you need.
Booking Essentials
This section contains the most common booking form fields, such as:
- Calendar,
- Email,
- First Name,
- Last Name,
- Static Text,
- Captcha,
- Submit button.
These fields are often enough to build a basic booking or request form.
Fields
This section typically contains additional standard input fields that help you collect customer details, messages, and other booking information.
Time & Services
This section is useful for appointment booking forms and time-slot booking forms. It can include fields related to start time, service selection, duration, or time-based booking options.
Layout
This section helps you structure the form. You can use it to create rows, columns, and other layout blocks for better visual organization.
Multi-Step & Navigation
This section is useful when you want to build a multi-step booking form with several pages and navigation controls.
How editing works
The Booking Form Builder is designed to be simple:
- Choose a field from the right sidebar.
- Drag it into the center canvas.
- Click the added field to edit its settings.
- Adjust labels, placeholders, required options, styles, or other settings.
- Save your form.
- Preview and publish it when ready.
This workflow makes it much faster to create forms compared to editing form code manually.
What you can create with the Booking Form Builder
The new builder is flexible and can be used for many different types of forms, including:
- full-day booking forms,
- time-slot booking forms,
- appointment forms,
- contact forms,
- inquiry forms,
- request forms,
- multi-step booking forms.
This means you can use Booking Calendar not only for date selection, but also for collecting customer requests and service inquiries.
Basic tips for getting started
- Start with the Visual Builder if you are new to the feature.
- Begin with the most important fields first, such as date, name, email, and submit button.
- Use sections and columns to keep your layout clean.
- Use multi-step pages only when your form needs more space or more logic.
- Preview the form before publishing it.
- Always click Save Form after making changes.
Summary
The new Booking Form Builder interface in Booking Calendar gives you a more visual and flexible way to create forms. The center canvas is where you build the form layout, and the right sidebar is where you add fields and change settings.
With this interface, you can create simple or advanced booking forms faster, organize fields more clearly, and build a better booking experience for your website visitors.
Please check the screenshot for a visual example of the main builder sections and interface areas.
How to Add Custom JavaScript to Your Booking Form in Booking Calendar
Since version 10.15, Booking Calendar includes stricter security validation for booking form content when you edit a form in Advanced Mode (code). For security reasons, you cannot insert direct JavaScript code inside the booking form configuration itself. If you want to add custom JavaScript to your booking form, you should add it on the page or post where the form is published, not inside the Booking Form Builder.
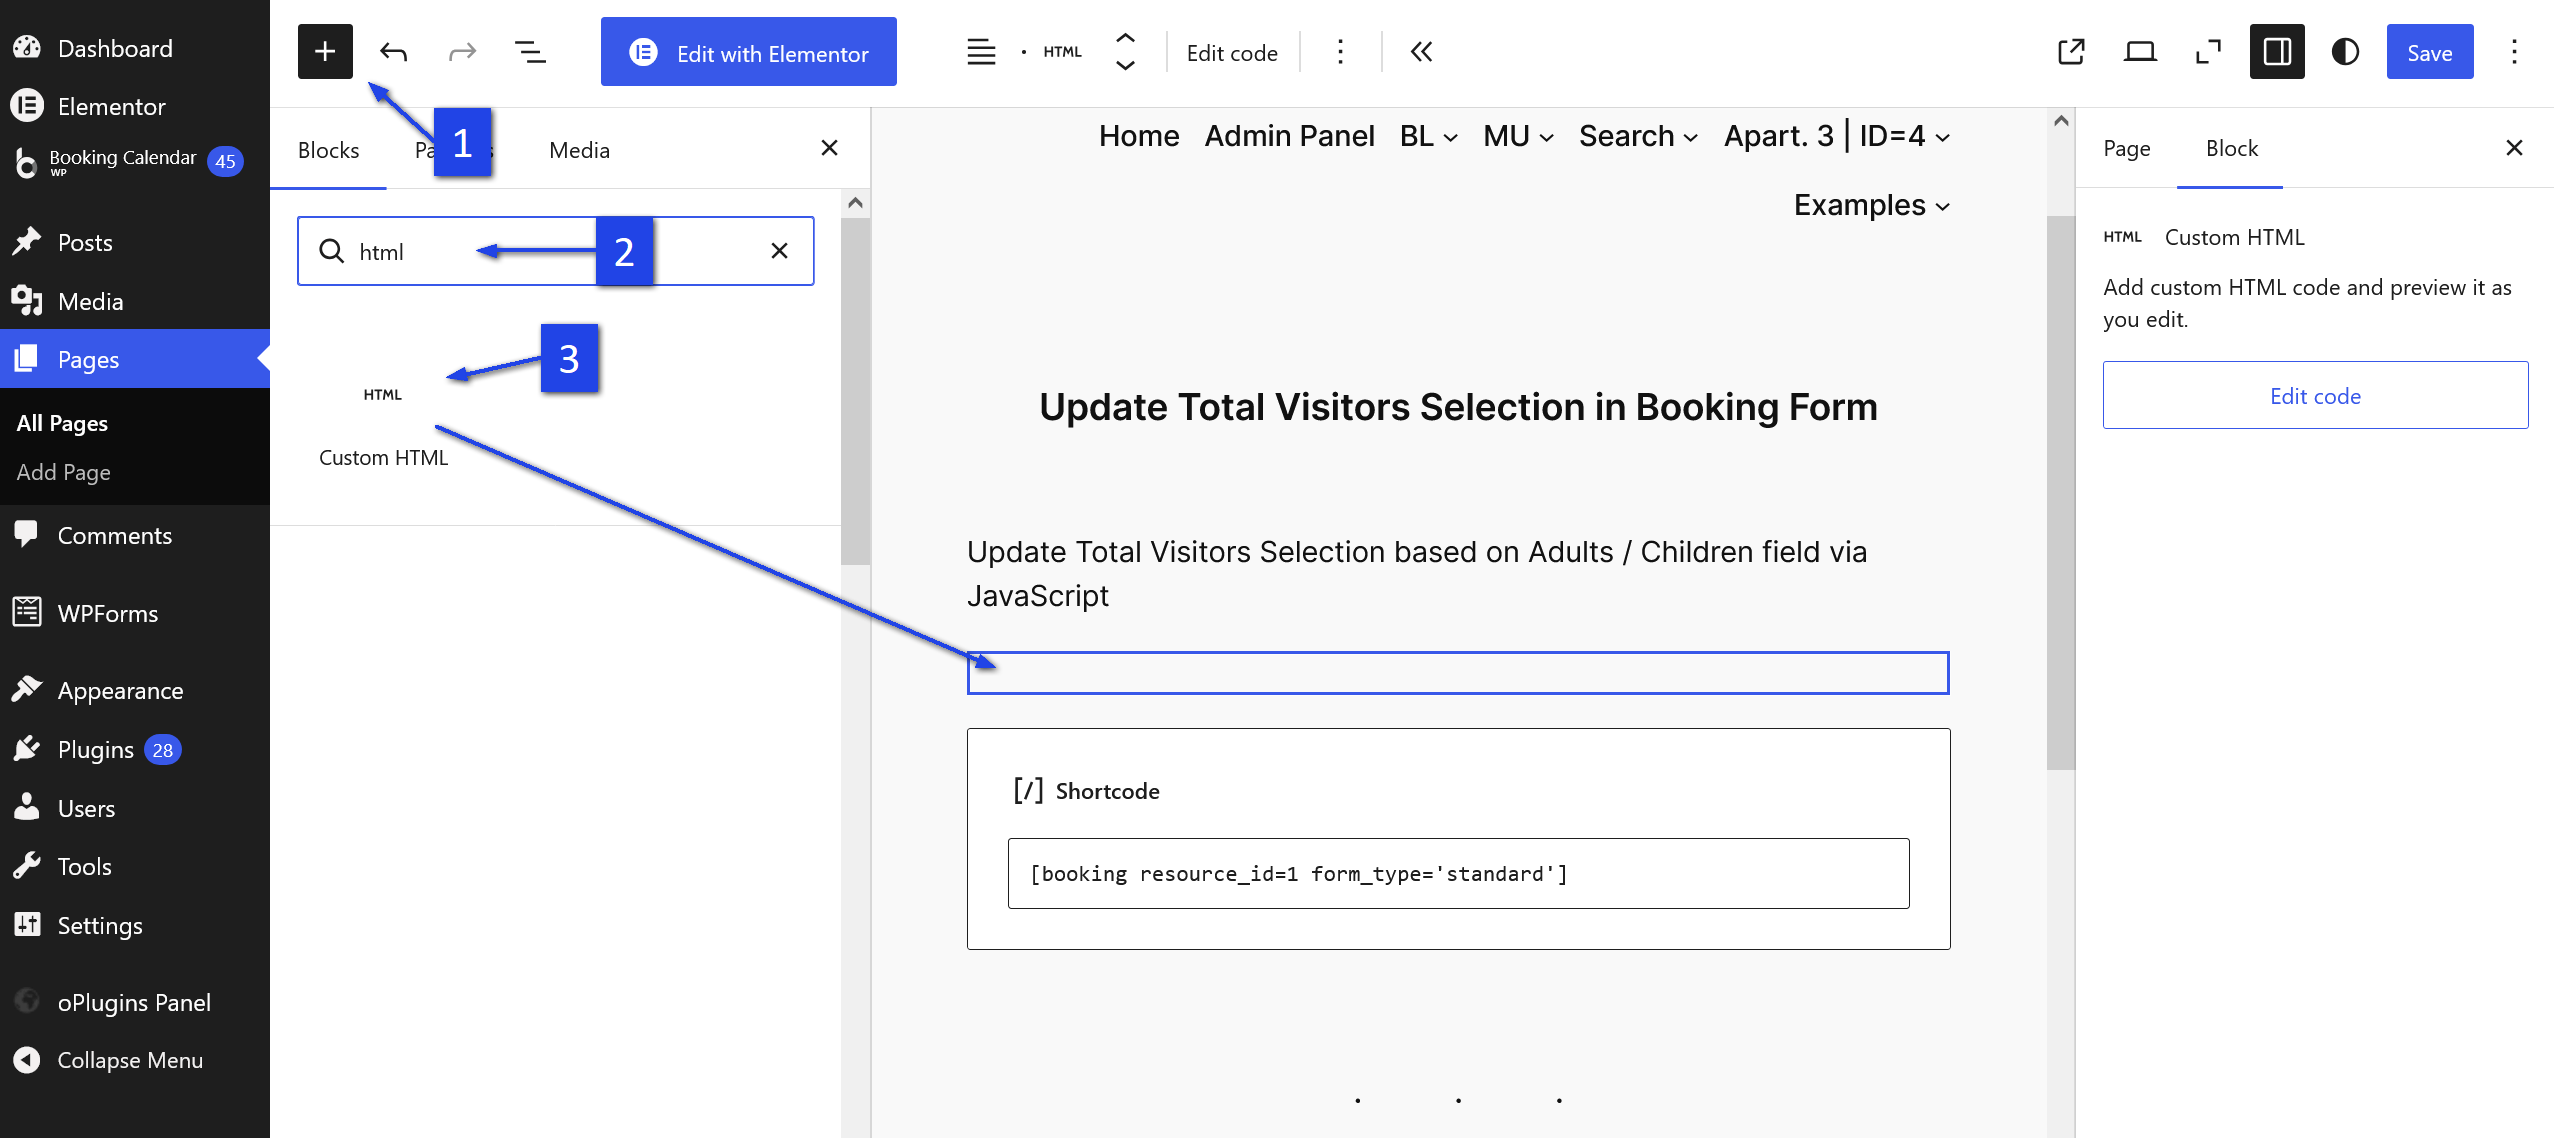
Why is direct JavaScript blocked in the Booking Form Builder?
The new validation helps protect your website and booking forms from unsafe or broken code. It keeps the booking form structure cleaner, safer, and more stable.
How to add custom JavaScript to your booking form
When you publish your booking form to a WordPress page or post, you can add your JavaScript by using the standard Custom HTML block in WordPress.
Steps to add custom JavaScript
- Open the page or post where your booking form is published.
- Add a Custom HTML block in the WordPress editor.
- Insert your JavaScript code inside this block.
- Save or update the page.
This is the recommended and safe way to add extra JavaScript functionality to your booking form.

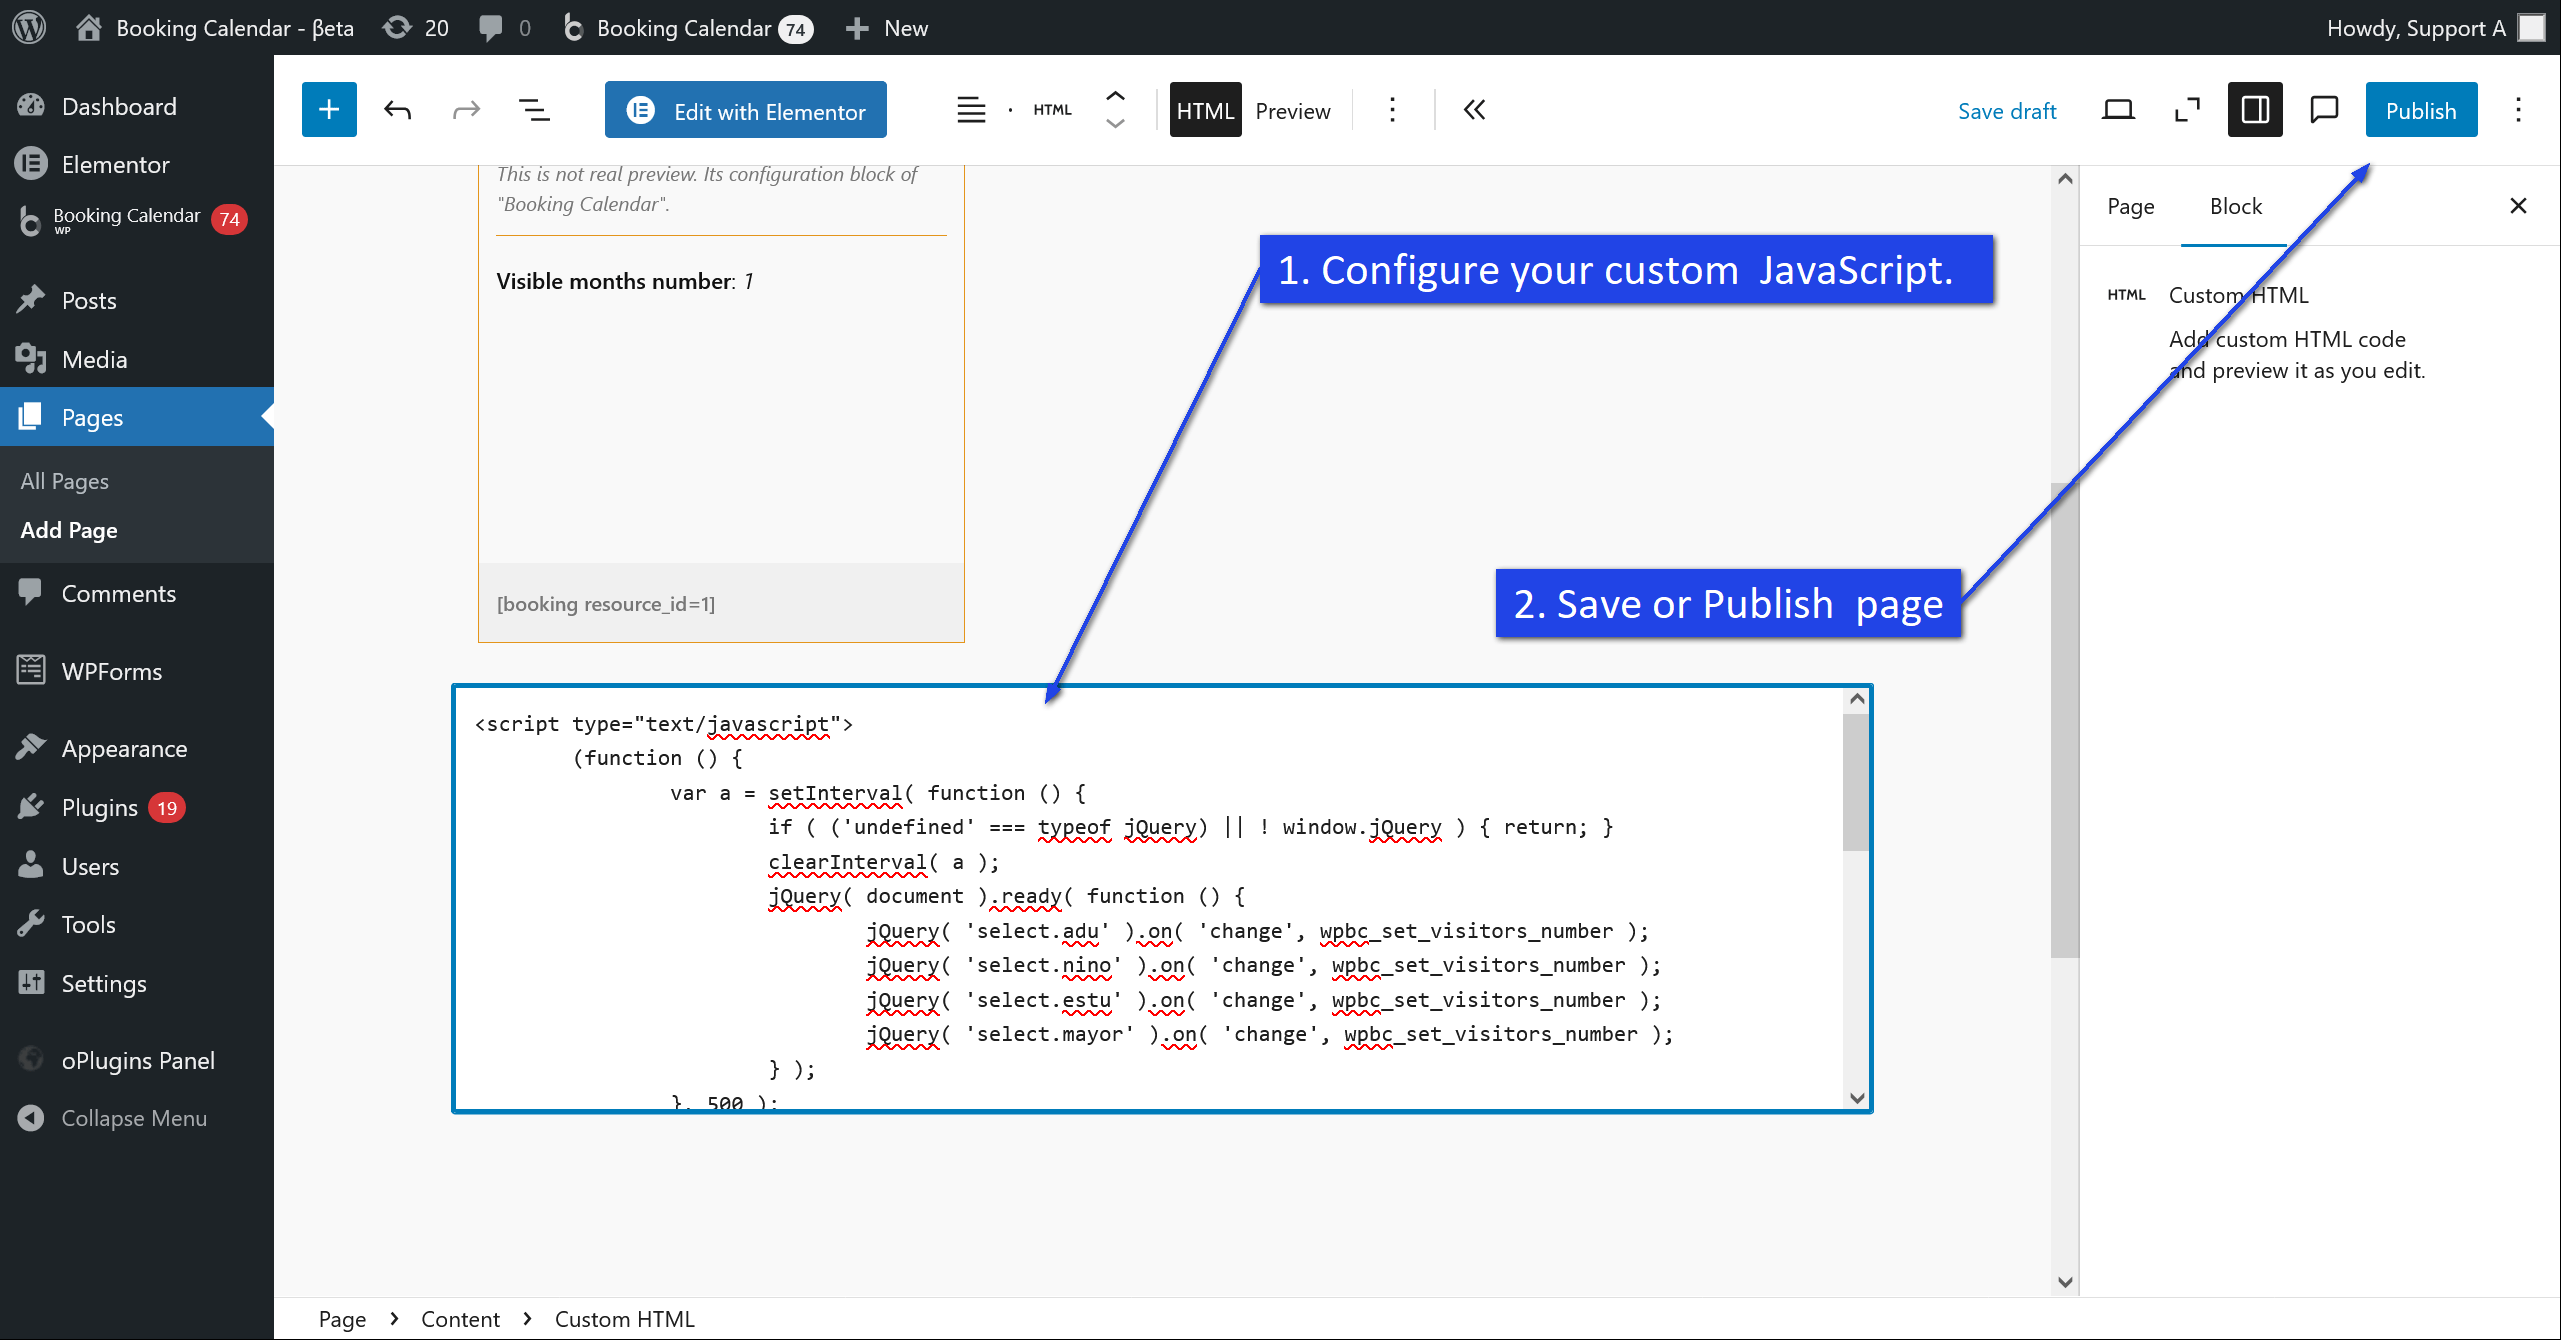
When would you use custom JavaScript?
You may want to add custom JavaScript for things like:
- showing or hiding extra elements,
- tracking events,
- changing field behavior,
- adding custom interactions after the form loads.
Important note
Do not place <script>
code directly inside the booking form configuration in Advanced Mode (code) on the WP Booking Calendar > Settings > Forms Builder page, because it will be blocked by the security validation.
Always add custom JavaScript on the page itself by using a Custom HTML block or another standard WordPress method for adding scripts.
Tip
If needed, you can place the Custom HTML block near the booking form on the same page, so your custom code works together with the published form.
You can Import / Export booking forms in the new "Drag and Drop Booking Form Builder" via JSON content.
1. Import.
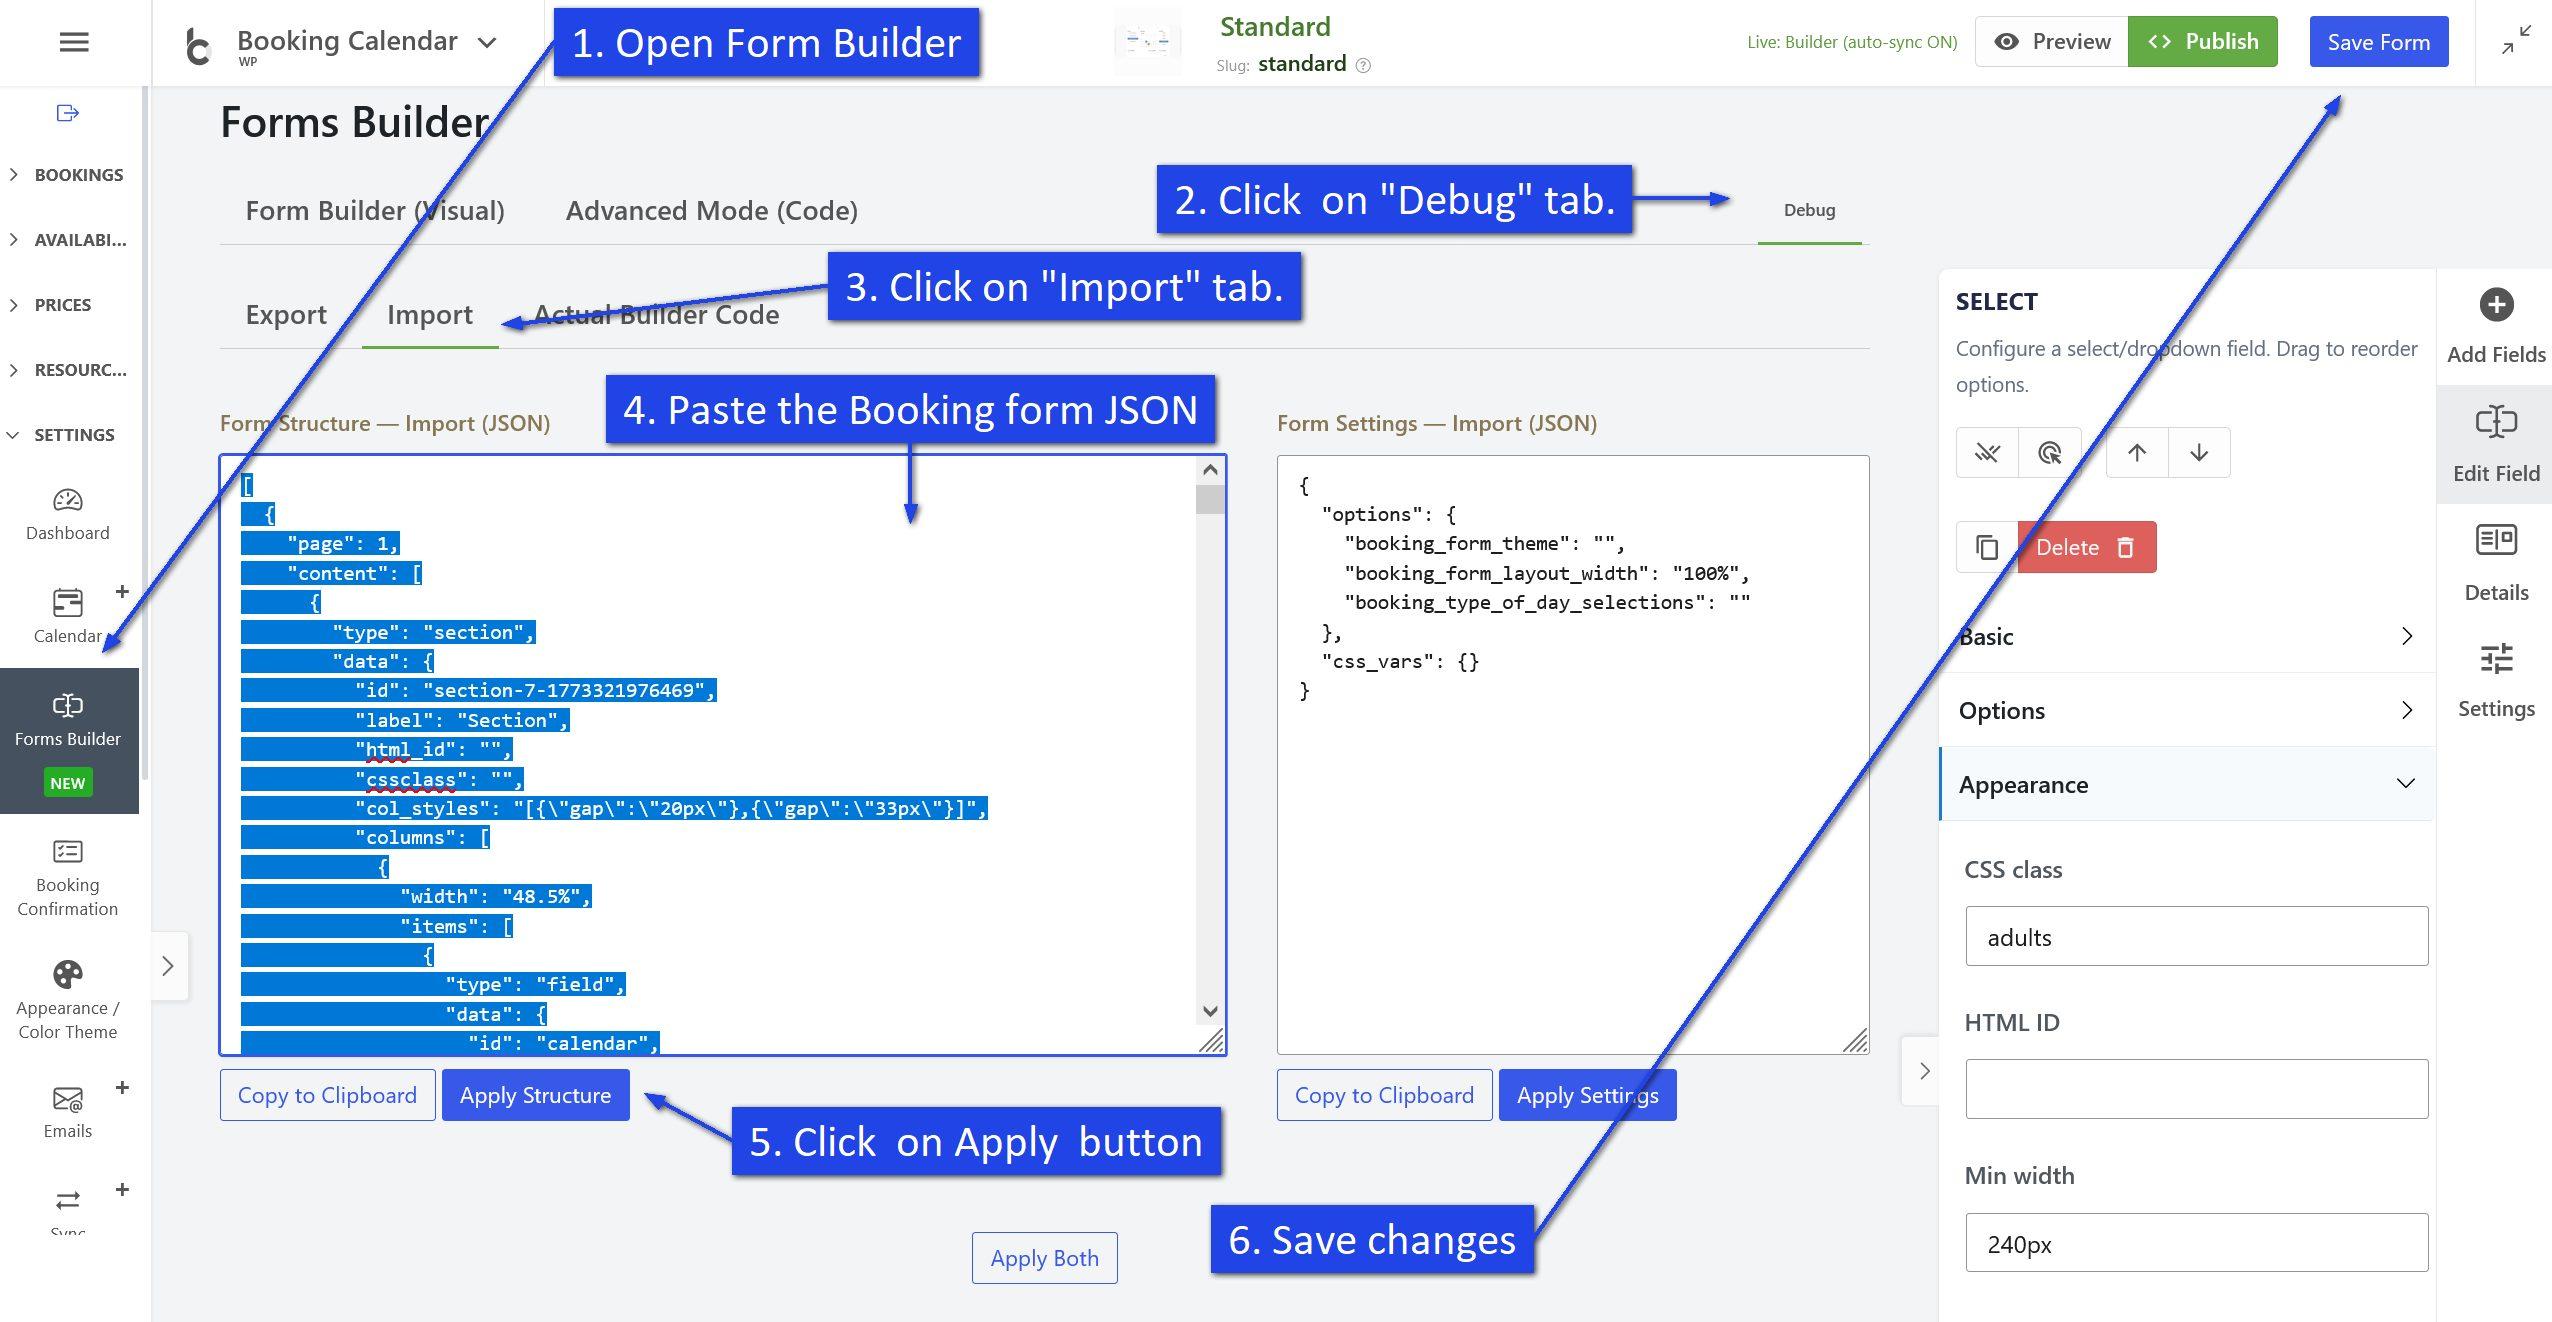
2. Export
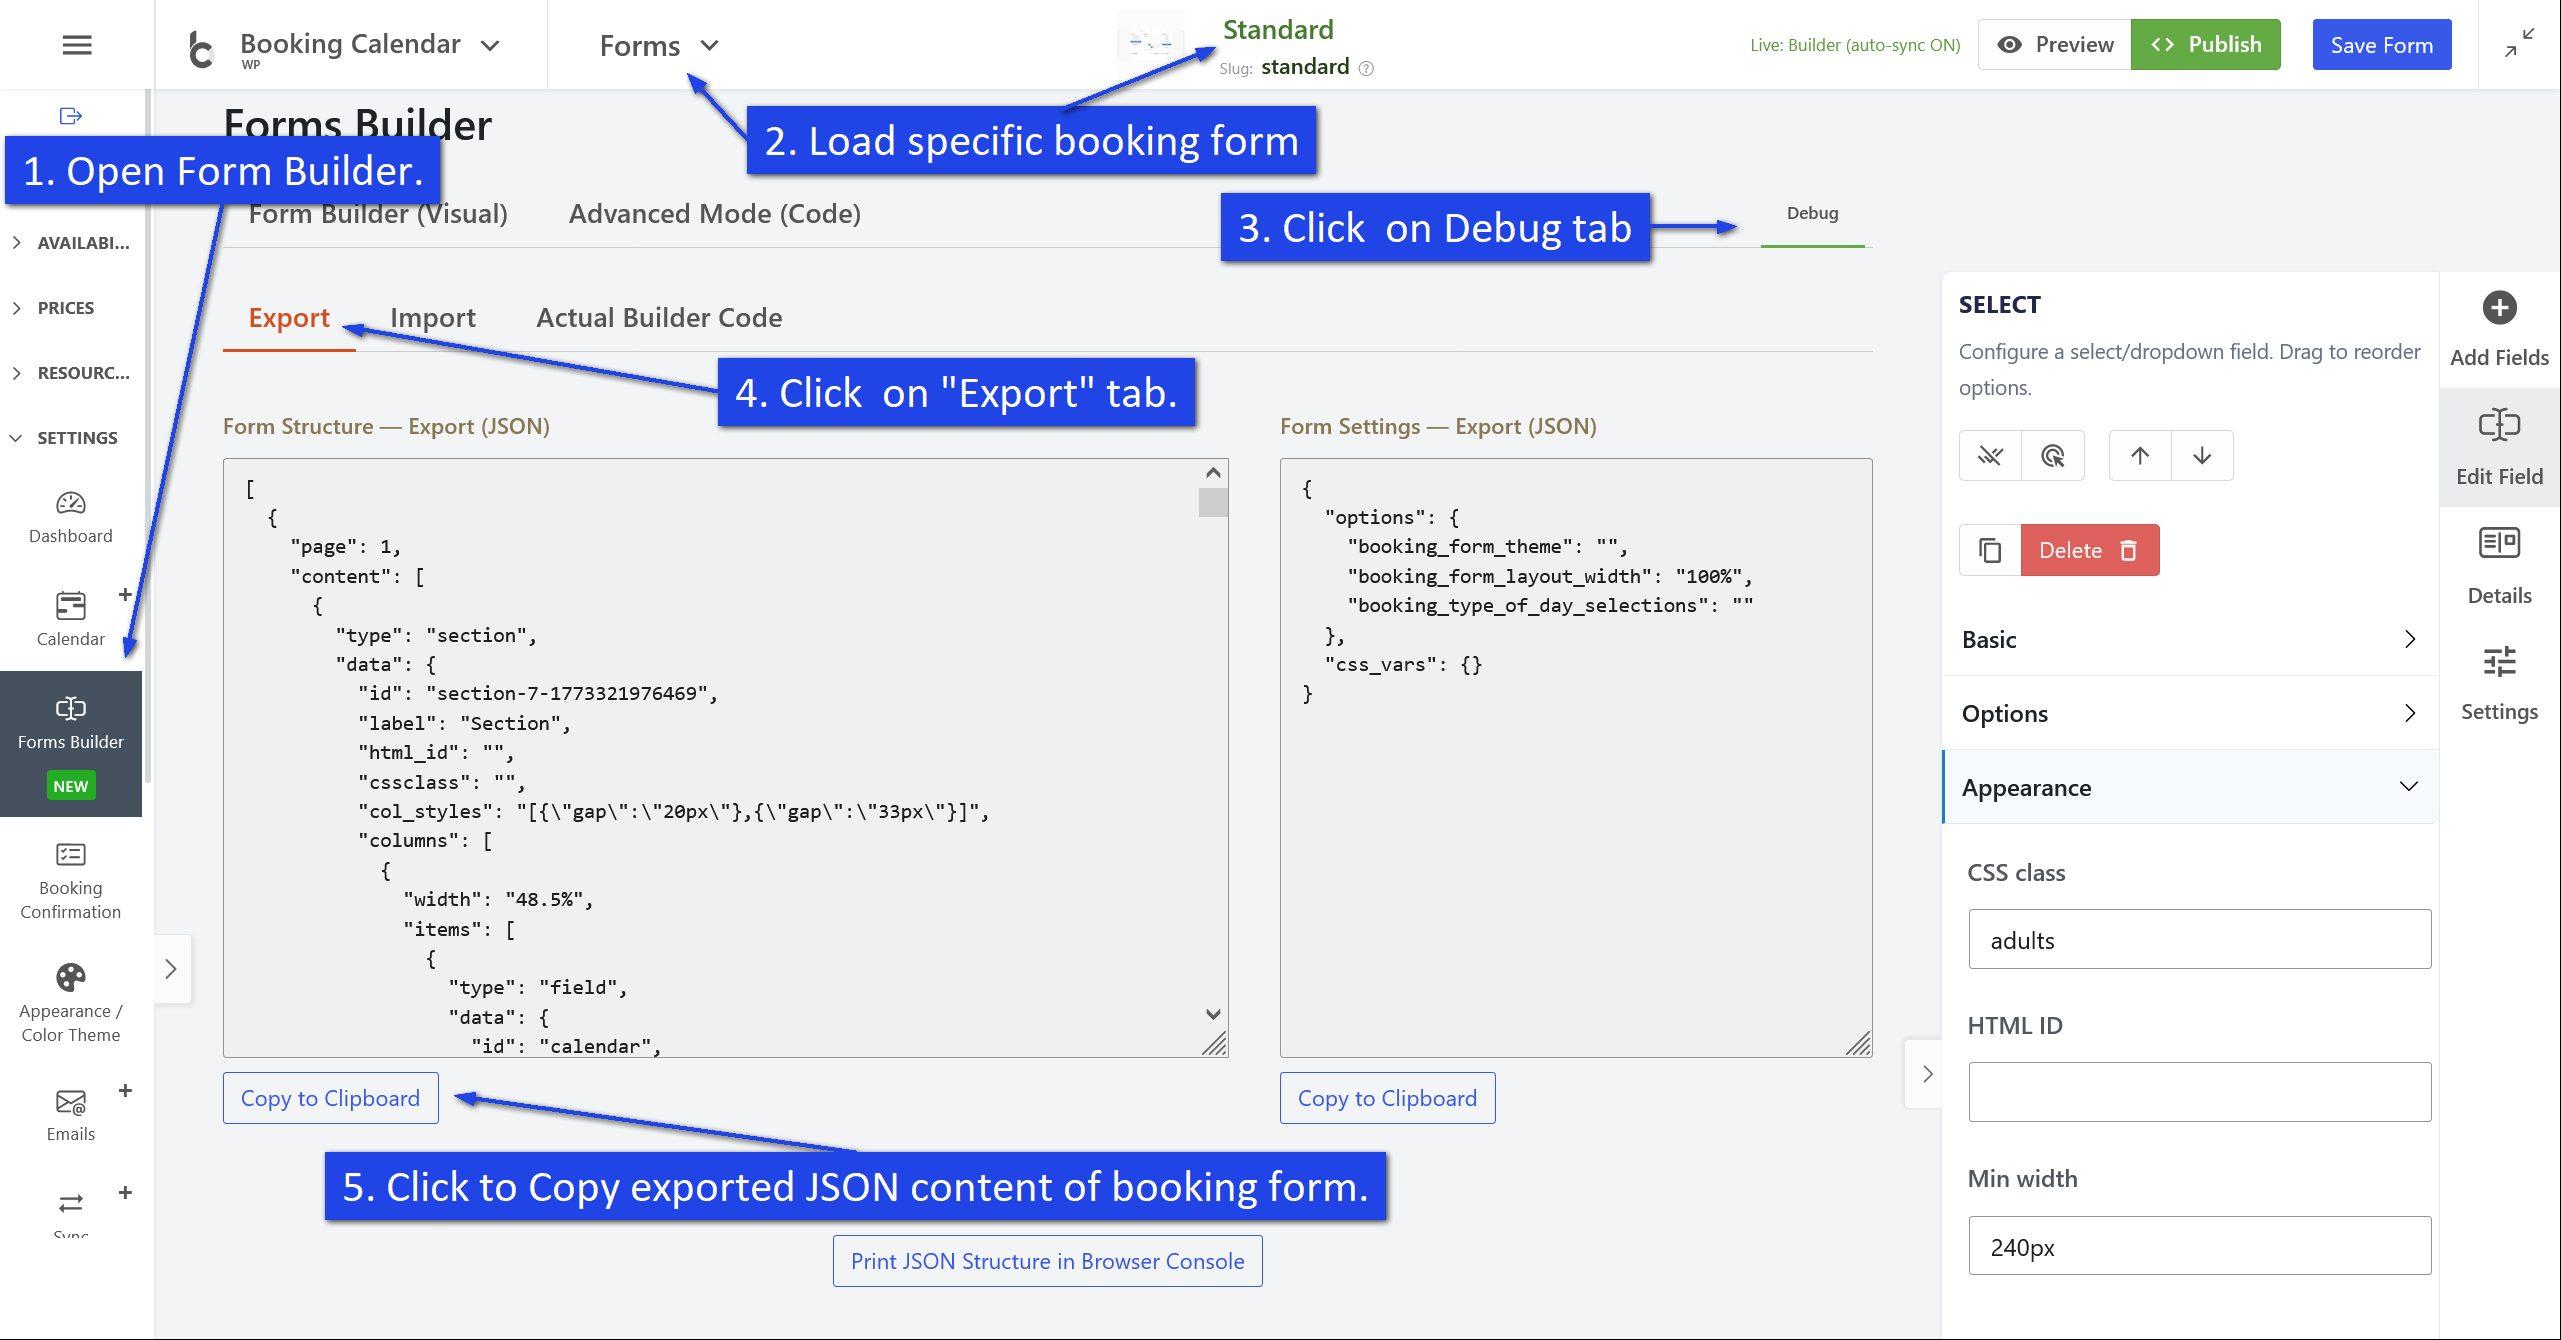
How can I delete a specific custom booking form?
If you want to delete a specific custom booking form, first load that exact form in the Form Builder, then use the Delete form option in the Details tab.
This helps you safely remove only the selected custom form from the database.
Step 1. Load the specific custom booking form you want to delete
Open the Form Builder (WP Booking Calendar > Settings > Forms Builder page) and click the Forms menu (at top toolbar) and then select Open option. In the popup, find the custom booking form you want to remove, select it, and click Load.

Step 2. Open the Details tab
After the selected custom booking form is loaded, open the Details tab in the right sidebar.
Step 3. Scroll to the Danger zone section
In the Form Details panel, scroll down until you see the Danger zone section.
Step 4. Click the Delete form button
Click the Delete form button to remove the currently loaded custom booking form from the database.
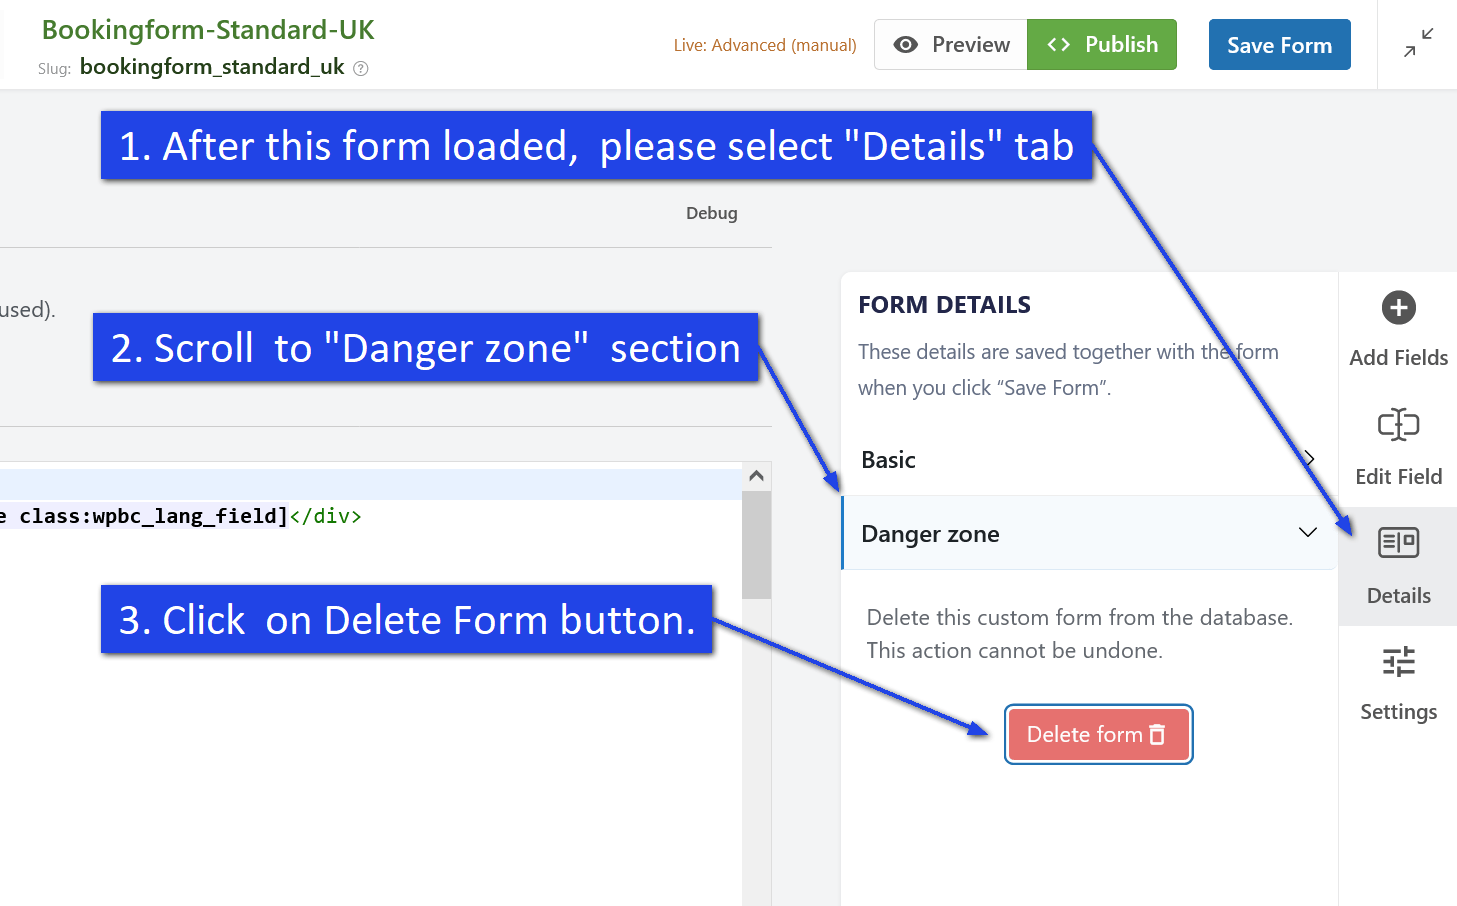
Important note
Be sure that you loaded the correct custom booking form before deleting it. The Delete form action removes only the form that is currently opened in the Form Builder.
Warning
Deleting a custom booking form cannot be undone. If you may need this form later, it is a good idea to create a copy or keep a backup before deleting it.
Tip
If you have many custom booking forms, use the search field in the Load Booking Form popup to quickly find the exact form you want to delete.
How to Configure Time Slots in AM/PM Format in Booking Calendar Form Builder
If you want to display your booking time slots in AM/PM format instead of 24-hour format, you can do it directly inside the Booking Calendar Form Builder.
This is useful for websites where visitors are more familiar with time formats such as 9:00 AM, 1:30 PM, or 6:00 PM.
Booking Calendar makes this setup quick and easy. You only need to select your time field, switch the time format to AM/PM, generate the time slots, and adjust them if needed.
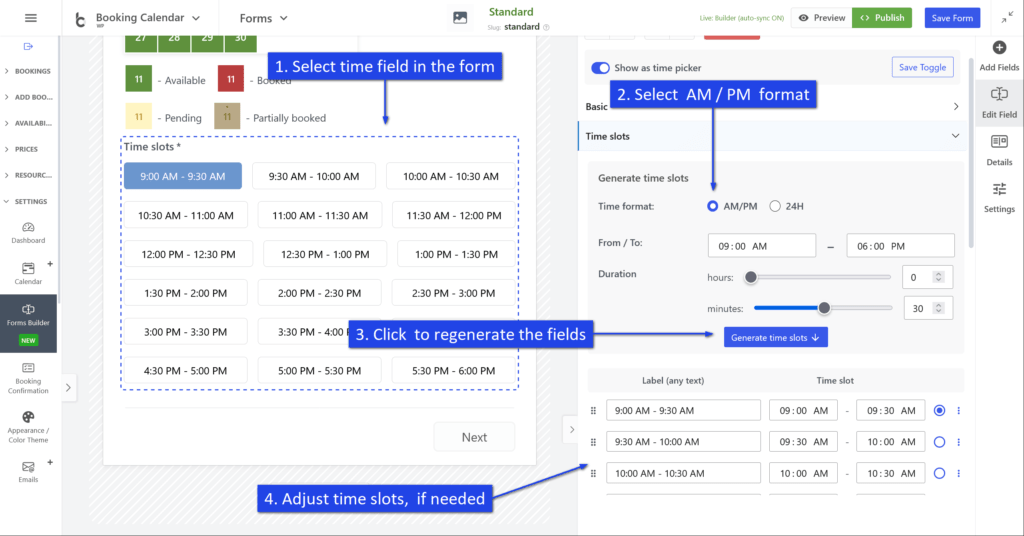
How to Set Time Slots in AM/PM Format
-
Select the time field in your form.
Open the Booking Calendar Form Builder and click the Time slots field in the form preview area. Once selected, its settings will appear in the right sidebar. -
Choose the AM/PM time format.
In the right sidebar, open the Time slots settings section. In the Time format option, select AM/PM. -
Set the working time range and slot duration.
Define the From / To time range for available appointments, for example from 09:00 AM to 06:00 PM.
After that, set the duration of each time slot using the hours and minutes controls, for example 30 minutes. -
Click “Generate time slots”.
After selecting the AM/PM format and setting the required time range and duration, click the Generate time slots button. The plugin will automatically create the list of time slots for you. -
Adjust the generated time slots if needed.
After generation, you can manually edit the slot labels and the exact start/end times. This is useful if you want to fine-tune your schedule or rename specific time slots. -
Save your form.
When everything looks correct, click Save Form to keep your changes.
Example
If you set:
- Time format: AM/PM
- From: 09:00 AM
- To: 06:00 PM
- Duration: 30 minutes
Booking Calendar can automatically generate time slots like:
- 9:00 AM - 9:30 AM
- 9:30 AM - 10:00 AM
- 10:00 AM - 10:30 AM
- 10:30 AM - 11:00 AM
- ...
Configure AM/PM Time Slots in Pro Version — Advanced Mode (Code)
If your form is configured in Advanced Mode (code), you can define time slots in AM/PM format by using the Title@@Value option format.
In this setup, the visitor sees a user-friendly label such as 09:00 AM - 09:30 AM, while Booking Calendar stores the internal value in strict 24-hour format, for example 09:00 - 09:30.
This is the recommended way to create AM/PM time-slot options in Advanced Mode.
Example Configuration
[calendar]

<r>
	<c><l>Select a time slot:</l><br />
	[selectbox rangetime
	"09:00 AM - 09:30 AM@@09:00 - 09:30"
	"09:30 AM - 10:00 AM@@09:30 - 10:00"
	"10:00 AM - 10:30 AM@@10:00 - 10:30"
	"10:30 AM - 11:00 AM@@10:30 - 11:00"
	"11:00 AM - 11:30 AM@@11:00 - 11:30"
	"11:30 AM - 12:00 PM@@11:30 - 12:00"
	"12:00 PM - 12:30 PM@@12:00 - 12:30"
	"12:30 PM - 01:00 PM@@12:30 - 13:00"
	"01:00 PM - 01:30 PM@@13:00 - 13:30"
	"01:30 PM - 02:00 PM@@13:30 - 14:00"
	]
	</c>
</r>

<r>
	<c>[submit "Send"]</c>
</r>
How It Works
- Before @@ — the visible title shown to visitors in AM/PM format.
- After @@ — the internal value saved by Booking Calendar in strict 24-hour format.
For example:
"01:30 PM - 02:00 PM@@13:30 - 14:00"This means the visitor sees 01:30 PM - 02:00 PM, but the saved booking value is 13:30 - 14:00.
Important Notes
- Use the reserved field name rangetime for a single time-slot range selector.
- Keep all saved values in strict 24-hour format.
- Use the Title@@Value format whenever you want to show friendly labels but save machine-friendly values.
Show Selected Value in Emails or Booking Details
You can use these shortcodes in booking details or email templates:
- [rangetime] — shows the stored 24-hour value
- [rangetime_val] — shows the visible AM/PM label selected by the visitor
Example:
<b>Selected time slot:</b> [rangetime_val]
<b>Stored value:</b> [rangetime]
How to Import Legacy Booking Forms into the New Drag and Drop Form Builder
If you updated Booking Calendar from an older version and started using the new Drag and Drop Booking Form Builder, please make sure that all your legacy booking forms have been imported into the new builder.
This is important because booking forms that were created in older versions of Booking Calendar may need to be converted before they can be edited and managed in the new Form Builder interface.
How to import all legacy booking forms
- Go to Booking > Settings > Form Builder.
- Open the Forms menu.
- Click Import all legacy forms.
- Wait until the import process is completed.
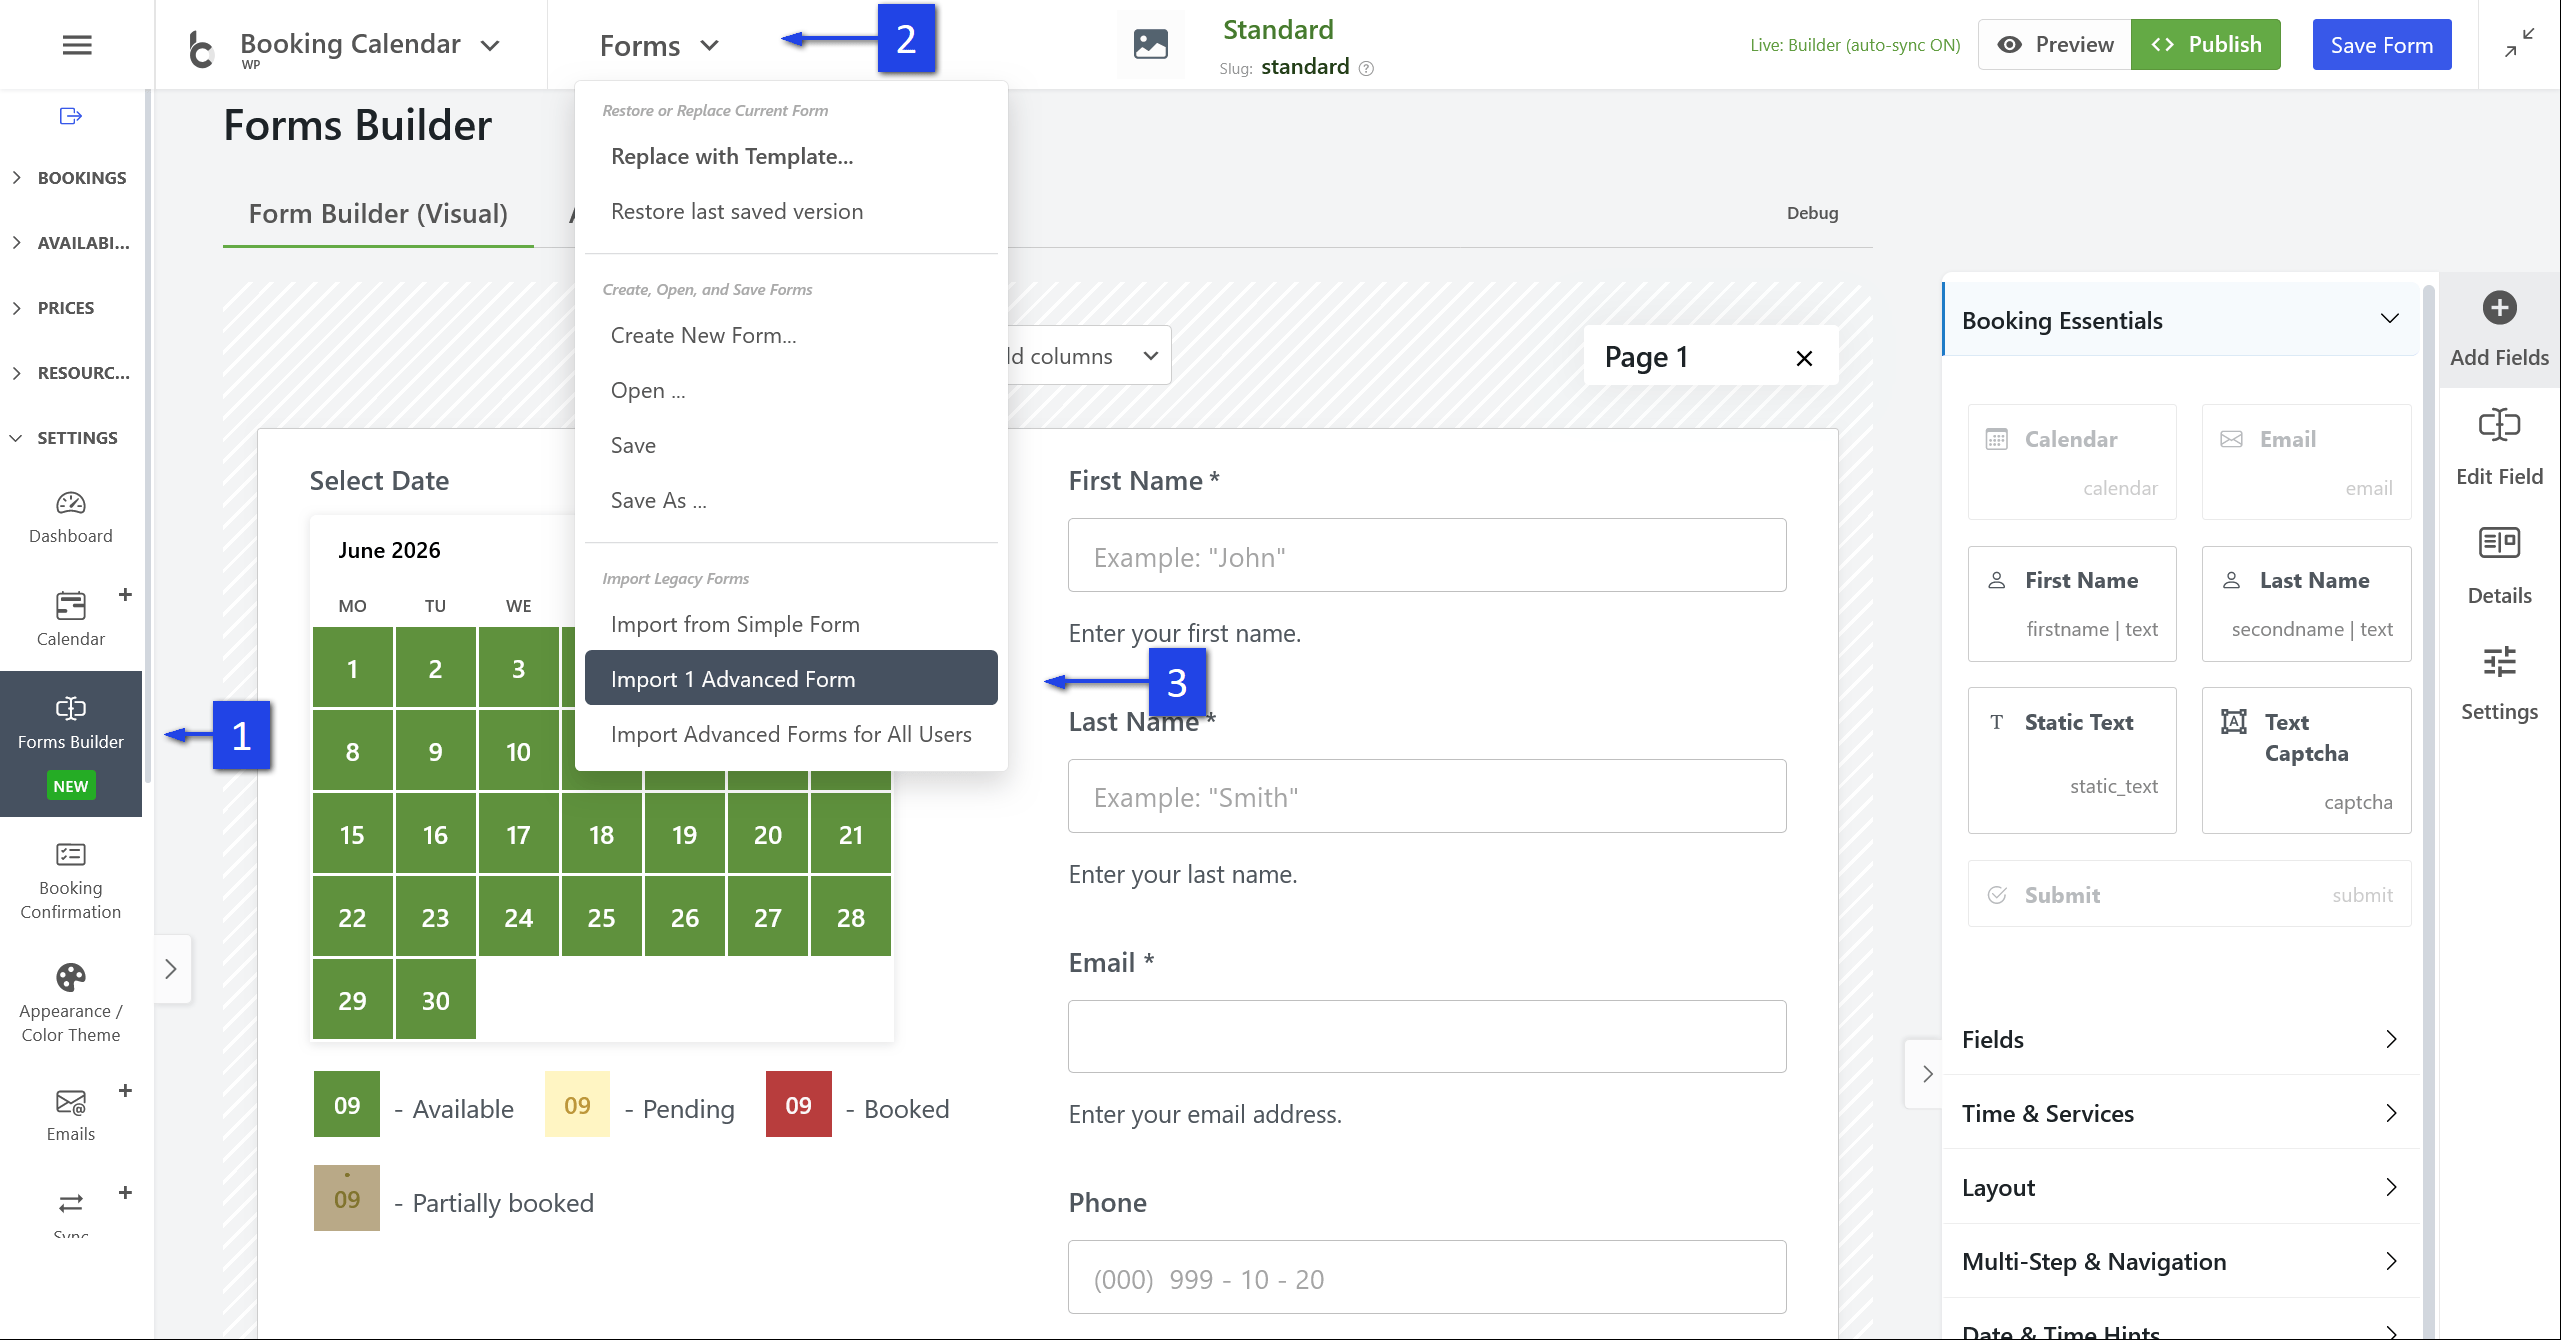
After the import is finished, your old booking forms should be available in the new Drag and Drop Booking Form Builder.
Important: clear your browser cache
Before testing the imported forms, please clear your browser cache. This helps ensure that your browser loads the latest Booking Calendar scripts, styles, and Form Builder interface.
If you do not clear the cache, the old cached files may still be used by your browser, and some changes may not appear correctly.
What to check after import
After importing your legacy forms, open each form in the new Form Builder and check that the fields, labels, email field, calendar field, submit button, and any custom form content are displayed correctly.
Then test the booking form on the front-end side of your website to make sure that visitors can submit bookings correctly.
Booking Form Setup - Advanced Mode
You can start customizing your booking form fields from one of the predefined booking form templates.
Go to WP Booking Calendar > Settings > Booking Form page. From the top toolbar, you can select one of the predefined form templates. Then click the reset button. Now customize your existing booking form with different shortcodes or customize the existing fields.

Preview of this booking form template:

This article explains the overall approach to building booking forms in “Advanced mode,” where you compose the form with shortcodes and simple layout tags.
- What is Advanced mode?
- Prerequisites & where to edit
- Layout tags (rows, columns, labels, spacer)
- The required [calendar] field
- How fields (shortcodes) work
- Option titles vs saved values (Title@@Value)
- Reserved field names (time & duration)
- Live “hint” outputs vs final outputs
- Conditional display by weekday/season
- Multilingual sections (WPML/qTranslate)
- Validation & special CSS classes
- Fields allowed only once per form
- Styling with id / class
- “Content of booking fields data”
- Starter templates
- Troubleshooting & best practices
1) What is Advanced mode?
Advanced mode lets you assemble the booking form with CF7‑style shortcodes and lightweight layout tags. You decide the structure (rows/columns) and insert field shortcodes where you want them to appear. This approach is powerful, fast, and copy‑paste friendly.
2) Prerequisites & where to edit
- Go to Booking → Settings → Form.
- Switch to the form you want to edit (or create a new one).
- Make sure you’re in the Advanced (shortcode) configuration area.
- For live pricing/date hints, ensure JavaScript/front‑end is not blocked by caching/minify conflicts.
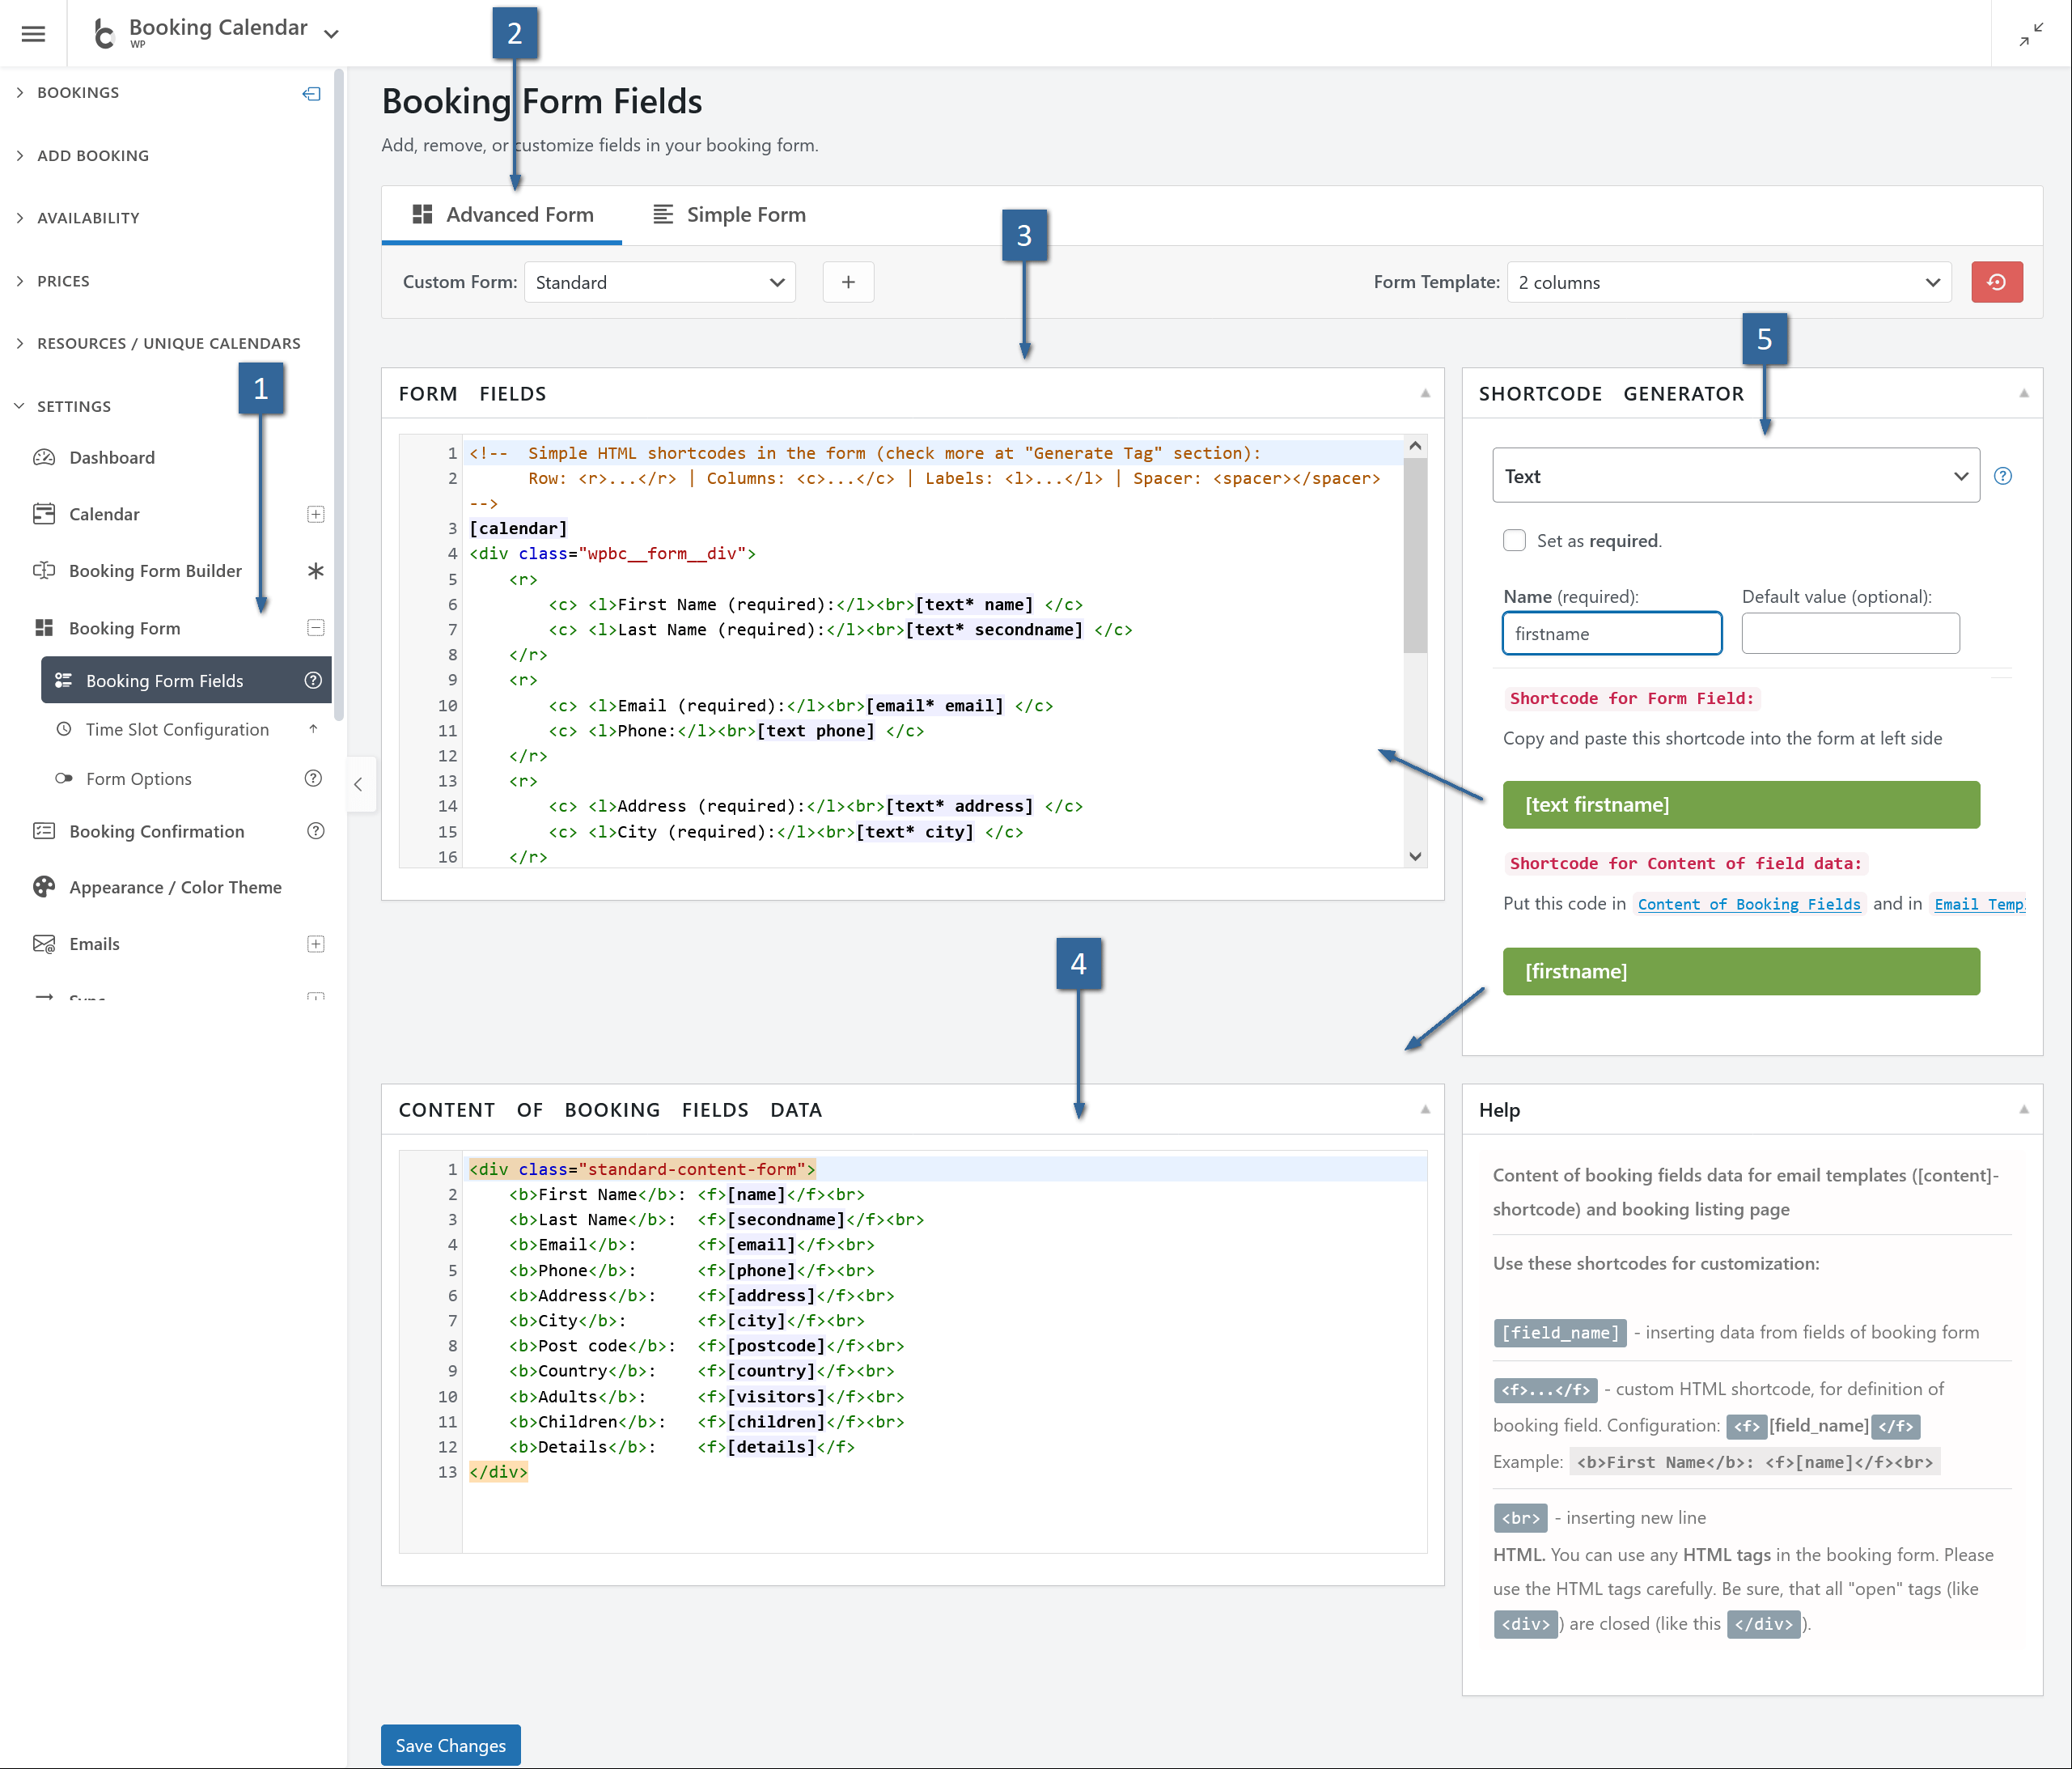
3) Layout tags (rows, columns, labels, spacer)
Use these HTML‑like helpers to build a clean grid without heavy markup:
<r>...</r>– a row (can hold 1–3 columns)<c>...</c>– a column (put labels/fields inside)<l>...</l>– a label wrapper for consistent styling<spacer>...</spacer>– spacing; content can be inline CSS likeheight:10px;orwidth:1em;
<r>
  <c><l>First Name (required):</l><br> [text* name]</c>
  <c><l>Last Name:</l><br> [text secondname]</c>
  <c><l>Email:</l><br> [email* email]</c>
</r>
<spacer>height:10px;</spacer><c> (e.g., flex, padding) for quick layouts.4) The required [calendar] field
The calendar is mandatory—no calendar, no dates, no booking. At least one [calendar] must be present:
[calendar]You can target specific resources (IDs) if enabled:
[calendar] [calendar id=2] [calendar id=3]5) How fields (shortcodes) work
A field shortcode has a type and a name (slug). Examples:
[text* name]           <!-- required text -->
[email* email]         <!-- primary visitor email (must exist) -->
[textarea details]     <!-- multi-line input -->
[selectbox visitors "1" "2" "3" "4"]- Required: add
*right after the type (e.g.,[text* ...]). - Naming: choose unique, simple names (lowercase, no spaces):
name,secondname,phone. - Output: in emails/listing, use the field name inside brackets to print its value (e.g.,
[name]).
6) Option titles vs saved values (Title@@Value)
Choice fields (selectbox/checkbox/radio) accept human‑readable titles but can store strict values using "Title@@Value" syntax.
[selectbox room_type "Single Room@@SGL" "Double Room@@DBL" "Suite@@STE"]
[room_type_val]  → "Double Room"
[room_type] → "DBL"7) Reserved field names (time & duration)
For time‑aware bookings, these names are special and should be used exactly:
rangetime— time ranges via selectbox, values asHH:MM - HH:MM(24h)starttime— start time (text or selectbox), valueHH:MMendtime— end time (text or selectbox), valueHH:MMdurationtime— duration (selectbox), valueHH:MM
[selectbox rangetime "10:00 AM - 12:00 PM@@10:00 - 12:00" "12:00 PM - 02:00 PM@@12:00 - 14:00"]
[selectbox starttime "8:00 AM@@08:00" "8:30 AM@@08:30"]
[selectbox endtime   "5:00 PM@@17:00" "6:00 PM@@18:00"]
[selectbox durationtime "30 min@@00:30" "1 hour@@01:00"]08:00 or 10:00 - 12:00.8) Live “hint” outputs vs final outputs
Hints are live, read‑only labels you place in the form to preview selections & prices. Final outputs are used in emails and booking details.
Live hints (in‑form)
- Prices:
[cost_hint],[original_cost_hint],[additional_cost_hint],[deposit_hint],[balance_hint],[coupon_discount_hint] - Dates/times:
[check_in_date_hint],[check_out_date_hint],[selected_dates_hint],[start_time_hint],[end_time_hint],[days_number_hint],[nights_number_hint], etc. - Resource/availability:
[resource_title_hint],[capacity_hint]
Final outputs (emails/listing)
Use the field names (e.g., [name], [email]) and static info like [bookingresource show='title'], [bookingresource show='cost']. For coupons: [discount].
9) Conditional display by weekday/season
Dynamically swap parts of the form based on which date the user selects.
[condition name="weekday-condition" type="weekday" value="*"]
  Default: [selectbox rangetime "10:00 - 11:00" "11:00 - 12:00"]
[/condition]
[condition name="weekday-condition" type="weekday" value="1,2"]
  Mon/Tue: [selectbox rangetime "10:00 - 12:00" "12:00 - 14:00"]
[/condition]

[condition name="season-times" type="season" value="High_season"]
  High season: [selectbox rangetime "10:00 - 12:00" "12:00 - 14:00" "14:00 - 16:00"]
[/condition]10) Multilingual sections (WPML/qTranslate)
Create language‑specific blocks right inside the form config:
[calendar]
<p>First Name: [text* name]</p>

[lang=fr_FR]
[calendar]
<p>Prénom : [text* name]</p>
And register arbitrary strings for translation with WPML:
[wpml]Some Text to translate[/wpml]11) Validation & special CSS classes
- Required: add
*after type:[text* name] - Email confirmation: second field must match primary via class:
[email* email_verify class:same_as_email](primary name isemail) - Digits only:
class:validate_as_digitor exact lengthclass:validate_digit_9,class:validate_digit_5, etc.
12) Fields allowed only once per form
[captcha][country][coupon discount][cost_corrections](admin Add‑booking only)[submit "…"](recommended one logical submit)
13) Styling with id / class
Most generated fields support optional HTML id and class attributes via the tag generator.
[text phone id:phone_input class:input input--lg]Add your CSS in theme styles or a customizer. Use <l> for consistent label styling.
14) “Content of booking fields data”
Configure how submitted data appears in the Booking List and in emails. Use field names inside brackets:
<div class="standard-content-form">
  <b>First Name</b>: <f>[name]</f><br>
  <b>Last Name</b>:  <f>[secondname]</f><br>
  <b>Email</b>:      <f>[email]</f><br>
  <b>Phone</b>:      <f>[phone]</f><br>
  <b>Adults</b>:     <f>[visitors]</f><br>
  <b>Children</b>:   <f>[children]</f><br>
  <b>Details</b>:    <f>[details]</f>
</div>..._hint) only inside the form. In emails/listings, use final outputs (field names and static resource shortcodes).15) Starter templates
Single‑step form (simple)
<r>
  <c>[calendar]</c>
  <spacer>width:40px;</spacer>
  <c>
    <r><c><l>First Name (required):</l><br>[text* name]</c></r>
    <r><c><l>Last Name (required):</l><br>[text* secondname]</c></r>
    <r><c><l>Email (required):</l><br>[email* email]</c></r>
    <r><c><l>Adults:</l><br>[selectbox visitors "1" "2" "3" "4"]</c></r>
    <r><c><l>Details:</l><br>[textarea details]</c></r>
    <r><c>[checkbox* term_and_condition use_label_element "I Accept term and conditions"]</c></r>
    <r><c>[captcha]</c></r>
    <hr />
    <r><c>[submit "Send"]</c></r>
  </c>
</r>
Step‑by‑step (wizard) with live hints
<div class="wpbc_wizard__border_container">
  <div class="wpbc_wizard_step wpbc_wizard_step1">
    <r>
      <c style="flex:1 1 160px;padding-right:20px;border-right:1px solid #ccc;">
        <l>Select Service *</l><br/><spacer>height:22px;</spacer>
        [selectbox durationtime "Service A (20 min)@@00:20" "Service B (30 min)@@00:30"]
      </c>
      <c style="flex:1 1 70%">
        <r style="gap:30px">
          <c><l>Select Date *</l><br/>[calendar]</c>
          <c><l>Select Time *</l><br/>[selectbox starttime "09:00" "09:30" "10:00"]</c>
        </r>
      </c>
    </r>
    <r><c>Date: <strong>[selected_dates_hint]</strong> | Time: <strong>[start_time_hint]</strong></c>
       <c>Total: <strong>[cost_hint]</strong></c></r>
    <r><c class="wpbc_aling_right"><a class="wpbc_button_light wpbc_wizard_step_button wpbc_wizard_step_2">Next</a></c></r>
  </div>

  <div class="wpbc_wizard_step wpbc_wizard_step2" style="display:none">
    <r><c><l>First Name *</l><br/>[text* name]</c><c><l>Last Name *</l><br/>[text* secondname]</c></r>
    <r><c><l>Email *</l><br/>[email* email]</c><c><l>Phone</l><br/>[text phone]</c></r>
    <r><c><l>Details</l><br/>[textarea details]</c></r>
    <r><c>[checkbox* term_and_condition use_label_element "I Accept term and conditions"]</c><c>[captcha]</c></r>
    <r><c class="wpbc_aling_right"><a class="wpbc_button_light wpbc_wizard_step_button wpbc_wizard_step_1">Back</a> [submit "Send"]</c></r>
  </div>
</div>
16) Troubleshooting & best practices
- Calendar missing? Add
[calendar]. Without it, date selection won’t work. - Primary email required: Include
[email* email]so notifications can be sent to visitors. - One‑per‑form fields: Don’t duplicate
[captcha],[country],[coupon discount],[cost_corrections]. - Time values strict: Use 24h format for
starttime/endtimeandrangetimevalues. - Use Title@@Value: When labels differ from machine values (e.g., “8:00 AM@@08:00”).
- Live vs final: Use
..._hinttags in the form; use final outputs (field names, resource shortcodes) in emails/listings. - Conditions: Always include a default
value="*"block; enable single‑day mode. - Validation: For confirmation email, add
class:same_as_emailto second field; for digits useclass:validate_as_digitorclass:validate_digit_9. - Legend: Place
[legend_items]near the calendar for clarity. - Testing checklist: Select dates → times → options → verify live totals → submit → confirm email/listing outputs.
This article explains how to use the Booking Calendar’s “Simple HTML tags” (layout tags) to structure your booking form in Advanced mode. These tags help you arrange fields into rows, columns, and other organized layouts without writing complex HTML or CSS.
1) What are layout tags?
Layout tags are special HTML-like wrappers that Booking Calendar parses and turns into styled containers in the booking form. They let you:
- Group fields in horizontal rows
- Divide rows into columns
- Add labels in a consistent style
- Create vertical or horizontal spacing
With this feature, you have the flexibility to design your booking form exactly as you need it. (Available in all paid versions).

2) The <r> row tag
Wraps one or more columns in a horizontal row. Typically used as the outer container for a set of columns:
<r>
  <c>[text* name]</c>
  <c>[text* secondname]</c>
</r>- Can hold 1–3 columns (more if your CSS allows)
- Each column will align side by side in responsive flexbox layout
3) The <c> column tag
Contains the actual field(s) or labels inside a row. Columns are flex children of <r> and can be styled individually.
<r>
  <c style="flex:1">[calendar]</c>
  <c style="flex:1">[textarea details]</c>
</r>flex or width to control column sizing.4) The <l> label tag
Wraps label text for consistent formatting across the form. Keeps labels visually aligned regardless of where you place them.
<l>First Name (required):</l><br>[text* name]- Can be placed inside any column
- Helps match label font and spacing site-wide
5) The <spacer> tag
Inserts horizontal or vertical space between elements. Accepts inline CSS for sizing:
<spacer>height:20px;</spacer>
<spacer>width:40px;</spacer>6) Nesting tags
You can nest layout tags to create complex structures:
<r>
  <c>
    <r>
      <c>[text first]</c>
      <c>[text last]</c>
    </r>
  </c>
  <c>[email* email]</c>
</r>7) Styling with inline CSS
Each layout tag can have a style attribute to fine-tune spacing, widths, or alignment:
<c style="flex:1;padding-right:15px">[text phone]</c>
<spacer>height:15px;</spacer>8) Example layouts
Two-column contact info row
<r>
  <c><l>First Name:</l><br>[text* name]</c>
  <c><l>Last Name:</l><br>[text* secondname]</c>
</r>
Calendar with sidebar
<r>
  <c style="flex:2">[calendar]</c>
  <spacer>width:20px;</spacer>
  <c style="flex:1">[cost_hint]<br>[submit "Book Now"]</c>
</r>
9) Shortcodes for "Content of booking fields data" form (located at bottom of WP Booking Calendar > Settings > Booking Form > Booking Form Fields page)
Simplified field data tag: <f>...</f>
Easily highlight field data by enclosing it within tags in the 'Content of booking fields data' section on the Booking > Settings > Form page: <f>...</f>
This will highlight the background of the field on the Booking Listing page. (All Pro Versions). For example <f>[secondname]</f>
10) Best practices & tips
- Always start with
<r>for structured content — it prevents accidental stacking issues. - For equal-width columns, set
flex:1on each<c>. - Combine
<l>with<br>before the field for consistent label-to-input spacing. - Use
<spacer>instead of empty rows or for cleaner markup. - Test on mobile to ensure columns stack correctly in narrow viewports.
This article explains how to use the standard booking form field shortcodes in Booking Calendar’s Advanced (CF7-style) form mode. These shortcodes define the fields users fill out when making a booking. You can customize them with parameters for default values, placeholder text, sizes, CSS styling, and more.
1) Text field – [text]
Single-line text input.
Minimal example:
[text first_name ""]Example with size, maxlength, placeholder, and CSS class:
[text firstname 10/30 id:fname class:input-lg placeholder:Your_name "John"]- 10 = size (optional)
- 30 = maxlength (optional)
placeholder:Your_name— underscores replace spaces
2) Textarea – [textarea]
Multi-line text area.
Minimal example:
[textarea comments ""]Example with columns, rows, placeholder:
[textarea details 40/5 placeholder:Enter_details_here]- 40 = columns (optional)
- 5 = rows (optional)
placeholder:Enter_details_here— underscores replace spaces
3) Select box – [selectbox]
Dropdown menu for single choice.
Overview & option values (Title@@Value)
Each option has a display title and an optional stored value in Title@@Value format. If no
@@Valueis given, the title is used as value.
Minimal example:
[selectbox service "Cleaning" "Consultation" "Other"]Example with default value and custom IDs/classes:
[selectbox service default:CONSULT id:svc class:input-md
"Cleaning@@CLEAN" "Consultation@@CONSULT" "Other@@OTHER"]
4) Checkbox – [checkbox]
Multiple selectable options (user can choose several).
Overview & option values (Title@@Value)
Same Title@@Value format as select boxes. Note: The default: parameter supports only a single value for checkboxes.
Minimal example:
[checkbox extras "WiFi" "Parking" "Breakfast"]Example with default and stored values:
[checkbox extras default:opt_wifi
"WiFi@@opt_wifi" "Parking@@opt_parking" "Breakfast@@opt_breakfast"]
5) Radio buttons – [radio]
List of mutually exclusive options (user picks one).
Overview & option values (Title@@Value)
Same Title@@Value format as select boxes. Use default: with the stored value you want pre-selected.
Minimal example:
[radio gender "Male" "Female"]Example with default and stored values:
[radio gender default:option_b "Option A@@option_a" "Option B@@option_b"]6) Captcha – [captcha]
Generates a built-in anti-spam verification code.
Minimal example:
[captcha]7) Submit button – [submit]
Button to send the booking form.
Minimal example:
[submit "Send Booking"]Example with ID and class:
[submit id:submit-btn class:btn-primary "Book Now"]8) Additional field parameters
id:HTMLID— custom HTMLidattribute.class:CSS_CLASS— custom CSS class for styling.placeholder:Your_text— for text/textarea; use underscores for spaces.use_label_element— wraps inputs in<label>.label_first— shows label before input (for radio/checkbox).- Size & maxlength:
size/maxlengthfor text;cols/rowsfor textarea.
9) Using “Content of booking fields data” form
This form is located at the bottom of WP Booking Calendar → Settings → Booking Form → Booking Form Fields (right after the booking form configuration form).
It defines how booking data appears in:
- The “Booking Data” column on the booking listing page.
- Email templates when you use the
[content]shortcode.
Rules:
- Use
[field_name]to insert the value of a specific booking form field. - You can use HTML for formatting (e.g.,
<b>,<br>), but avoid heavy layouts. - Each
[field_name]must match the field name from your booking form configuration above.
Example:
<div class="standard-content-form">
<b>First Name</b>: <f>[name]</f><br>
<b>Last Name</b>: <f>[secondname]</f><br>
<b>Email</b>: <f>[email]</f><br>
<b>Phone</b>: <f>[phone]</f><br>
<b>Adults</b>: <f>[visitors]</f><br>
<b>Children</b>: <f>[children]</f><br>
<b>Details</b>: <f>[details]</f>
</div>This article explains how to use the [calendar] shortcode in Booking Calendar’s Advanced (CF7-style) form mode. It also clarifies an important rule: in the form editor, you typically use [calendar] with no parameters. Calendar behavior parameters belong to the page/post shortcode [booking], not inside the form.
- What is the
[calendar]shortcode? - Where to place this shortcode
- Where parameters actually go (
[booking]) - Selection modes (single, multiple, range)
- Integrating dates with time fields
- Live “hint” outputs to show selections & costs
- Capacity counters & legend
- Showing different content by weekday/season
- Examples (form editor vs page/post)
- Best practices & common pitfalls
- More information
1) What is the [calendar] shortcode?
The [calendar] shortcode inserts the interactive month-view booking calendar directly into your booking form. It lets visitors select available dates and automatically blocks unavailable ones. It’s the core element of any Booking Calendar form.
2) Where to place this shortcode
Add [calendar] inside your form layout at WP Booking Calendar → Settings → Booking Form → Booking Form Fields. Place it within your layout tags so it appears exactly where you want.
<r>
  <c><l>Select Date *</l><br>[calendar]</c>
  <c><l>Notes</l><br>[textarea details]</c>
</r>[calendar] only once per form. If your setup allows multiple resources on the same page, these are controlled by page/post parameters (see next section).3) Where parameters actually go ([booking])
When you publish your form on a page/post, use [booking] with parameters. That’s where you control calendar behavior (resource, months to show, etc.). Keep [calendar] in the form editor without parameters.
Example – page/post shortcode:
[booking resource_id=1]Example – form editor content:
[calendar]For the full list of supported [booking] parameters, see the official guide: Shortcode: Booking Form – Parameters & Usage
4) Selection modes (single, multiple, range)
Depending on your settings in WP Booking Calendar → Settings → Calendar → Calendar Settings, the calendar can allow:
- Single — pick one date (appointments)
- Multiple — pick several non-consecutive dates
- Range — pick a continuous date range (rentals)
5) Integrating dates with time fields
Pair the calendar with reserved time field names to capture times:
[selectbox starttime "09:00" "09:30" "10:00" ...]— start time list[selectbox endtime "17:00" "17:30" "18:00" ...]— end time list[selectbox rangetime "10:00 AM - 12:00 PM@@10:00 - 12:00" ...]— predefined ranges (value must be 24-hour format)[selectbox durationtime "30 min@@00:30" "1 hour@@01:00" ...]— duration values inHH:MM
starttime, endtime, rangetime, durationtime) require strict 24h values.starttime, you must also use endtime or durationtime. The rangetime field is used by itself.6) Live “hint” outputs to show selections & costs
Show read-only hints near the calendar to reflect selections and costs in real time:
- Dates/times:
[selected_dates_hint],[start_time_hint],[end_time_hint],[days_number_hint],[nights_number_hint] - Costs:
[cost_hint],[original_cost_hint],[additional_cost_hint],[deposit_hint],[balance_hint],[coupon_discount_hint] - Resource:
[resource_title_hint],[capacity_hint]
7) Capacity counters & legend
If your resource has capacity, display remaining slots with [capacity_hint]. Add a legend so users understand calendar colors/status:
[legend_items]
[legend_items items="available,unavailable,pending,approved,partially"]
[legend_items is_vertical="1"]
Or enable the default legend list in WP Booking Calendar → Settings → Calendar → Calendar Settings.
8) Showing different content by weekday/season
Use [condition] blocks to adjust form content by weekday or season. Example switching time ranges by weekday:
[condition name="weekday-condition" type="weekday" value="*"]
  Default: [selectbox rangetime "10:00 - 11:00" "11:00 - 12:00"]
[/condition]
[condition name="weekday-condition" type="weekday" value="1,2"]
  Mon/Tue: [selectbox rangetime "10:00 - 12:00" "12:00 - 14:00"]
[/condition]9) Examples (form editor vs page/post)
Form editor
<r>
  <c><l>Select Date *</l><br>[calendar]</c>
  <c><l>Select Time *</l><br>[selectbox starttime "09:00" "09:30" "10:00"]</c>
</r>
<r>
  <c>Date: <strong>[selected_dates_hint]</strong></c>
  <c>Total: <strong>[cost_hint]</strong></c>
</r>
Page/Post
[booking resource_id=1]The form itself still contains only [calendar].
10) Best practices & common pitfalls
- Include exactly one
[calendar]per form. - Keep time values in 24h format; use
Title@@Valueto show friendly labels. - Place hints for instant confirmation; use final outputs in emails and booking listings.
- Add
[legend_items]or enable the default legend for clarity. - For multilingual forms, wrap blocks with
[lang=LOCALE].
11) More information
Full list of page/post [booking] parameters: Shortcode: Booking Form – Parameters & Usage
This article explains how to use all time-related shortcodes in Booking Calendar’s Advanced (CF7-style) form mode. It covers both text inputs and selectbox variants for start time, end time, duration, and range selection — including strict 24-hour formats, conditional time lists, and how to output values in emails/listings.
- Reserved field names & formats
- [selectbox rangetime] — Time ranges (select)
- Overview & option values (
Title@@Value) - [selectbox starttime] — Start time (select)
- [selectbox endtime] — End time (select)
- [selectbox durationtime] — Duration (select)
- Live “hint” outputs for times
- [starttime] — Start time (text)
- [endtime] — End time (text)
- Conditional time lists by weekday/season
- Using values in “Content of booking fields data”
- Best practices & tips
1) Reserved field names & formats
starttime— the booking start timeendtime— the booking end timedurationtime— the booking durationrangetime— a start–end time range as one choice
HH:MM, ranges as HH:MM - HH:MM. Example: 08:30, 10:00 - 12:00.starttime, also include endtime or durationtime. The rangetime field is used by itself.2) [selectbox rangetime] — Time ranges (select)
Each option defines a label and a strict 24h range value using Title@@Value.
Minimal example:
[selectbox rangetime
"10:00 AM - 12:00 PM@@10:00 - 12:00"
"12:00 PM - 02:00 PM@@12:00 - 14:00"
"02:00 PM - 04:00 PM@@14:00 - 16:00"][rangetime] and the human label via [rangetime_val].3) Overview & option values (Title@@Value)
- Use
"Title@@Value"to show a friendly label but store a clean machine value.
4) [selectbox starttime] — Start time (select)
Minimal example (fixed list):
[selectbox starttime "08:00" "08:30" "09:00" "09:30" "10:00"]With ID/class:
[selectbox starttime id:start_sel class:time-select
"08:00" "08:30" "09:00" "09:30" "10:00"]
With friendly titles using Title@@Value:
[selectbox starttime
"8:00 AM@@08:00" "8:30 AM@@08:30" "9:00 AM@@09:00"]
5) [selectbox endtime] — End time (select)
Minimal example (hourly):
[selectbox endtime "09:00" "10:00" "11:00" "12:00" "13:00" "14:00" "15:00" "16:00" "17:00" "18:00"]6) [selectbox durationtime] — Duration (select)
Minimal example:
[selectbox durationtime "15 min@@00:15" "30 min@@00:30" "45 min@@00:45" "1 hour@@01:00" "1 hour 30 min@@01:30"]With ID/class:
[selectbox durationtime id:dur class:time-select
"15 min@@00:15" "30 min@@00:30" "45 min@@00:45" "1 hour@@01:00"]HH:MM (e.g., 01:30).7) [starttime] — Start time (text)
Minimal example:
[starttime]8) [endtime] — End time (text)
Minimal example:
[endtime]9) Live “hint” outputs for times
Available only in: Booking Calendar Business Medium or higher versions.
[start_time_hint]— selected start time[end_time_hint]— selected end time[selected_timedates_hint]— selected dates with times[selected_short_timedates_hint]— short format
<div class="form-hints">
Time: <strong>[start_time_hint] - [end_time_hint]</strong>
</div>
10) Conditional time lists by weekday/season
Available only in: Booking Calendar Business Medium or higher versions.
Swap time options depending on the selected date’s weekday or season filter.
[condition name="weekday-condition" type="weekday" value="*"]
  Default: [selectbox rangetime "10:00 - 11:00" "11:00 - 12:00"]
[/condition]
[condition name="weekday-condition" type="weekday" value="1,2"]
  Mon/Tue: [selectbox rangetime "10:00 - 12:00" "12:00 - 14:00"]
[/condition]

[condition name="season-times" type="season" value="High_season"]
  High season: [selectbox rangetime "10:00 - 12:00" "12:00 - 14:00" "14:00 - 16:00"]
[/condition]11) Using values in “Content of booking fields data”
At the bottom of WP Booking Calendar → Settings → Booking Form → Booking Form Fields, configure how time values appear in the Booking List and emails.
- Print field values by name:
[starttime],[endtime],[durationtime],[rangetime] - For selectboxes with titles, use
[_val]to print the human label: e.g.,[rangetime_val],[starttime_val]
Example:
<div class="standard-content-form">
<b>Start</b>: <f>[starttime]</f><br>
<b>End</b>: <f>[endtime]</f><br>
<b>Duration</b>: <f>[durationtime]</f><br>
<b>Range</b>: <f>[rangetime_val] (<small>[rangetime]</small>)</f>
</div>
12) Best practices & tips
- Choose one approach: start+end (with optional duration) or a single rangetime field.
- Keep values strictly 24-hour. Match
default:to the stored value (after@@). - Use
Title@@Valuefor friendly labels while storing clean 24-hour values. - Place live hints next to the calendar to confirm selections before submission.
- Leverage
[condition]blocks to show different time lists by weekday/season. - Test overlaps and business rules (e.g., minimum durations, closing times) against your resource settings.
This article explains how to use all cost, date, and other hint shortcodes in Booking Calendar’s Advanced (CF7-style) form mode. These shortcodes let you show live-calculated booking costs, selected dates/times, remaining capacity, and booking resource info directly in your form or in confirmation messages.
1) Cost-related shortcodes
Available only in: Booking Calendar Business Medium or higher versions.
[cost_hint]— Full cost of the booking.[original_cost_hint]— Cost for the selected dates only (without additional costs).[additional_cost_hint]— Additional cost that depends on selected form fields.[deposit_hint]— Deposit cost of the booking (if deposits are enabled).[balance_hint]— Remaining balance (total cost minus deposit).[coupon_discount_hint]— Coupon discount value applied to the booking.
For example, if you have an extra cost for my_tax, you can use: [my_tax_hint] in your form to display that extra cost. The pattern is: add _hint to the field name from the Form Options Costs page.
Example usage inside a form:
<div class="cost-summary">
    Total: <strong>[cost_hint]</strong><br>
    <div style="display:none;">[checkbox my_tax default:on ""]</div>
    Tax: [my_tax_hint]
</div>
2) Date & time hint shortcodes
Available only in: Booking Calendar Business Medium or higher versions.
[check_in_date_hint]— Selected check-in date. Example: 11/25/2025[check_out_date_hint]— Selected check-out date. Example: 11/27/2025[check_out_plus1day_hint]— Check-out date + 1 day. Example: 11/28/2025[start_time_hint]— Selected start time. Example: 10:00[end_time_hint]— Selected end time. Example: 12:00[selected_dates_hint]— All selected dates (full format). Example: 11/25/2025, 11/26/2025, 11/27/2025[selected_timedates_hint]— All selected dates with times. Example: 11/25/2025 10:00, 11/27/2025 12:00[selected_short_dates_hint]— All selected dates (short format). Example: 11/25/2025 - 11/27/2025[selected_short_timedates_hint]— All selected dates with times (short format). Example: 11/25/2025 10:00 - 11/27/2025 12:00[days_number_hint]— Number of selected days. Example: 3[nights_number_hint]— Number of selected nights. Example: 2[cancel_date_hint]— Date 14 days before check-in. Example: 11/11/2025[pre_checkin_date_hint]— Date N days before check-in (N set in shortcode options).
3) Other hint shortcodes
[capacity_hint]— Remaining available slots for selected dates/times (when capacity is enabled).[resource_title_hint]— Title of the booking resource.[bookingresource show='id']— Resource ID.[bookingresource show='title']— Resource title.[bookingresource show='cost']— Resource cost.
4) Version limitations
All shortcodes listed in this article are only available in Booking Calendar Business Medium or higher versions. They will not work in Free, Personal, or Small Business editions.
5) Using in “Content of booking fields data”
At the bottom of WP Booking Calendar → Settings → Booking Form → Booking Form Fields, you can insert these shortcodes in the “Content of booking fields data” area to include live-calculated costs, selected dates, or other hints in booking lists and emails.
Example content template:
<div class="booking-info">
    <b>Dates</b>: [selected_short_dates_hint]<br>
    <b>Total Cost</b>: [cost_hint]<br>
    <b>Deposit</b>: [deposit_hint] — <b>Balance</b>: [balance_hint]<br>
    <b>Capacity</b>: [capacity_hint]
</div>
6) Best practices & tips
- Use cost hints near the “Submit” button so customers clearly see the final cost before booking.
- For
_hintextras (like[my_tax_hint]), ensure the extra cost is configured in WP Booking Calendar > Prices > Form Options Costs settings. - Combine date hints with time hints for complete booking details.
- Test your form to confirm all hint values update live as selections change.
This FAQ explains a set of additional Booking Calendar shortcodes available in Advanced Mode
(CF7‑style syntax). These include the [country] dropdown, multi‑language form
sections, admin‑only cost correction, coupon fields, step timelines, email verification, and numeric‑only
validation.
1) [country] — Country selection dropdown
Purpose: Displays a dropdown list of countries for the visitor to select from.
Syntax: [country]
Parameters:
"CC"(optional) — 2‑letter ISO country code to set as the default selected country.
Examples:
[country "US"]“United States” selected by default. [country "FR"] → “France” selected by default.
Behavior:
- Country list comes from
../wp-plugins/booking/languages/wpdev-country-list.php— can be customized there. - Shows all countries in a standard dropdown.
- Only one
[country]field can be used in the form. - If no code is specified, the first country in the list will be selected by default.
- Field name is fixed — cannot be renamed.
Example in form layout:
<r> <c><l>Country:</l><br>[country "US"]</c></r>Example in email template: Country: [country]
2) [lang=LOCALE] — Multi‑language form sections
Purpose: Starts a new translation block in a specific language. Everything after [lang=LOCALE] until the next [lang=...] tag (or
end of form) will only be shown when the booking form is displayed in that locale.
Note: LOCALE format is language_COUNTRY, e.g., fr_FR, es_ES.
Example: English + French form
		[calendar]
		<p>First Name (required): [text* name] </p>
		<p>Last Name (required): [text* secondname] </p>
		<p>Email (required): [email* email] </p>
		<p>Visitors: [selectbox visitors "1" "2" "3" "4"]</p>
		<p>Details: [textarea details] </p>
		<p>[submit "Send"]</p>
[lang=fr_FR]
		[calendar]
		<p>Prénom (obligatoire): [text* name] </p>
		<p>Deuxième prénom (requis): [text* secondname] </p>
		<p>Email (obligatoire): [email* email] </p>
		<p>Visiteurs : [selectbox visitors "1" "2" "3" "4"]</p>
		<p>Détails : [textarea details] </p>
		<p>[submit "Envoyer"]</p>
3) [cost_corrections] — Admin cost correction
Purpose: Field visible only in Admin Panel on the “Add booking” page. Allows the admin
to adjust the booking cost before saving.
Example: [cost_corrections]
4) [coupon discount] — Coupon input
Purpose: Allows visitors to enter a coupon code. If a valid coupon is configured, the discount
is applied to the booking cost.
Example: [coupon discount]
5) [steps_timline] — Multi‑step progress indicator
Purpose: Displays a step progress bar for multi‑step booking forms.
Parameters:
steps_count="3"— total number of stepsactive_step="1"— the current stepcolor="#619d40"— (optional) hex color for active step
Example:
[steps_timline steps_count="3" active_step="1" color="#619d40"]6) Email verification field
Purpose: To add a “confirm email” field, use a CSS class starting with same_as_ followed by the name of your primary email field.
Example:
[email* other_verify_email class:same_as_email]This ensures that the confirmation field value matches the original email field.
7) Digit‑only text field validation
Purpose: Force a text field to accept only digits, with optional exact length.
Classes:
class:validate_as_digit— any number of digitsclass:validate_digit_N— exactly N digits
Examples:
[text* dig_field class:validate_as_digit]
[text* phone class:validate_digit_9]
[text* zip class:validate_digit_5]
Best practices
- Use
[lang=LOCALE]blocks to provide fully translated forms without
duplicating separate forms. - Reserve
[cost_corrections]for admin forms only — it will be hidden on
the frontend. - Keep
[steps_timline]consistent across all steps for a smoother UX. - Always test coupon logic with
[coupon discount]before going live. - For email verification and digit validation, double‑check your field names to ensure rules apply
correctly. - For
[country], specify the default ISO code for better UX (e.g.,[country "US"]).
This article explains how to use the [legend_items] shortcode in Booking Calendar’s Advanced (CF7-style) form mode. It shows how to display the booking calendar legend inside your form and customize it with parameters for specific items, orientation, and styling.
1) What is the [legend_items] shortcode?
The [legend_items] shortcode outputs the legend for your booking calendar — a list of color-coded date statuses (e.g., Available, Pending, Approved, Unavailable). This helps visitors understand what each color in the calendar means.
2) Where to place this shortcode
Place [legend_items] in your form layout at WP Booking Calendar → Settings → Booking Form → Booking Form Fields to show the legend alongside the calendar. You can position it inside layout tags (<r>, <c>) or anywhere else in the form structure.
<r>
  <c style="flex:2">[calendar]</c>
  <c style="flex:1">[legend_items]</c>
</r>3) Available parameters
items="list"— Comma-separated list of status keys to display. Valid keys:available,unavailable,pending,approved,partially,in_range. Example:items="available,unavailable,pending"is_vertical="1"— Displays legend items vertically instead of inline.show_title="0"— Hides the default “Legend” title above the list.custom_titles="Title1,Title2,..."— Overrides default item titles (order must match theitemslist).
items, all statuses from your calendar settings will be shown in their default order.4) Usage examples
Default legend with all statuses
[legend_items]Show only Available and Unavailable, vertically
[legend_items items="available,unavailable" is_vertical="1"]Custom titles for statuses
[legend_items items="available,pending" custom_titles="Open for Booking,Awaiting Confirmation"]5) Styling the legend
The legend inherits your theme’s list and text styles, but you can customize it using CSS. Each status gets a specific class for targeting:
.wpbc-legend-item-available.wpbc-legend-item-unavailable.wpbc-legend-item-pending.wpbc-legend-item-approved.wpbc-legend-item-partially
/* Example: Make legend boxes bigger */
.wpbc-legend-item-available .wpbc-legend-color {
  width: 20px;
  height: 20px;
}6) Best practices & tips
- Place the legend close to the calendar so users can easily match colors to meaning.
- Hide unnecessary statuses with
items=to avoid clutter. - Use
is_vertical="1"in narrow side columns for better mobile readability. - Translate or rename statuses with
custom_titles=to match your site’s language and tone. - Test on both desktop and mobile to ensure colors and text remain readable.
Two-Column Layout: Calendar Next to Form
If you want to display the calendar next to the booking form, with the calendar on the left and the booking form fields on the right, follow these steps:
- Go to WP Booking Calendar > Settings > Booking Form page.
- Select the "Calendar next to form" template from the top toolbar.
- Click the Reset button.
- Click the Save Changes button.

After completing these steps, you will see the calendar next to the booking form fields on the front-end of your site.

Two-Column Layout for Booking Form Fields
If you want to display the calendar at the top and show the booking form in two columns, follow these steps:
- Go to WP Booking Calendar > Settings > Booking Form page.
- Select the "2 columns" template from the top toolbar.
- Click the Reset button
- Click the Save Changes button.

After completing these steps, you will see the calendar at the top and the booking form fields in two columns on the front-end of your site.

Typical configuration of a mandatory checkbox to accept terms and conditions with a link to an external terms page:
<r>
   <c>
      <p class="wpbc_row_inline">
         <l>[checkbox* terms "I accept"] <a href="https://server.com/terms/" target="_blank">the terms and conditions</a></l>
      </p>
   </c>
</r>
Configuration:

Preview:

Description
Available in Booking Calendar Business Medium or higher versions.
This feature provide possibility to show the different form fields or any other HTML content in the booking form, depends from the selection of specific week day in calendar or different days, which assigned to the specific season filters.
Configuration
If you are not familiar with the booking form fields configuration, please read firstly about the booking form fields configuration here.
The general structure of the configuration condition rule are following:
[condition name="FILTER-NAME" type="FILTER-TYPE" value="VALUE"]
   CONTENT (any HTML or form fields shortcodes), showing if these condition is TRUE
[/condition]name - its the unique name of the condition group, several conditions with different values. For example, if you want to have the specific HTML content for the different week days, you will be have the several conditions, with the same name but with different value parameters in conditions. Please check more about it, in the examples.
type - type of the condition. There are 2 types of the condition: "weekday" and "season". "weekday" - is mean that condition rule is based on the selected day of week value, like Monday, Tuesday, etc... . "season" - is mean that condition rule is based on the "season filter" name of selected date. In other words the condition is TRUE if the selected day is belong to some season filter in the Booking > Resources > Filters page.
value - value of the specific conditions. If the value is true, so then the content of the conditions is showing in the booking form. You can have the default value (empty - "", or like this - "*") for showing the content of this condition, if all other conditions is FALSE, or at initial stage, when the date in calendar is not selected yet.
Examples:
Week days conditions.
[condition name="weekday-condition" type="weekday" value="*"]
  Default:   [select rangetime  "10:00 - 11:00" "11:00 - 12:00" "12:00 - 13:00" "13:00 - 14:00" "14:00 - 15:00" "15:00 - 16:00" "16:00 - 17:00" "17:00 - 18:00"]
[/condition]
[condition name="weekday-condition" type="weekday" value="1,2"]
  Monday, Tuesday:    [select rangetime  "10:00 - 12:00" "12:00 - 14:00"]
[/condition]
[condition name="weekday-condition" type="weekday" value="3,4"]
  Wednesday, Thursday:  [select rangetime  "14:00 - 16:00" "16:00 - 18:00" "18:00 - 20:00"]
[/condition]
[condition name="weekday-condition" type="weekday" value="5,6,0"]
  Friday, Saturday, Sunday:  [select rangetime  "10:00 - 12:00" "12:00 - 14:00" "14:00 - 16:00" "16:00 - 18:00" "18:00 - 20:00"]
[/condition]
"*" - default value, if no dates are selected, or none of the exist condition is true.
0 - Sunday,
1 - Monday,
2 - Tuesday,
3 - Wednesday,
4 - Thursday,
5 - Friday,
6 - Saturday
You can use the several values, separated by comma.
Season filters conditions.
[condition name="season-times" type="season" value="*"]
  Default: [select rangetime "14:00 - 16:00" "16:00 - 18:00" "18:00 - 20:00"]
[/condition]
[condition name="season-times" type="season" value="High_season"]
  High season: [select rangetime  "10:00 - 12:00" "12:00 - 14:00" "14:00 - 16:00" "16:00 - 18:00" "18:00 - 20:00"]
[/condition]
[condition name="season-times" type="season" value="Low_season"]
  Low season: [select rangetime "12:00 - 14:00" "14:00 - 16:00"]
[/condition]
High_season - its a name of the some Season filter on the Booking > Resources > Filters page,
Low_season - its a name of the some Season filter on the Booking > Resources > Filters page
You can use only single season filter name in the one value.
Additional info.
Please note, if you will activate the "Multiple days" selection or "Range days" selection in the General Booking Settings page at calendar section, so all these conditions will be based on the "first" day of that selection in the calendar.
If you need to show or hide some form fields in the booking form, depend from the selected option in some selectbox, you can make it with JavaScript customization.
For example, if you need to show additional fields for entering "First and Last Names" of the each visitor, depend from the selected number of this visitors, then you can have this customization in your booking form at the Booking > Settings > Fields page:
<p>Adults:  [select visitors class:visitors_selection "1" "2" "3" "4"] </p>
<p>First Name (required):<br />[text* name] </p>
<p>Last Name (required):<br />[text* secondname] </p>
<p>Email (required):<br />[email* email] </p>
<div class="visitors_selection_div v_num2 v_num3 v_num4" style="display:none;">
   <p>First Name of 2nd visitor:<br />[text* name_2nd] </p>
   <p>Last Name of 2nd visitor:<br />[text* secondname_2nd] </p>
</div>
<div class="visitors_selection_div v_num3 v_num4" style="display:none;">
   <p>First Name of 3rd visitor:<br />[text* name_3rd] </p>
   <p>Last Name of 3rd visitor:<br />[text* secondname_3rd] </p>
</div>
<div class="visitors_selection_div v_num4" style="display:none;">
   <p>First Name of 4th visitor:<br />[text* name_4th] </p>
   <p>Last Name of 4th visitor:<br />[text* secondname_4th]</p>
</div>
<script type="text/javascript">
   jQuery('.visitors_selection').on('change', function() {
       var visitors_num = jQuery(this).find(":selected").val();
       jQuery('.visitors_selection_div').hide();
       jQuery('.visitors_selection_div.v_num' + visitors_num ).show();
   });
</script>
Description of this code:
We are having 3 additional DIV elemtns, where exist fields shortcodes for entering First and Last names of visitors. All these DIV elements does not visible for the visitors
style="display:none;".
We attach JavaScript function for selection of the visitors number:
jQuery('.visitors_selection').on('change', function() {Then we get the number of selected visitors:
var visitors_num = jQuery(this).find(":selected").val();Hide by default all our additional DIV elements:
jQuery('.visitors_selection_div').hide();And show DIV elements, that fit to our number of selected visitors:
jQuery('.visitors_selection_div.v_num' + visitors_num ).show();The trick here in how we apply CSS CLASSes to the DIV elements structure.
Advanced Setup | How to open booking form in popup modal window
For ability to open the booking form in a popup window, please follow these steps.
Important note for newer versions
In newer versions of Booking Calendar, the plugin uses native popup windows internally, for example on admin pages and booking editing screens. Because of this, do not place the modal wrapper directly inside the Booking Form configuration if the same form is also used by the plugin’s built-in popups.
Instead, keep the booking form configuration normal, and place the popup/modal wrapper on the front-end page where you want to show the popup button.
1. Add the popup code to your page
Create a new page, or edit an existing page, and add a Custom HTML block with code similar to this:
<script src="https://your-site.com/wp-content/plugins/booking/vendors/_custom/dropdown_modal/_out/dropdown_modal.js"></script>
<a href="javascript:void(0)"
   onclick="jQuery('.bookingFormModal').wpbc_my_modal({keyboard:false, backdrop:true, show:true}); return false;"
   class="wp-element-button">Booking</a>
<div class="wpdevelop">
  <div class="modal wpbc_popup_modal bookingFormModal" tabindex="-1" role="dialog" style="display:none; z-index:9999999;">
    <div class="modal-dialog modal-lg" role="document">
      <div class="modal-content">

        <div class="modal-header">
          <button type="button" class="close" data-dismiss="modal" aria-label="Close">
            <span aria-hidden="true">×</span>
          </button>
          <strong class="modal-title">Booking Form</strong>
        </div>

        <div class="modal-body">
          [booking resource_id=1]
        </div>

      </div>
    </div>
  </div>
</div>
<style>
  .wpdevelop .modal {
    overflow-y: auto;
  }
</style>
Replace your-site.com with your real website domain.
If you use a paid version of Booking Calendar, also replace /booking/ with your actual Booking Calendar plugin folder name, for example:
/wp-content/plugins/booking.bs.10.0/vendors/_custom/dropdown_modal/_out/dropdown_modal.jsThe modal JavaScript file is now located here:
/wp-content/plugins/booking/vendors/_custom/dropdown_modal/_out/dropdown_modal.jsThe old path:
/wp-content/plugins/booking/assets/libs/ui/_out/dropdown_modal.jsis no longer the correct location in the newer versions.
2. Keep the Booking Form configuration normal
Open:
Booking Calendar > Settings > Booking Form
Configure only the booking form fields there, for example:
[calendar]
<div class="standard-form">
     <p>First Name (required):<br />[text* name]</p>
     <p>Last Name (required):<br />[text* secondname]</p>
     <p>Email (required):<br />[email* email]</p>
     <p>Phone:<br />[text phone]</p>
     <p>Adults:<br />[select visitors "1" "2" "3" "4"]</p>
     <p>Children:<br />[select children "0" "1" "2" "3"]</p>
     <p>Details:<br />[textarea details]</p>
     <p>[checkbox* term_and_condition use_label_element "I Accept term and conditions"]</p>
     <p>[captcha]</p>
     <p>[submit class:btn "Send"]</p>
</div>
Do not wrap this form configuration in modal HTML inside the Booking Form settings, for example do not add this there:
<div class="modal ...">3. Result
The page will show a “Booking” button. When the visitor clicks it, the booking form shortcode opens inside the popup modal window.
This setup avoids conflicts with the newer native popup windows used by Booking Calendar internally.
In Booking Calendar Business Large or higher versions, you can define capacity for booking resources and deduct availability based on the selected number of visitors.
Before starting, please check this article about capacity configuration in the Booking Calendar plugin.
Sometimes you may want to show separate fields for Adults and Children, while Booking Calendar still deducts capacity from the total number of visitors.
In the new Form Builder, this can be done by using:
- a visible Adults select field,
- a visible Children select field,
- a hidden Visitors select field,
- a small JavaScript snippet that automatically updates the Visitors field.
The hidden Visitors field is the field used for capacity deduction.
1. Configure fields in the Form Builder
Open WP Booking Calendar > Settings > Form Builder and add these fields:
Adults field
- Field type: Select
- Field name:
adults - CSS class:
adults
Children field
- Field type: Select
- Field name:
children - CSS class:
children
Visitors field
- Field type: Select
- Field name:
visitors - CSS class:
wpbc_hide_field wpbc_visitors_field visitors
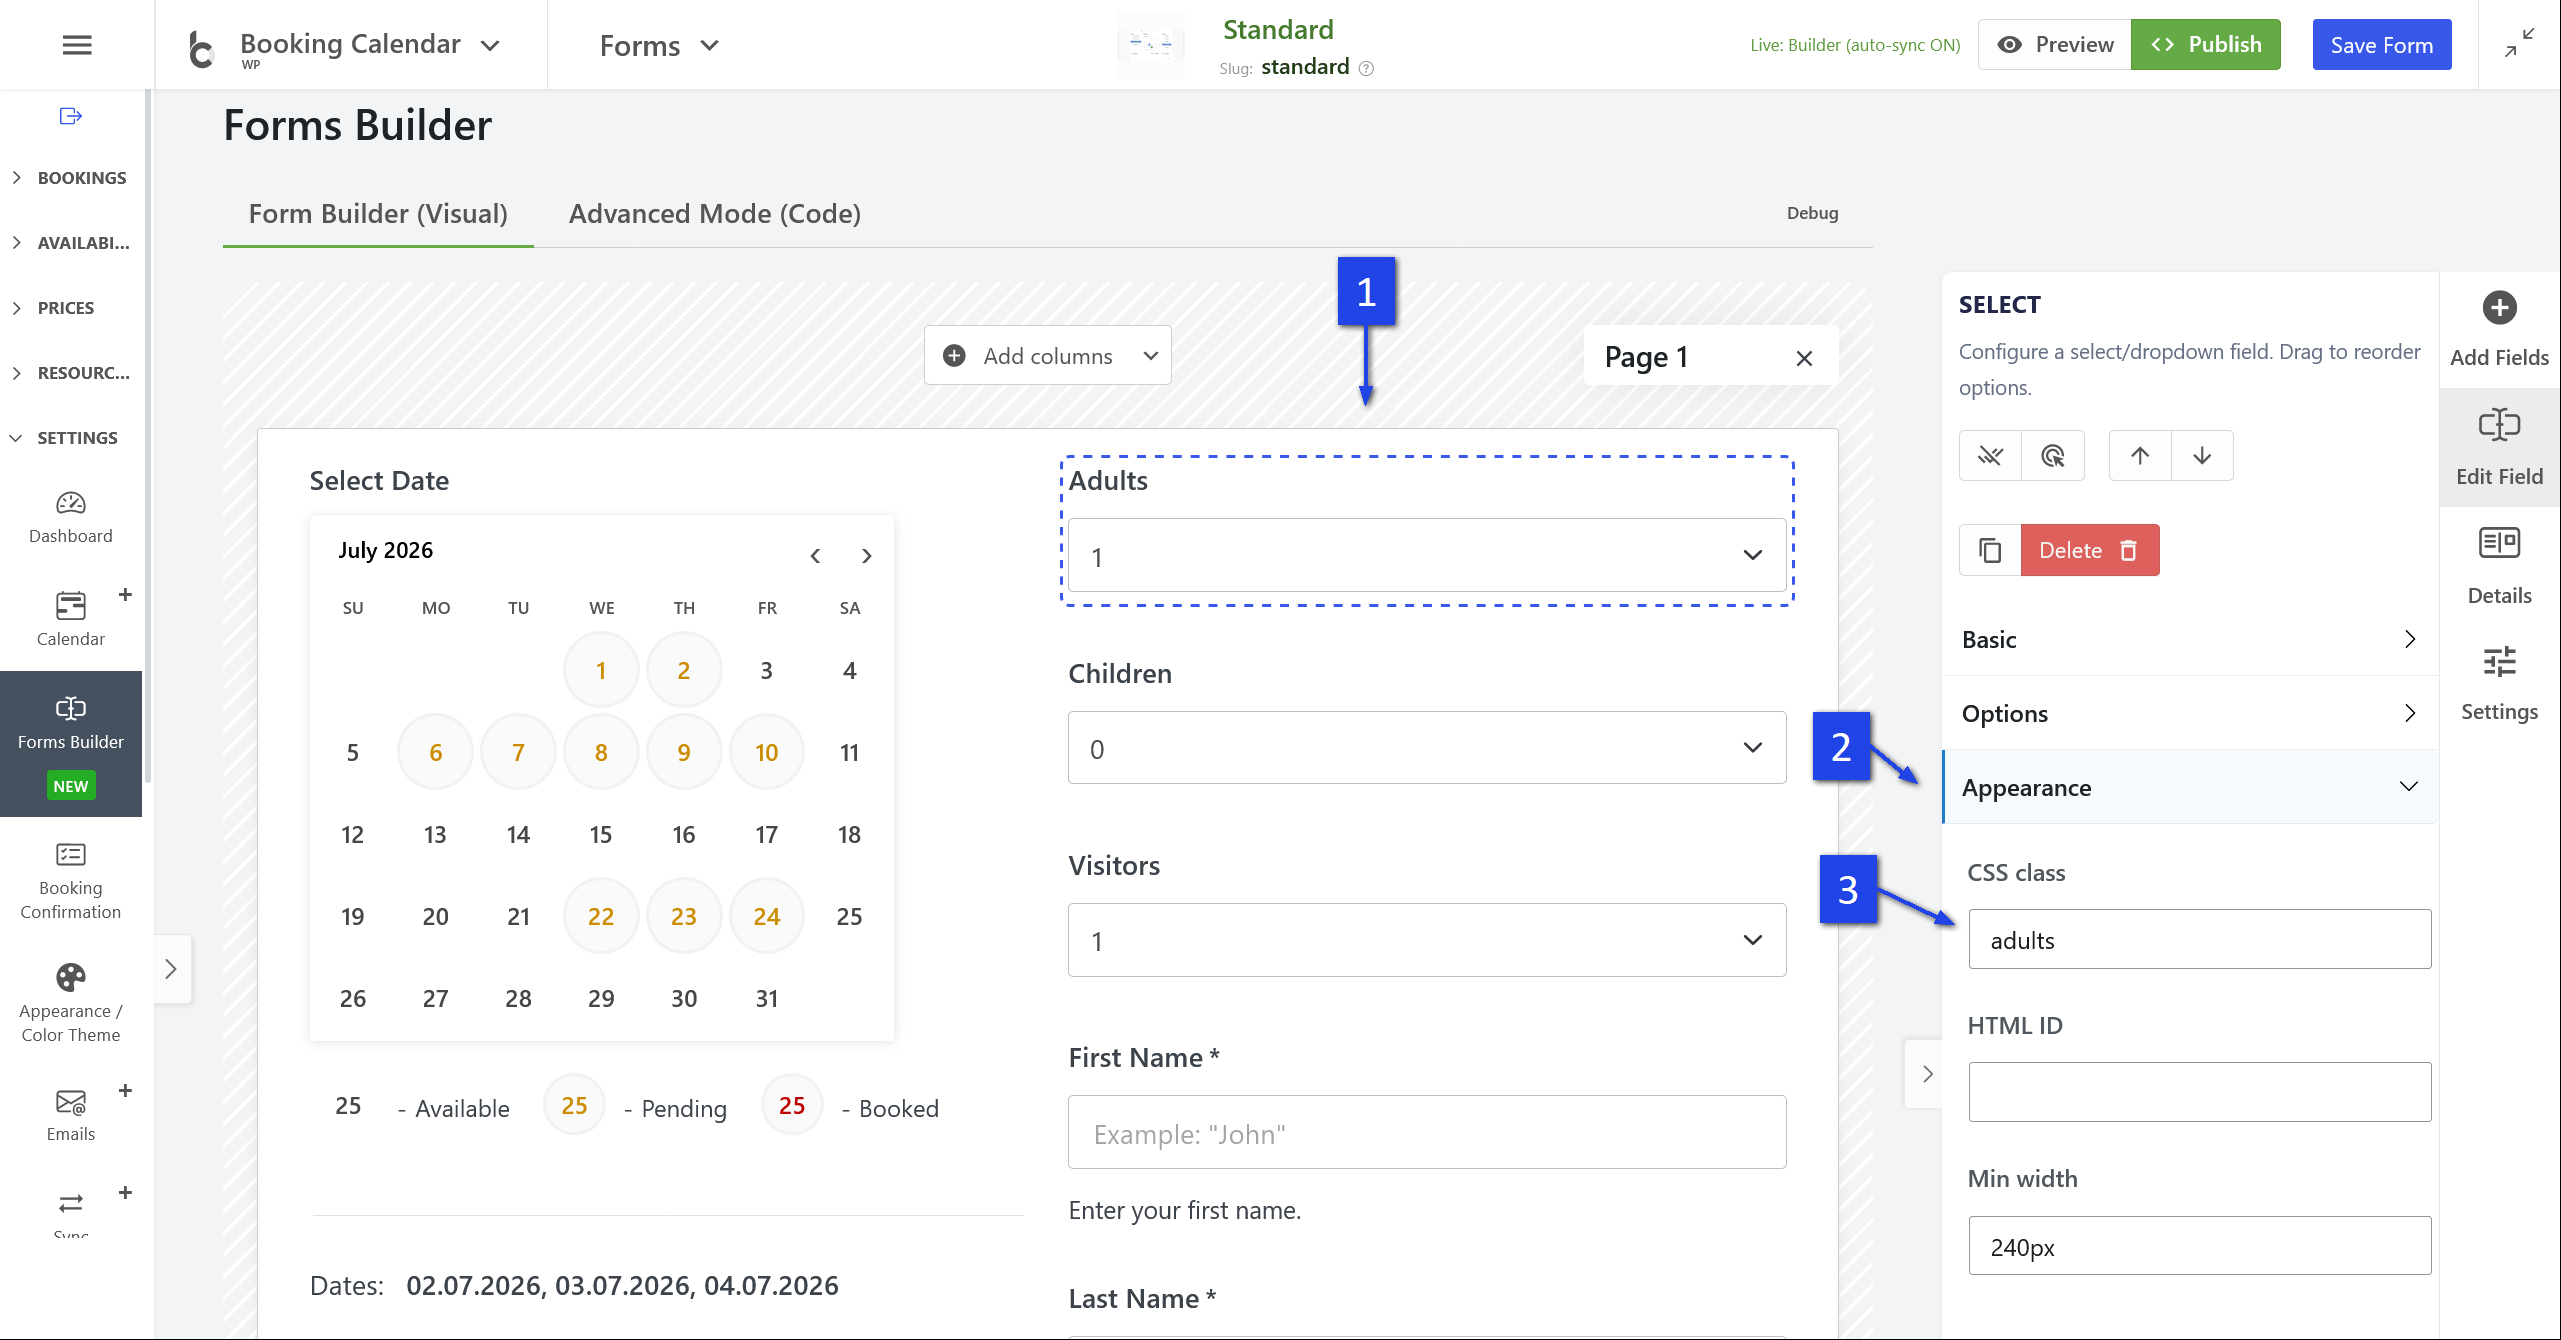
Make sure the Visitors field contains all possible total values. For example, if Adults can be from 1 to 4 and Children can be from 0 to 3, then Visitors should contain values from 1 to 7 or higher.
2. Add CSS and JavaScript to the booking page
Add a standard WordPress HTML Block to the page where you inserted the booking form. Then paste this CSS and JavaScript inside that HTML Block:
Paste the following CSS and JavaScript into a WordPress Custom HTML block on the same page where the booking form is inserted:
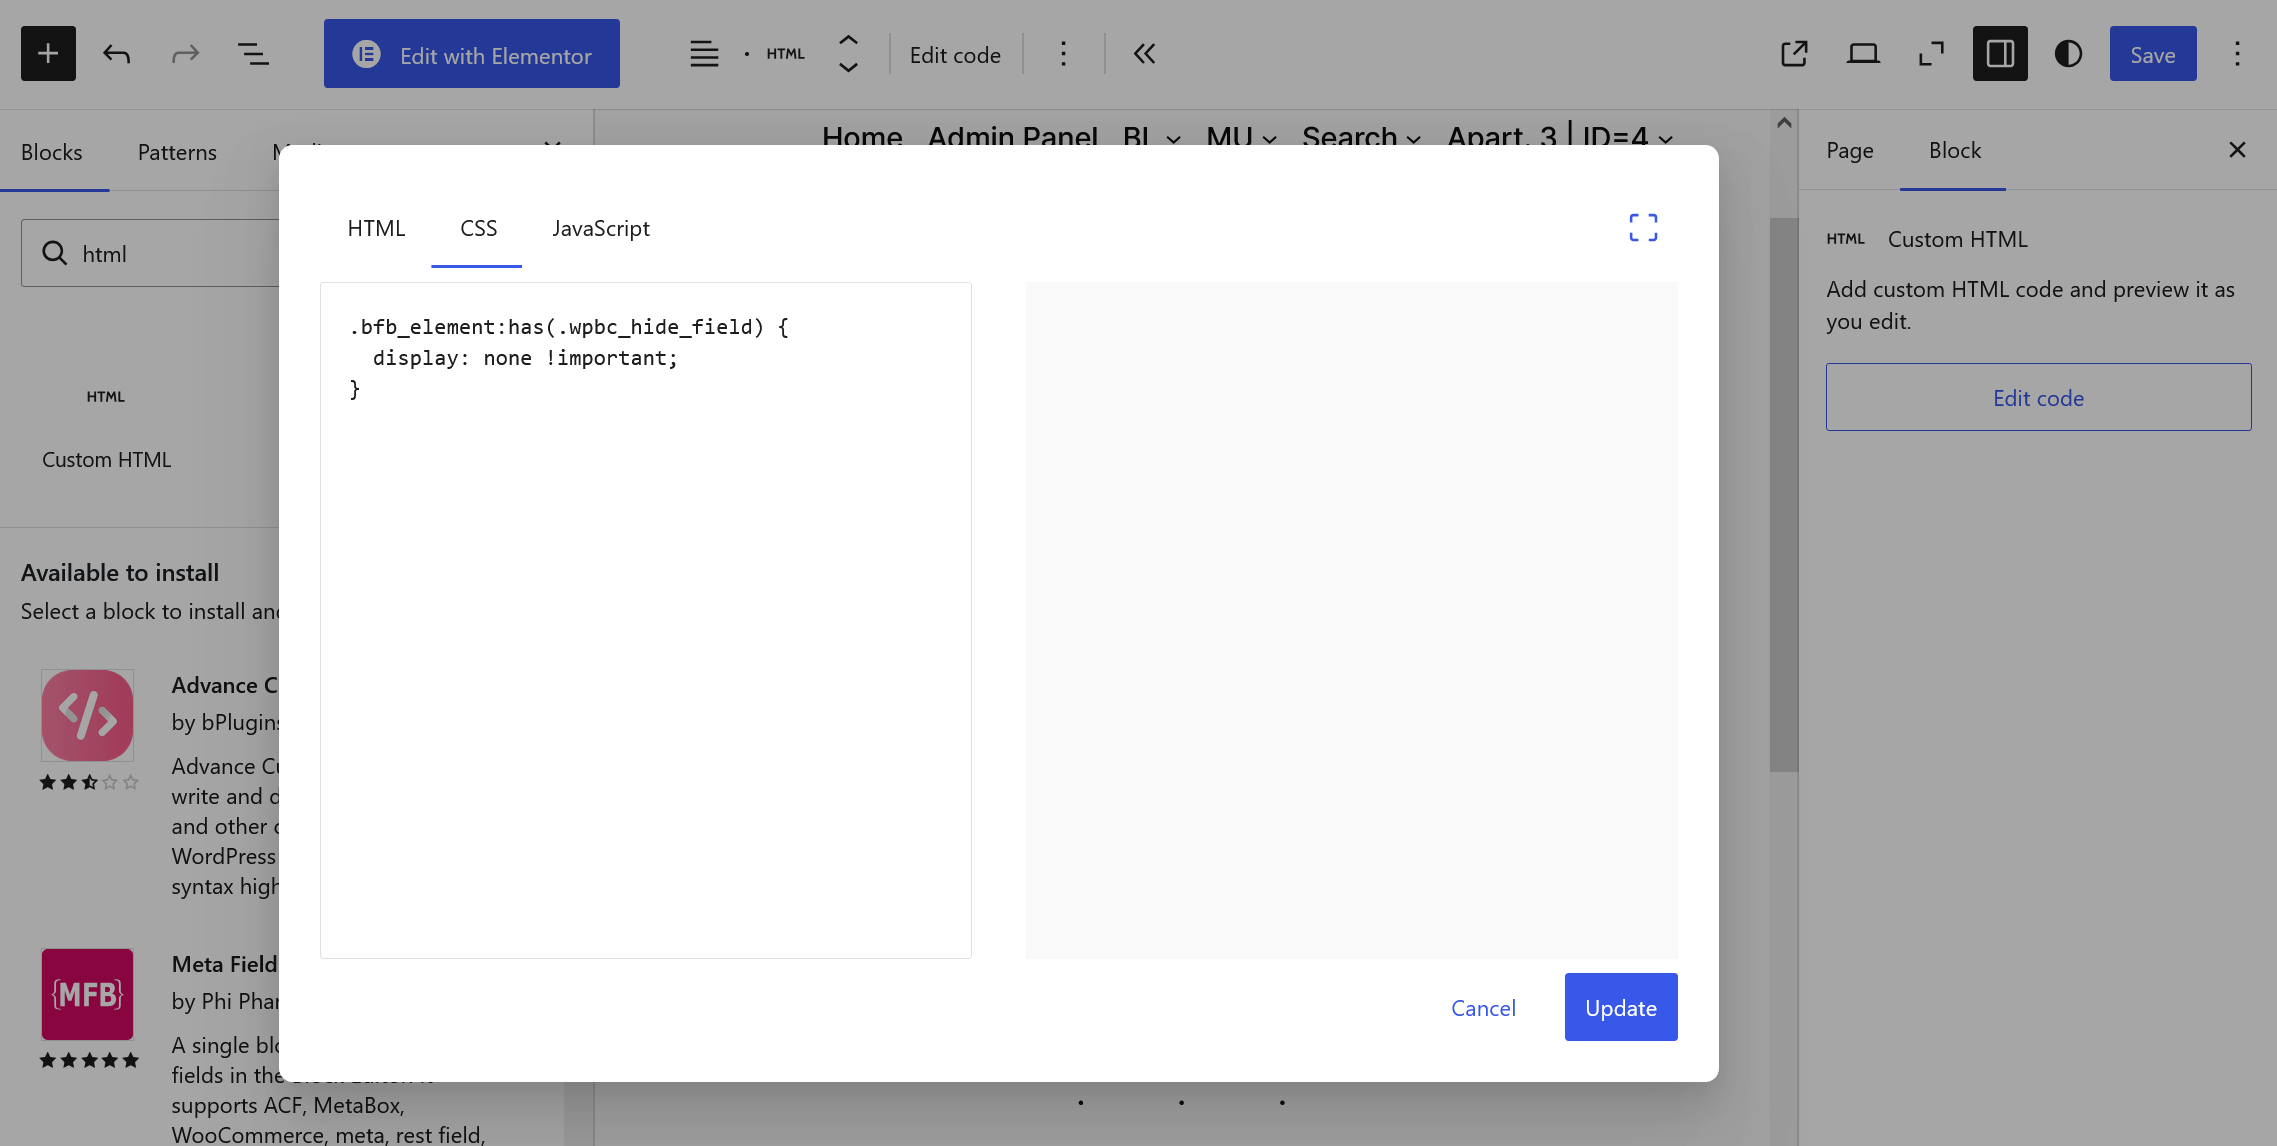
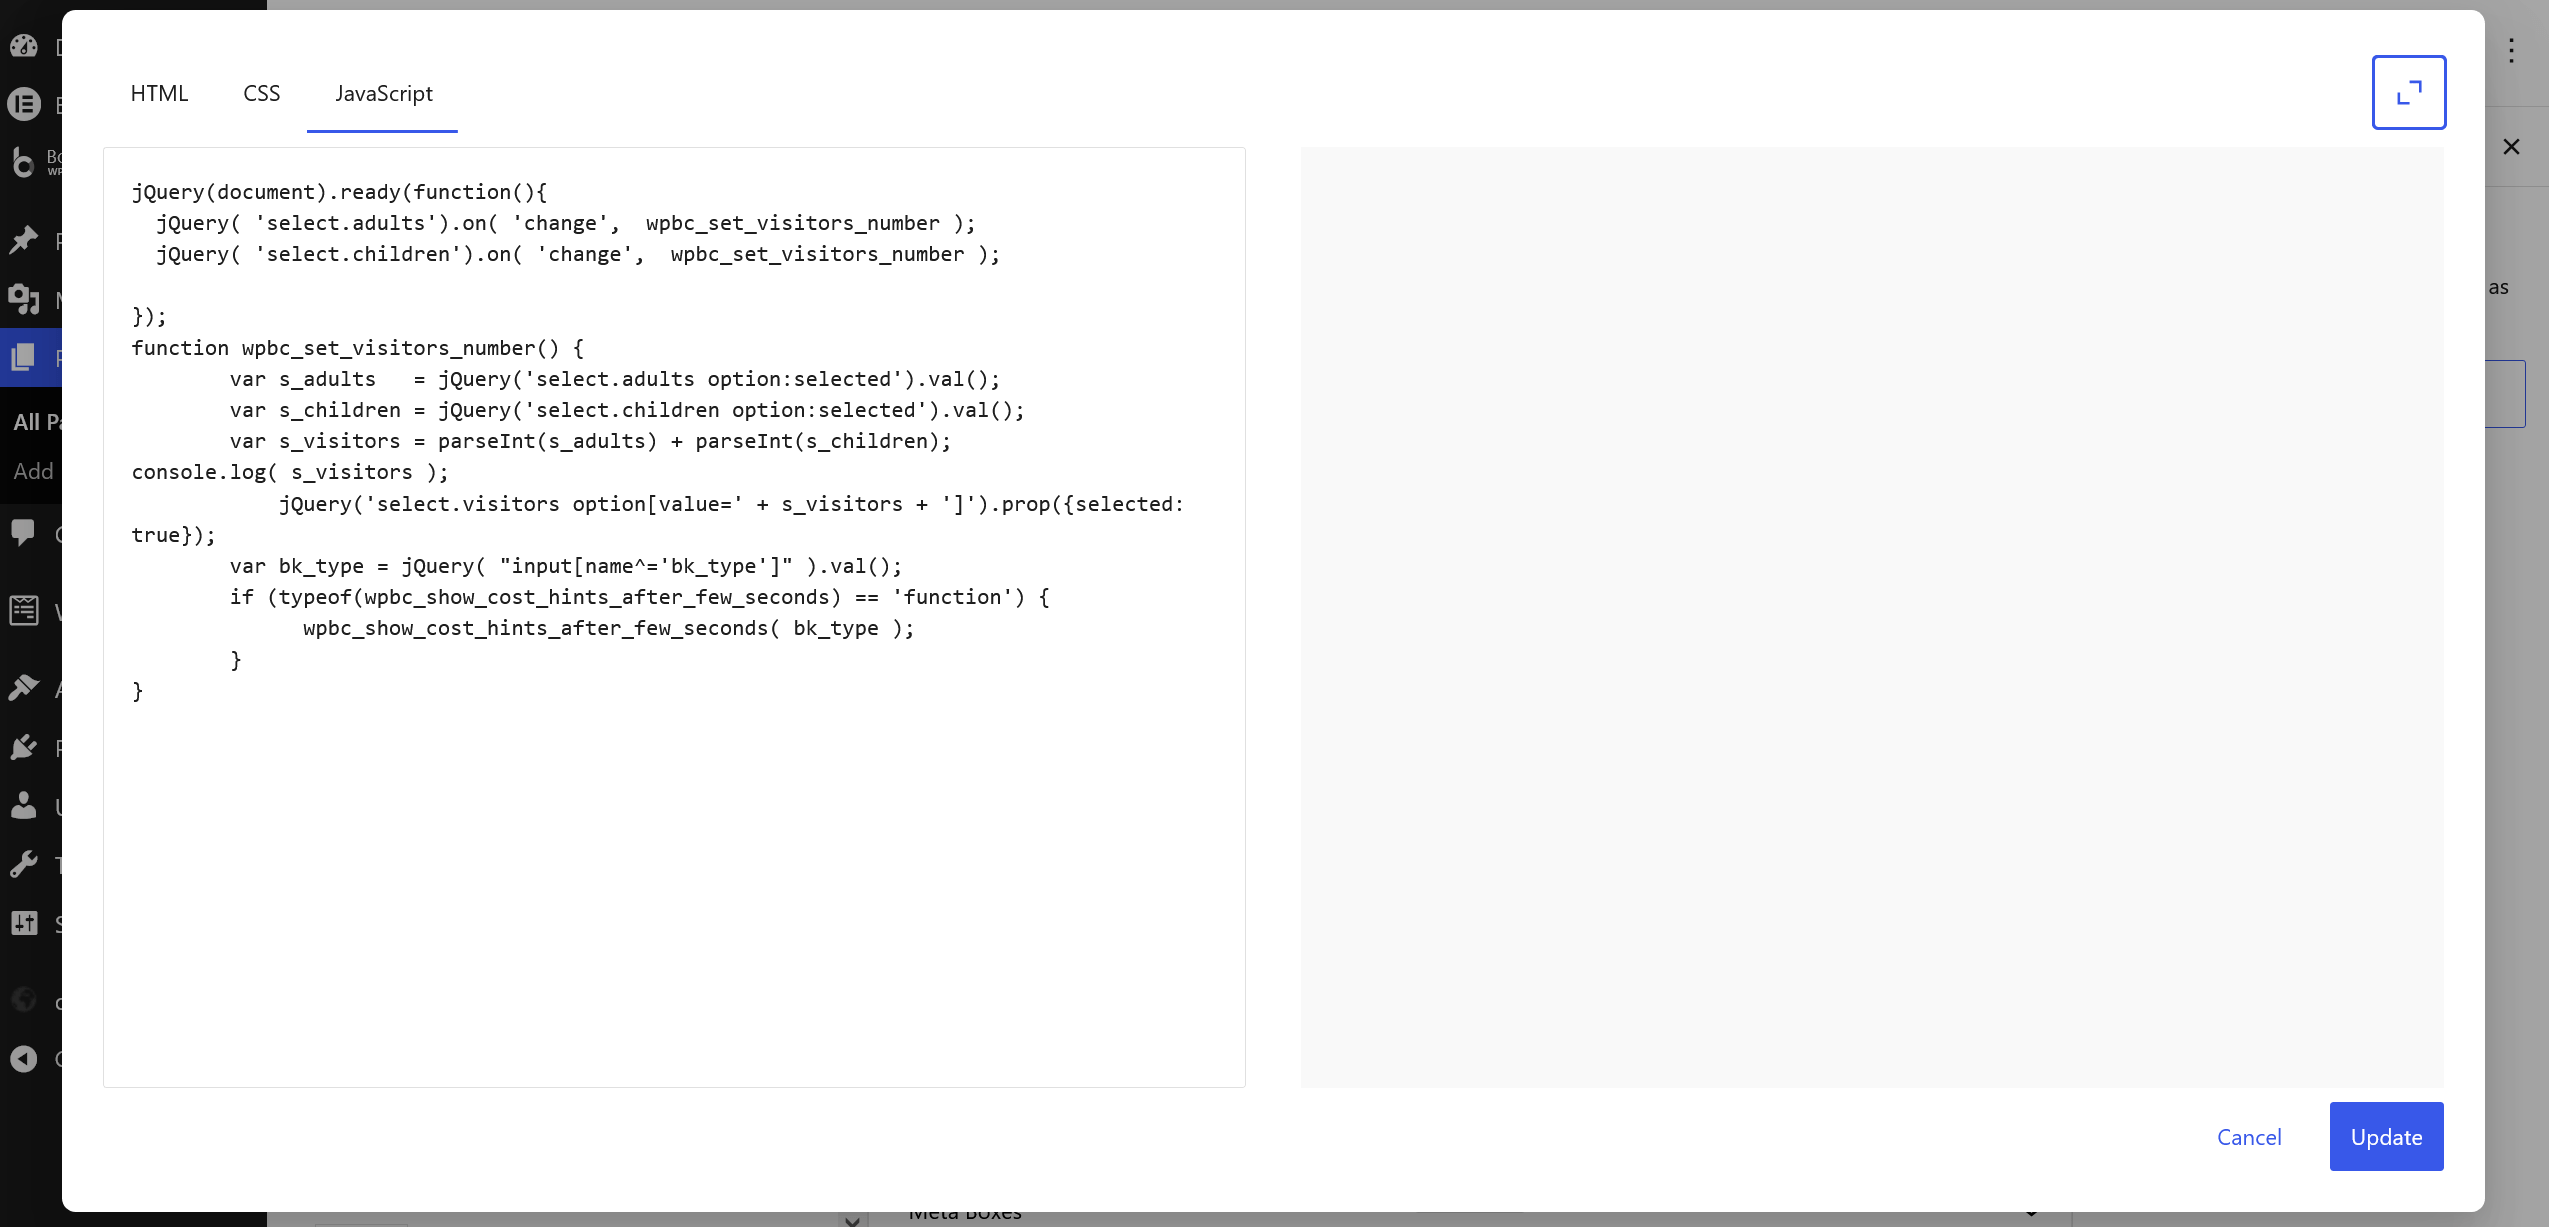
<style>
.bfb_element:has(.wpbc_hide_field) {
  display: none !important;
}
</style>

<script>
jQuery(document).ready(function() {
  jQuery('select.adults').on('change', wpbc_set_visitors_number);
  jQuery('select.children').on('change', wpbc_set_visitors_number);

  wpbc_set_visitors_number();
});

function wpbc_set_visitors_number() {
  var s_adults = parseInt(jQuery('select.adults option:selected').val(), 10) || 0;
  var s_children = parseInt(jQuery('select.children option:selected').val(), 10) || 0;
  var s_visitors = s_adults + s_children;

  jQuery("select.visitors option[value='" + s_visitors + "']").prop('selected', true);

  var bk_type = jQuery("input[name^='bk_type']").val();

  if (typeof(wpbc_show_cost_hints_after_few_seconds) == 'function') {
    wpbc_show_cost_hints_after_few_seconds(bk_type);
  }
}
</script>
3. How it works
When the visitor changes the number of Adults or Children, the JavaScript calculates the total number of visitors and automatically selects the same value in the hidden Visitors field.
For example:
- Adults:
2 - Children:
1 - Hidden Visitors value:
3
Booking Calendar then uses the hidden Visitors value for capacity deduction.
4. Testing with Form Builder export/import
You can test this configuration by importing a prepared Form Builder configuration.
- Open WP Booking Calendar > Settings > Form Builder.
- Open the Debug tab.
- Select the Import sub-tab.
- Paste the exported Form Builder JSON configuration.
- Import it and test the booking form.
Example of prepared Form Builder configuration:
[
{
"page": 1,
"content": [
{
"type": "section",
"data": {
"id": "section-7-1773321976469",
"label": "Section",
"html_id": "",
"cssclass": "",
"col_styles": "[{\"gap\":\"20px\"},{\"gap\":\"33px\"}]",
"columns": [
{
"width": "48.5%",
"items": [
{
"type": "field",
"data": {
"id": "calendar",
"type": "calendar",
"usage_key": "calendar",
"usagenumber": 1,
"resource_id": 1,
"months": 1,
"label": "Select Date",
"min_width": "250px",
"name": "calendar",
"wpbc-cal-init": 1,
"wpbc-cal-loaded-rid": 1
}
},
{
"type": "field",
"data": {
"id": "divider_horizontal",
"type": "divider",
"usage_key": "divider",
"orientation": "horizontal",
"line_style": "solid",
"thickness_px": 1,
"length": "100%",
"align": "center",
"color": "#e0e0e0",
"label": "Divider_horizontal",
"name": "divider_horizontal",
"margin_top_px": 2,
"margin_bottom_px": 2,
"margin_left_px": 2,
"margin_right_px": 2,
"cssclass_extra": "",
"html_id": ""
}
},
{
"type": "field",
"data": {
"id": "selected_dates_hint",
"type": "selected_dates_hint",
"usage_key": "selected_dates_hint",
"prefix_text": "Dates:",
"help": "",
"label": "Dates:",
"name": "selected_dates_hint",
"html_id": "",
"cssclass": ""
}
}
]
},
{
"width": "48.5%",
"items": [
{
"type": "field",
"data": {
"id": "select",
"type": "select",
"usage_key": "select",
"label": "Adults",
"name": "adults",
"min_width": "240px",
"html_id": "",
"cssclass": "adults",
"placeholder": "--- Select ---",
"options": [
{
"label": "1",
"value": "1",
"selected": true
},
{
"label": "2",
"value": "2",
"selected": false
},
{
"label": "3",
"value": "3",
"selected": false
},
{
"label": "4",
"value": "4",
"selected": false
}
]
}
},
{
"type": "field",
"data": {
"id": "select-69q",
"type": "select",
"usage_key": "select",
"label": "Children",
"name": "children",
"min_width": "240px",
"html_id": "",
"cssclass": "children",
"placeholder": "--- Select ---",
"options": [
{
"label": "0",
"value": "0",
"selected": true
},
{
"label": "1",
"value": "1",
"selected": false
},
{
"label": "2",
"value": "2",
"selected": false
},
{
"label": "3",
"value": "3",
"selected": false
}
]
}
},
{
"type": "field",
"data": {
"id": "select-4li",
"type": "select",
"usage_key": "select",
"label": "Visitors",
"name": "visitors",
"min_width": "240px",
"html_id": "",
"cssclass": "wpbc_hide_field wpbc_visitors_field visitors",
"placeholder": "--- Select ---",
"options": [
{
"label": "1",
"value": "1",
"selected": true
},
{
"label": "2",
"value": "2",
"selected": false
},
{
"label": "3",
"value": "3",
"selected": false
},
{
"label": "4",
"value": "4",
"selected": false
},
{
"label": "5",
"value": "5",
"selected": false
},
{
"label": "6",
"value": "6",
"selected": false
},
{
"label": "7",
"value": "7",
"selected": false
},
{
"label": "8",
"value": "8",
"selected": false
}
],
"value_differs": ""
}
},
{
"type": "field",
"data": {
"id": "text-firstname",
"type": "text",
"usage_key": "text-firstname",
"label": "First Name",
"name": "firstname",
"placeholder": "Example: \"John\"",
"required": 1,
"help": "Enter your first name.",
"cssclass": "firstname",
"min_width": "8em",
"html_id": ""
}
},
{
"type": "field",
"data": {
"id": "text-secondname",
"type": "text",
"usage_key": "text-secondname",
"label": "Last Name",
"name": "secondname",
"placeholder": "Example: \"Smith\"",
"required": 1,
"help": "Enter your last name.",
"cssclass": "secondname lastname",
"min_width": "8em",
"html_id": ""
}
},
{
"type": "field",
"data": {
"id": "email",
"type": "email",
"usage_key": "email",
"label": "Email",
"usagenumber": 1,
"name": "email",
"html_id": "",
"cssclass": "",
"required": true,
"help": "Enter your email address."
}
},
{
"type": "field",
"data": {
"id": "text",
"type": "text",
"usage_key": "text",
"label": "Phone",
"name": "phone",
"cssclass": "",
"html_id": "",
"placeholder": "(000) 999 - 10 - 20",
"help": "Enter contact phone number"
}
},
{
"type": "field",
"data": {
"id": "textarea",
"type": "textarea",
"usage_key": "textarea",
"min_width": "260px",
"label": "Details",
"name": "details",
"cssclass": "",
"html_id": ""
}
},
{
"type": "field",
"data": {
"id": "accept_terms",
"type": "accept_terms",
"usage_key": "accept_terms",
"label": "Accept Terms",
"name": "accept_terms",
"required": 1,
"links": [
{
"key": "terms",
"text": "terms",
"link_type": "url",
"destination": "https://server.com/terms/",
"target": "_blank",
"cssclass": ""
},
{
"key": "conditions",
"text": "conditions",
"link_type": "url",
"destination": "https://server.com/conditions/",
"target": "_blank",
"cssclass": ""
}
]
}
}
]
}
]
}
},
{
"type": "section",
"data": {
"id": "section-13-1773062424785",
"label": "Section",
"html_id": "",
"cssclass": "",
"col_styles": "[{\"dir\":\"row\",\"wrap\":\"wrap\",\"jc\":\"flex-end\",\"ai\":\"flex-end\",\"gap\":\"10px\",\"aself\":\"flex-end\"}]",
"columns": [
{
"width": "100%",
"items": [
{
"type": "field",
"data": {
"id": "divider_horizontal-2",
"type": "divider",
"usage_key": "divider_horizontal",
"orientation": "horizontal",
"line_style": "solid",
"thickness_px": 1,
"length": "100%",
"align": "center",
"color": "#e0e0e0",
"label": "Divider_horizontal",
"name": "divider_horizontal-2",
"margin_top_px": 2,
"margin_bottom_px": 2,
"margin_left_px": 2,
"margin_right_px": 2,
"cssclass_extra": "",
"html_id": ""
}
},
{
"type": "field",
"data": {
"id": "submit",
"type": "submit",
"usage_key": "submit",
"usagenumber": 1,
"label": "Send",
"name": "submit",
"cssclass": "wpbc_bfb__btn wpbc_bfb__btn--primary",
"html_id": ""
}
}
]
}
]
}
}
]
}
]
Capacity configuration in the Booking Calendar.
Import / Export booking forms in Booking Calendar.
You can find it at the Booking > Settings > Form page (available in paid versions only).
Please use shortcode generator at the right side of the Booking > Settings > Form page for the fast and correct creation of booking form fields.
Booking Form Fields setting
Inside of this form, you can use the text, HTML tags and special short codes for the form fields.
General shortcode rule for fields insertion
[shortcode_type* field_name "value"] shortcode_type - its a reserved term, for the definition type of booking field (like a text field or select box, etc). Please check the full list of these terms bellow.
Parameters:
* - this symbol means that this field is Required (can be skipped in shortcode)
field_name - field name, must be unique (can not be skipped), you can use any letter or "_"symbol.
"value" - default value of field (can be skipped)
In addition you can define the "ID" and CSS "CLASS" of HTML element, in such way:
[shortcode_type* field_name id:id-of-element class:class-name "value"]where "id-of-element" - its ID of element, "class-name" - its CSS CLASS of element.
Shortcodes of form fields
[calendar] - calendar. Insert the booking availability calendar into the booking form.
[email] - email field, Example:
[email* my_email]. This field is required and have to be inside of the each booking form customization.
[captcha] - CAPTCHA. Insert the captcha into the booking form. Please note, you are need to activate using of the captcha at the general booking form, also.
[text] - text field. Example:
[text firt_name "John"][select] - select field, Example:
[select my_slct "1" "2" "3"] If you want to use the different option titles from the option values,
you can use the select box options in this format: Option-Title@@Option-Value
Example:
[select my_day_parts "Morning@@08:00 - 12:00" "Evening@@13:00 - 17:00" "Full day@@08:00 - 17:00"] [checkbox] - checkbox field,
Example #1:
[checkbox my_radio ""]Example #2:
[checkbox my_radio default:on ""] - checked by default
Example #3:
[checkbox my_radio "TV" "Player"] - several values
[textarea] - textarea field, Example:
[textarea my_details ""] [country] - countries list field,
Example #1:
[country] - default usage
Example #2:
[country "US"] - country selected by default as "United States of America"
[submit] - submit button, Example:
[submit "Send"] Time shortcodes (Business Small/Medium versions)
Entering the time using the text fields (you can enter the time only in 24 hour time format)
[starttime] - start time field. Example:
[starttime].
[endtime] - end time field. Example:
[endtime].
[time] - additional time field (as an additional property). Do not apply to the dividing day into sections. Example:
[time my_tm] Selection of time from predefined time slot list.
[select rangetime] - start and end time field in one drop-down list If you have predefined times (start and end time), use this code:
[select rangetime "10:00 - 12:00" "12:00 - 14:00" "14:00 - 16:00" "16:00 - 18:00" "18:00 - 20:00" ][select durationtime] - duration time field. If you set already start time, you can set duration of time using this shortcode:
[select durationtime "00:30" "01:00" "01:30" "02:00" "02:30" "03:00" ]. You do not require endtime.
[select starttime "12:00" "14:00"] - if you have already predefined check in time slots.
[select endtime "16:00" "20:00"] - if you have already predefined check out time slots.
(Business Medium/Large, MultiUser versions)
[cost_corrections] - enter direct cost at admin panel at page: "Add booking".
Example:
[cost_corrections] Showing the cost in real time at booking form. (Business Medium/Large, MultiUser versions).
[cost_hint] - show cost hint for full booking in real time, depends from selection of days and form elements. Example:
The full cost for payment: [cost_hint][original_cost_hint] - show cost hint of original booking cost without additional costs for full booking in real time, depends only from days selection. Example:
The original cost for payment: [original_cost_hint][additional_cost_hint] - show cost hint of additional booking cost, which depends from selection of form elements. Example:
The additional cost for payment: [additional_cost_hint] (Business Large, MultiUser versions)
[coupon] - coupon field, Example:
[coupon* my_coupon][lang=LOCALE] - start new translation section, where LOCALE - locale of translation
Use any other HTML tags (carefully).
Some other shortcodes available in new updates of Booking Calendar, as well.
Please use shortcode generator at the right side of the Booking > Settings > Form page for checking other available shortcodes.
"Content of booking fields data" form
Configuration of booking data showing in the booking listing page at "Booking Data" column and in the email templates, if used this shortcode - [content].
Use these shortcodes for customization:
Use any other HTML tags (carefully).
Configuration of Booking Calendar

- Open the WP Booking Calendar > Availability > Season Availability page
- Select several booking resources
- Scroll down to "Bulk Actions" selectbox and select "Set Availability" option. Then click on "Set Availability" button.
- Enable season filters to set available / unavailable dates for your selected booking resources. Click on Save changes button.
Configure the Booking Calendar to automatically cancel pending bookings that have not been successfully paid within a specific period. This frees up availability and keeps your calendar accurate.
1. Check Your Time Zone Settings
- Go to WordPress > Settings > General.
- Verify the Time Zone matches your local time.
2. Set the Auto‑Cancellation Interval
- Go to Booking > Settings General.
- Scroll to the Auto cancellation / approving section.
- Configure Auto‑Cancel Pending Bookings After — choose minutes, hours, or days after booking creation.
- Click Save.
3. When Auto‑Cancellation Runs
- Visitor‑Triggered (Default WordPress Cron): When a visitor loads any page, WordPress checks if scheduled events are due. If the cancellation time has passed, pending bookings are cancelled automatically.
- Server CRON Job (Recommended for Reliability): Set up a real server‑side CRON to trigger WordPress tasks at fixed intervals, even with low site traffic.
4. How WordPress Cron Works
WordPress Cron is a “pseudo‑cron” and behaves differently from a standard UNIX cron:
| UNIX Cron | WordPress Cron |
|---|---|
| Runs at the exact scheduled time, independent of traffic. | Checks schedules when a visitor loads any page. |
| Executes the action at the scheduled minute. | Executes overdue actions once a visit occurs (or when a server CRON triggers it). |
For consistent auto‑cancellations on low‑traffic sites, configure a server‑side CRON to call WordPress regularly.
Quick Summary
- Set the correct Time Zone in WordPress > Settings > General.
- Choose a reasonable Auto‑Cancel interval in Booking > Settings > Auto cancellation / approving.
- Understand that WordPress Cron depends on site visits unless you set up a server CRON.
- Use longer intervals so customers can finish payment before cancellation.
These screen-cast illustrate how works selection of booking resources with aggregate parameter and different parameters in this shortcode. System set as unavailable the dates in all calendars in all booking resources if for such date(s) has been made the bookings. But if you defined some dates as unavailable in WP Booking Calendar > Availability > Days Availability page or in WP Booking Calendar > Availability > Season Availability page, then system set such dates differently depends on value in option parameter of Booking Calendar shortcode and depends if this "Season Availability" or "Days Availability" settings.
It's give you flexibility in configuration of unavailable dates in booking resources.


You can customize the number of months to scroll using JavaScript, allowing for different settings than the general configuration defined in option "Number of months to scroll" at WP Booking Calendar > Settings General page in the "Calendar" section.
To do this:
1) Add a Custom HTML block to your website near your Booking Calendar block. This block allows you to insert JavaScript code into your page.
2) If, for example, you have a booking resource with ID = 4 and need to set the number of months to scroll as 2 years, you can use the following JavaScript code:
Example #1
<script type="text/javascript">
    var my_resource_id = 4;                                                                      /* Defining ID of booking resource - calendar */
    _wpbc.calendar__set_param_value( my_resource_id,'booking_max_monthes_in_calendar','2y' );    /* Defining number of months to  scroll. Can be Years: '4y' or Months: '6m' */
    wpbc_cal__re_init( my_resource_id );                                                         /* Update look  of calendar */
</script>
To set the number of months to scroll as 5 months for the booking resource with ID = 1 (which is the default booking resource in the Booking Free version), you can use the following code:
Example #2
<script type="text/javascript">
    var my_resource_id = 1;                                                                      /* Defining ID of booking resource - calendar */
    _wpbc.calendar__set_param_value( my_resource_id,'booking_max_monthes_in_calendar','5m' );    /* Defining number of months to  scroll. Can be Years: '4y' or Months: '6m' */
    wpbc_cal__re_init( my_resource_id );                                                         /* Update look  of calendar */
</script>
These scripts allow you to customize the scrolling behavior for specific booking resources on your website.
1) Firstly, create a new post or page, and insert into content of the page this shortcode:
[bookingedit]You can just click at the booking button at edit toolbar and then at popup dialog select second tab for inserting this shortcode or just write manually it. Publish or update page and COPY the URL to this page.
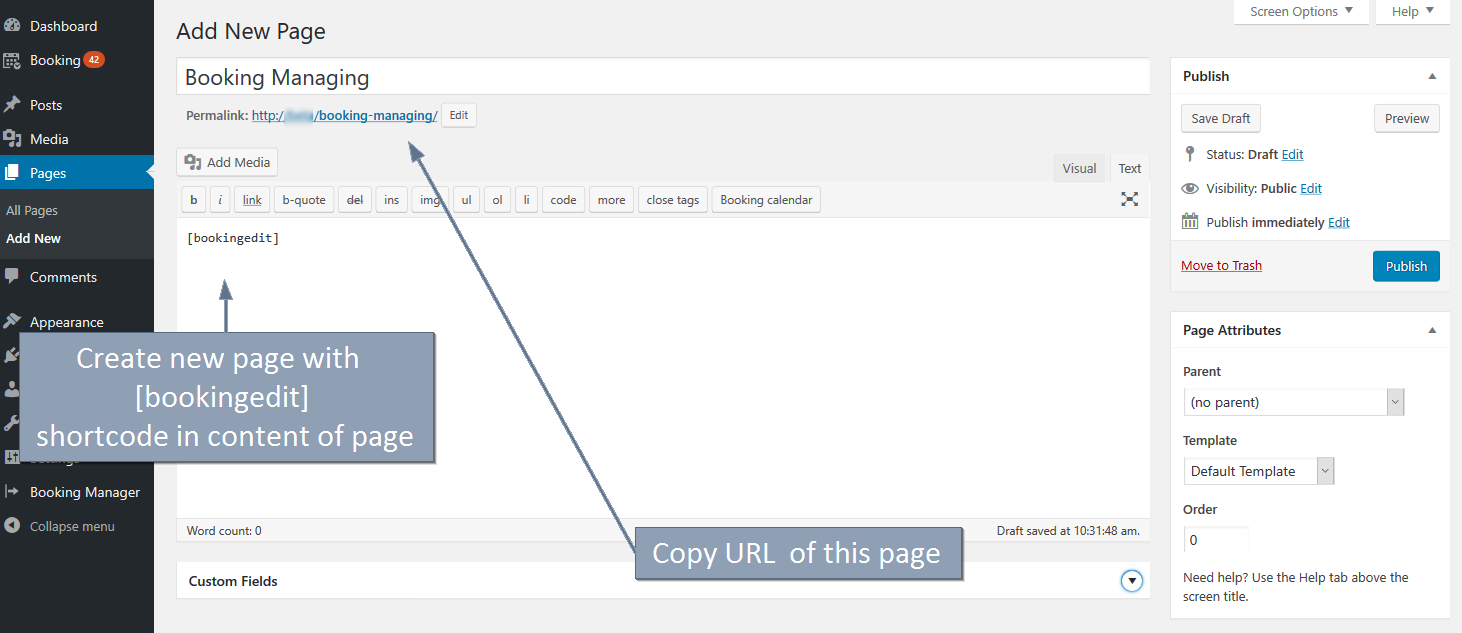
Important! Please note, if you open this page directly, you will see this warning "You do not set any parameters for booking editing". It's because system allow to open this page only from link(s) in email templates, which your website visitor had to received, after he/she made the booking (inside of that link will be specific parameter (secret HASH) for the identification of the booking).
2) Now, open the general booking settings page and at the "Manage bookings section" for field: "URL to edit bookings" write (paste) the URL to the page from point #1. Save the changes of this settings page.

In old versions of Booking Calendar this field located at the Booking > Settings General page in "Advanced" section:

3) Open Booking > Settings > Emails page and inside of email template(s), where it's possible (you can check it at help section under the each email template), you can use these shortcodes (for the inserting links into the email templates), which are sending to the visitors:
[visitorbookingediturl]- inserting link of booking editing by visitor at client side of site,
[visitorbookingcancelurl] - inserting link for booking cancellation by visitor at client side of site,

[visitorbookingpayurl] - inserting link to payment page for visitor at client side of site.

4) You can test it for a new bookings.
Configuration of ability to view and manage all previous bookings of user, at front-end side of your website. Visitors of your website, can view previous (own) bookings, by clicking on secret link in email, which is sending after booking created.
Important! Please note, if you open this page directly, you will see this warning "You do not set any parameters for booking editing". It's because system allow to open this page only from link(s) in email templates, which your website visitor had to received, after he/she made the booking (inside of that link will be specific parameter (secret HASH) for the identification of the booking). Check more about such type of configuration here.


Such shortcodes possible to use in the Booking > Settings > Emails page in New (admin) email template only.
Available since update 8.5.1 of paid versions of Booking Calendar.
Using of such shortcodes require correct configuration of [bookingedit] shortcode in your system.
Please check this FAQ instruction how to configure it.
You can enable the "Redirect to thank you page" option on the Booking > Settings General page in the "Booking Confirmation" section. This allows visitors to be redirected to a specified page after creating a new booking. To showcase the confirmation and "booking details" on this page, simply insert the following shortcode:
[booking_confirm]For guidance on inserting Booking Calendar shortcodes into a page, refer to the instructions on this page, particularly in the 4. Manual Shortcode Configuration section.

To enable the display of the booking admin panel exclusively for specific users, you'll need to install an additional plugin that restricts access to other pages in the WordPress admin panel. You can use the "User Role Editor" plugin or any other plugin of your choice that offers similar functionality.
Follow these steps to show only the booking admin panel for "Subscriber" users in your WordPress admin panel:
- Navigate to WP Booking Calendar > Settings General page in the "Plugin Menu / Permissions" section. Set the value "Subscriber" for each plugin menu option in the "User permissions for plugin menu pages" section.
- Install the "User Role Editor" plugin by going to WordPress > Plugins > "Add New Plugin" menu. Alternatively, install another plugin that can restrict access to the WordPress admin plugin pages.
- Open the Users > User Role Editor page and ensure that only one "Read" capability is defined for "Subscriber" users. Save changes.
- Log in with another WordPress user who has only the "Subscriber" user role and test it.
Important Note: If you have any questions about configuring the "User Role Editor" plugin or another plugin with similar functionality, please contact the support of that specific plugin for assistance. We can only provide help with configuring the Booking Calendar plugin. Thank you for your understanding.
To add Booking Calendar shortcodes to your pages in DIVI Builder using the "Code" module, please follow these steps:
- Edit the page where you want to add the Booking Calendar shortcode in the DIVI Builder.
- Add a new section or row where you want the Booking Calendar to appear.
- Within the section or row, add a new module and select the "Code" module.
- In the Code module settings, paste the Booking Calendar shortcode.
- Customize the settings of the Code module as needed, such as adjusting the alignment or size.
- Save or update the page.
By following these steps, you'll be able to seamlessly integrate Booking Calendar shortcodes into your DIVI Builder pages using the "Code" module.
Days Selection
1) In update 10.15 it is possible to configure the different custom days selection for the different custom booking forms in the new Drag and Drop Booking Form Builder on the WP Booking Calendar > Settings > Forms Builder page. Please check image for detailed step by step confuguration:
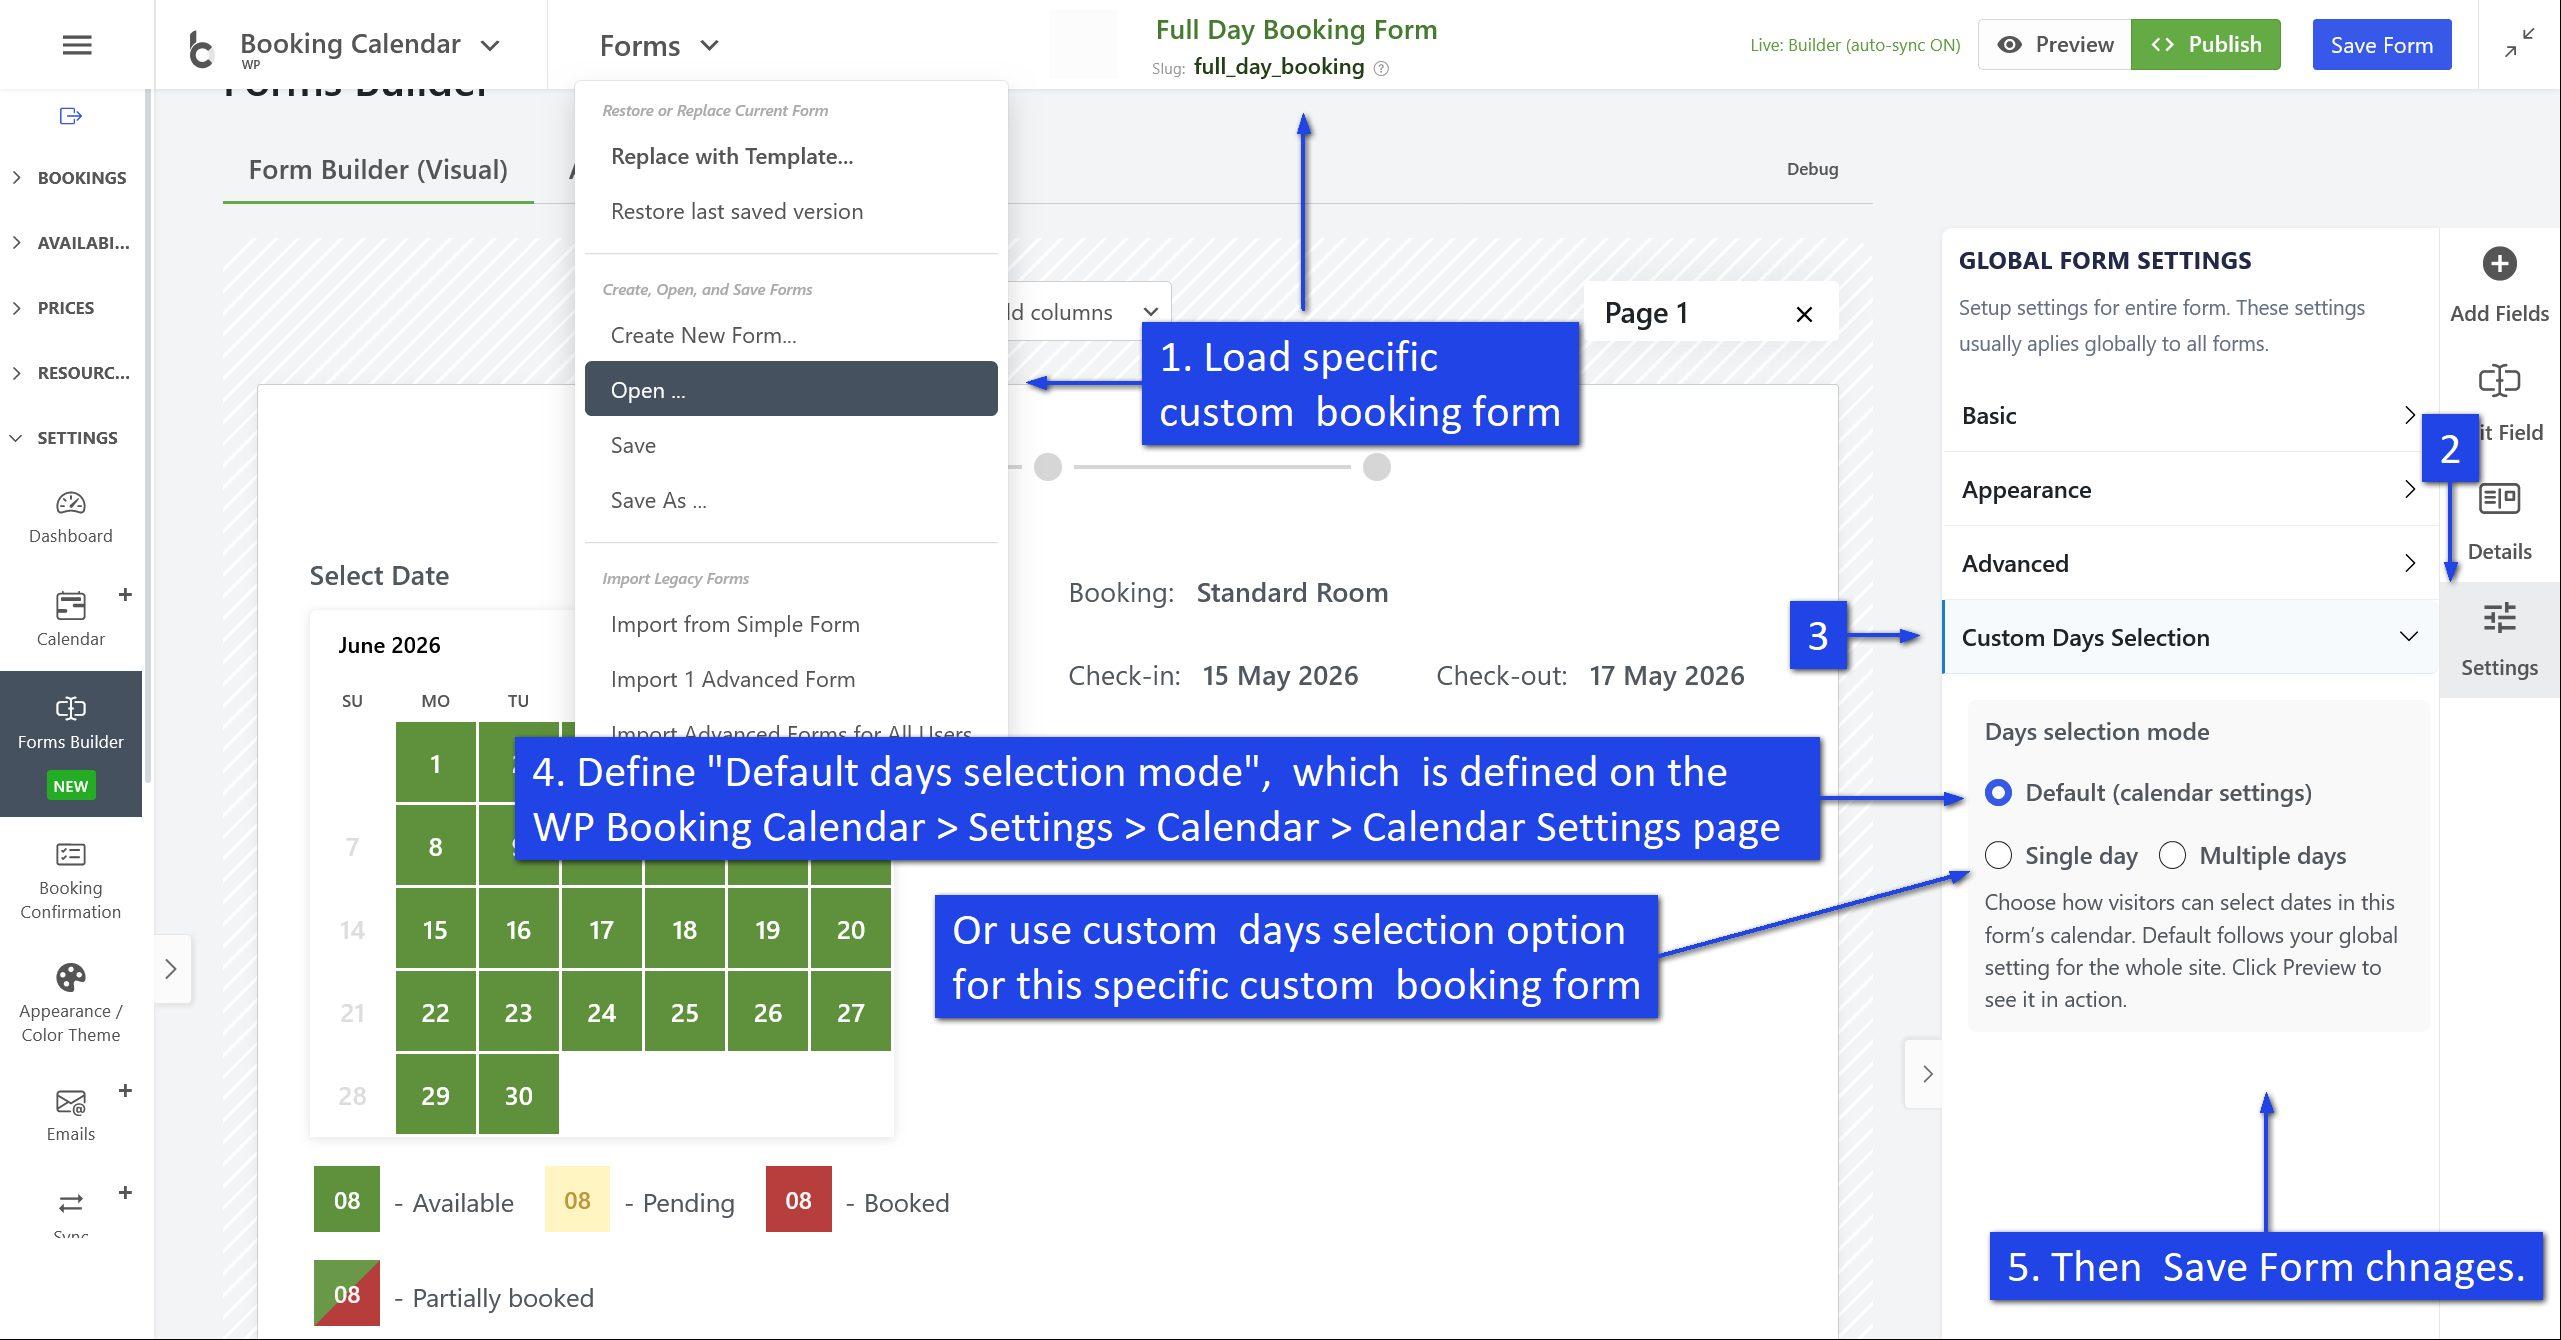
2) Follow this more flexible detailed guide to customize day selection for different calendars using JavaScript integration via shortcodes.
Insert Booking Shortcode:
You can use this JavaScript AFTER the booking shortcode, like this: [booking resource_id=1] in the WordPress post or page editor. While the examples provided here use this shortcode, keep in mind that in your own examples, you'll likely have different parameters for the booking shortcode, such as ID of booking resource. To learn more about how to insert and configure the booking shortcode into your posts or pages, please read our guide here.
JavaScript Insertion:
Please note: You can insert JavaScript only if you are logged in as an admin user. Subscriber users do not have the permission to insert JavaScript into posts or pages. Follow these steps to add custom JavaScript:
- Classic Editor: Switch from "Visual" mode to "Text" mode by clicking the "Text" tab at the top right of the post content form.
- Block Editor: Add a "Custom HTML" block, where you can configure the custom JavaScript code. Or switch from Visual Editor to Code Editor by pressing "Ctrl + Shift + Alt + M" or by using the options toolbar at the top right of the page.
-
Elementor: Add an HTML Widget and follow these steps:
- Edit Page: Navigate to the page you want to edit in Elementor and click on "Edit with Elementor."
- Add HTML Widget: Drag and drop the HTML widget from the Elementor widget panel onto the desired section of the page.
- Edit HTML Widget: Click on the "Edit" button of the HTML widget.
- Insert JavaScript: Insert your custom JavaScript script in the HTML code editor.
- Wrap Script: Wrap your JavaScript script inside the <script> tags. For example, <script> your JS code here </script>.
- Save and Preview: Save your changes and preview your website to ensure that the custom JavaScript script is executed properly.
Customization for Booking Calendar Version 9.8.9 or Newer Updates
Single Day Selection
Activate the Single Day Selection mode with the following code. This code is used to enable single-day selection in the current booking form if you have a different type of day selection set as the default at the General Booking Settings page.
[booking resource_id=1]

<script type="text/javascript">

function wpbc_set_custom_days_selection1(){

   var wpbc_resource_id = 1;

   wpbc_cal_ready_days_select__single( wpbc_resource_id );

}

( function() { if ( document.readyState === 'loading' ){ document.addEventListener( 'DOMContentLoaded', wpbc_set_custom_days_selection1); } else { wpbc_set_custom_days_selection1(); } }() );

</script>
Please note that in this code, the line var wpbc_resource_id = 1; defines the ID of the booking resource (calendar). You can find the IDs of your booking resources on the Booking > Resources page. Be sure to use the same resource ID in the shortcode with the wpbc_resource_id parameter.
Multiple Days Selection
Enable Multiple Days Selection mode with the following code:
[booking resource_id=1]

<script type="text/javascript">

function wpbc_set_custom_days_selection2(){

   var wpbc_resource_id = 1;

   wpbc_cal_ready_days_select__multiple( wpbc_resource_id );

}

( function() { if ( document.readyState === 'loading' ){ document.addEventListener( 'DOMContentLoaded', wpbc_set_custom_days_selection2); } else { wpbc_set_custom_days_selection2(); } }() );

</script>
Please note that in this code, the line var wpbc_resource_id = 1; defines the ID of the booking resource (calendar). You can find the IDs of your booking resources on the Booking > Resources page. Be sure to use the same resource ID in the shortcode with the resource_id parameter.
Range Days Selection with a Fixed Number of Days with 1 Mouse Click.
Activate the Range Days Selection with a fixed number of days using a single mouse click with the following code:
[booking resource_id=1]

<script type="text/javascript">

function wpbc_set_custom_days_selection3(){

   var wpbc_resource_id = 1;

   wpbc_cal_ready_days_select__fixed( wpbc_resource_id, 7, [-1] );

}

( function() { if ( document.readyState === 'loading' ){ document.addEventListener( 'DOMContentLoaded', wpbc_set_custom_days_selection3); } else { wpbc_set_custom_days_selection3(); } }() );

</script>
In this code, we are using 3 parameters:
Parameter #1 - Resource ID:
The line var wpbc_resource_id = 1; define the ID of the booking resource (calendar). Locate the IDs of your booking resources on the Booking > Resources page, and ensure you use the same resource ID in the shortcode with the wpbc_resource_id parameter in JavaScript code.
Parameter #2 - Number of Dates to Select:
The second parameter, in our case, sets the number of dates for selection to 7 days.
Parameter #3 - Start Week Day(s) Selection:
The third parameter, represented as an array, allows you to specify the starting day(s) of the week. Assign values according to the following:
    0: Sunday

    1: Monday

    2: Tuesday

    3: Wednesday

    4: Thursday

    5: Friday

    6: Saturday
[-1] - defines the selection of any weekdays.
For example, if you want the start day of the range selection to be Saturday and you want to select 2 days, use this code:
var wpbc_resource_id = 1;

wpbc_cal_ready_days_select__fixed( wpbc_resource_id, 2, [6] );
If you want to set the start day of range selections as Monday and Friday and make a selection of 4 days, use this code:
var wpbc_resource_id = 1;

wpbc_cal_ready_days_select__fixed( wpbc_resource_id, 4, [1,5] );
The following codes are equivalent:
var wpbc_resource_id = 1;

wpbc_cal_ready_days_select__fixed( wpbc_resource_id, 7, [-1] );
var wpbc_resource_id = 1;

wpbc_cal_ready_days_select__fixed( wpbc_resource_id, 7, [0,1,2,3,4,5,6] );
Range Days Selection as a Dynamic Range of Days with 2 Mouse Clicks.
This code enables this type of day selection for the current booking form if you have a different type of day selection set as the default at the General Booking Settings page.
Activate the Range Days Selection with a dynamic range of days using 2 mouse clicks with the following code:
[booking resource_id=1]

<script type="text/javascript">

function wpbc_set_custom_days_selection4(){

  var wpbc_resource_id = 1;

  wpbc_cal_ready_days_select__range( wpbc_resource_id, 7, 14, [], [-1] );

}

( function() { if ( document.readyState === 'loading' ){ document.addEventListener( 'DOMContentLoaded', wpbc_set_custom_days_selection4); } else { wpbc_set_custom_days_selection4(); } }() );

</script>
In this code, we are using 5 parameters:
Parameter #1 - Resource ID:
The line var wpbc_resource_id = 1; define the ID of the booking resource (calendar). Locate the IDs of your booking resources on the Booking > Resources page, and ensure you use the same resource ID in the shortcode with the wpbc_resource_id parameter in JavaScript code.
Parameter #2 - Minimum Number of Days to Select:
The second parameter defines the minimum number of days to select. In our example, it's 7 days.
Parameter #3 - Maximum Number of Days to Select:
The third parameter represents the maximum number of days to be selected with 2 mouse clicks. In our example, it's 14 days.
Parameter #4 - Specific Number of Days to Select:
The fourth parameter is an array that specifies the specific number of days that can be selected.
- To allow any number of days, use this parameter: []
- To allow only week-based selections, such as 7 days, 14 days, 21 days, and so on, use this parameter: [7,14,21].
Parameter #5 - Start Week Day(s) Selection:
The fifth parameter is an array where you can specify the start day of the range days selection.
Specify a specific day of the week or multiple days as the start day for the range selections, use the following values:
    0: Sunday

    1: Monday

    2: Tuesday

    3: Wednesday

    4: Thursday

    5: Friday

    6: Saturday
[-1] - defines the selection of any weekdays.
For example, to start the range selection on Saturday and make a selection from 3 to 10 days, use this code:
var wpbc_resource_id = 1;

wpbc_cal_ready_days_select__range( wpbc_resource_id, 3, 10, [], [6] );
To start the range selection on Monday and Friday and make a selection of only weeks, use this code:
var wpbc_resource_id = 1;

wpbc_cal_ready_days_select__range( wpbc_resource_id, 7, 28, [7,14,21,28], [1,5] );
The following codes are equivalent:
var wpbc_resource_id = 1;

wpbc_cal_ready_days_select__range( wpbc_resource_id, 7, 14, [], [-1] );
var wpbc_resource_id = 1;

wpbc_cal_ready_days_select__range( wpbc_resource_id, 7, 14, [], [0,1,2,3,4,5,6] );
If you're using version 9.7.7 or older, you can refer to the Legacy FAQ for Configuring Different Types of Day Selection at this link.
This resource should provide the guidance you need for configuring different types of day selection in your older version of the plugin.

In this screenshot you can check the typical change-over days setup in Booking Calendar Business Small or higher versions, where visitors can select only weeks starting from Saturday. Starting new booking on the same date, where some old bookings was ending.

At front-end side such bookings multi-day bookings with specific check-in and check-out days, clearly marked with diagonal or vertical lines. Test it here.
This guide explain how to prevent start day selection and finish of days selection (check-in and check-out) on Sunday.
In the similar way you can configure system for any other weekdays.
Such configuration possible in the Booking Calendar Business Medium or higher versions.
Important. Firstly please read about the configuration of days selection in the Booking Calendar shortcode in this FAQ guide.
1) Please enable the range days selection mode with 2 mouse clicks at the WP Booking Calendar > Settings General page in "Calendar" section and define check in day for all weekdays, excluding the Sunday, as in screenshot bellow.

2) Then configure the shortcode like this:
Please try to use something like this:
[booking resource_id=1 options='{calendar months_num_in_row=1 width=100% cell_height=50px},
{select-day condition="weekday" for="1" value="1,2,3,4,5,6,8"},
{select-day condition="weekday" for="2" value="1,2,3,4,5,7,8"},
{select-day condition="weekday" for="3" value="1,2,3,4,6,7,8"},
{select-day condition="weekday" for="4" value="1,2,3,5,6,7,8"},
{select-day condition="weekday" for="5" value="1,2,4,5,6,7,8"},
{select-day condition="weekday" for="6" value="1,3,4,5,6,7,8"}']
As you can see here I defined the start day selection for each weekdays, which defined by parameter for="X"
where values of the "for" parameter are mean following: 0 - Sunday, 1 - Monday, 2 - Tuesday, 3 - Wednesday, 4 - Thursday, 5 - Friday, 6 - Saturday.
and for value parameter I defined how many days to select for specific starting weekday. You can see that there skipped specific number of days to select. It is exact number of days, when user start selection on specific weekday and can not finish selection on Sundays.
For example, if start selection on Monday, then user can not select 7 days, that is why we use this:
{select-day condition="weekday" for="1" value="1,2,3,4,5,6,8"}, Time Slots Configuration
Its does not possible to select several time-slots (possible to select only one), if you are using Booking Calendar Free version of in paid versions using range-time shortcode:
Select time-slot: [select rangetime "10:00 - 12:00" "12:00- 14:00" "14:00 - 16:00" "16:00 - 18:00" "18:00 - 20:00"]Instead of time-slots selection you can use start time and end time selections or start time and time duration selections shortcodes at the Booking > Settings > Form page in paid versions of Booking Calendar. So you can book several consecutive hours during specific day.
1) Star time and duration of time shortcodes, for ability to book several consecutive hours during a day:
Start time: [select starttime "10:00" "11:00" "12:00" "13:00" "14:00" "15:00" "16:00" "18:00"]
Time Duration: [select durationtime "15min@@00:15" "30 min@@00:30" "45 min@@00:45" "1 hour@@01:00" "1 hour 30 min@@01:30"]
2) Or you can use start time and end time selections or time entering shortcodes:
 Start time: [select starttime "10:00" "11:00" "12:00" "13:00" "14:00" "15:00" "16:00" "18:00"]
 End time: [select endtime "11:00" "12:00" "13:00" "14:00" "15:00" "16:00" "19:00"]
You can configure the time-slots selections on the Booking > Settings > Form page. Please use the "shortcode generator" on the right side of that page for the correct generation of the shortcode.
Please watch more in this video: https://wpbookingcalendar.com/help/booking-calendar-video-timeslots/
You can test the bookings for the specific times in action on the live demo of Business Small version (which is configured by default for the bookings of specific time-slots) here: https://bs.wpbookingcalendar.com/
Other live demo you will need to reconfigure.
1) If you need to block occasionally specific time slot at specific date, then the fastest way to do this is to make the blank bookings for such date and time at the Booking > Add booking page.
You can use the "Auto-fill form" button at the top toolbar on the Booking > Add booking page in admin panel to make the fast blank booking in 3 mouse clicks. This "Auto-fill" feature in the Booking Calendar Business Small or higher versions.

2) If you need to define an unavailable specific time slot at specific weekday or season based on some rule, then you need to check the Booking Calendar Business Medium or higher versions. It's possible to have the different times selection for the different days in those versions. Please check more here.
You can check more info about this configuration at this page.
Also you can watch the legacy video about this config here.
Description
Available in Booking Calendar Business Medium or higher versions.
This feature provide possibility to use the different time slots selections in the booking form for the different week days or different days, which assigned to the specific season filters. So each week day (day of specific season filter) can have different time slots list.
Configuration
You can configure the time slots at the WP Booking Calendar > Settings > Booking Form > Booking Form Fields page. If you are not familiar with the booking form fields configuration, please read firstly about the booking form fields configuration here.
The general structure of the configuration condition rule are following:
[condition name="FILTER-NAME" type="FILTER-TYPE" value="VALUE"]
   CONTENT (any HTML or form fields shortcodes), showing if these condition is TRUE
[/condition]name - its the unique name of the condition group, several conditions with different values. For example, if you want to have the different time slots for the different week days, you will be have the several conditions, with the same name but with different value parameters in conditions. Please check more about it, in the examples.
type - type of the condition. There are 2 types of the condition: "weekday" and "season". "weekday" - is mean that condition rule is based on the selected day of week value, like Monday, Tuesday, etc... . "season" - is mean that condition rule is based on the "season filter" name of selected date. In other words the condition is TRUE if the selected day is belong to some season filter in the Booking > Resources > Filters page.
value - value of the specific conditions. If the value is true, so then the content of the conditions is showing in the booking form. You can have the default value (empty - "", or like this - "*") for showing the content of this condition, if all other conditions is FALSE, or at initial stage, when the date in calendar is not selected yet.
Examples:
Week days conditions.
[condition name="weekday-condition" type="weekday" value="*"]
  Default:   [select rangetime  "10:00 - 11:00" "11:00 - 12:00" "12:00 - 13:00" "13:00 - 14:00" "14:00 - 15:00" "15:00 - 16:00" "16:00 - 17:00" "17:00 - 18:00"]
[/condition]
[condition name="weekday-condition" type="weekday" value="1,2"]
  Monday, Tuesday:    [select rangetime  "10:00 - 12:00" "12:00 - 14:00"]
[/condition]
[condition name="weekday-condition" type="weekday" value="3,4"]
  Wednesday, Thursday:  [select rangetime  "14:00 - 16:00" "16:00 - 18:00" "18:00 - 20:00"]
[/condition]
[condition name="weekday-condition" type="weekday" value="5,6,0"]
  Friday, Saturday, Sunday:  [select rangetime  "10:00 - 12:00" "12:00 - 14:00" "14:00 - 16:00" "16:00 - 18:00" "18:00 - 20:00"]
[/condition]
"*" - default value, if no dates are selected, or none of the exist condition is true.
0 - Sunday,
1 - Monday,
2 - Tuesday,
3 - Wednesday,
4 - Thursday,
5 - Friday,
6 - Saturday
You can use the several values, separated by comma.
Season filters conditions.
[condition name="season-times" type="season" value="*"]
  Default: [select rangetime "14:00 - 16:00" "16:00 - 18:00" "18:00 - 20:00"]
[/condition]
[condition name="season-times" type="season" value="High_season"]
  High season: [select rangetime  "10:00 - 12:00" "12:00 - 14:00" "14:00 - 16:00" "16:00 - 18:00" "18:00 - 20:00"]
[/condition]
[condition name="season-times" type="season" value="Low_season"]
  Low season: [select rangetime "12:00 - 14:00" "14:00 - 16:00"]
[/condition]
High_season - its a name of the some Season filter on the Booking > Resources > Filters page,
Low_season - its a name of the some Season filter on the Booking > Resources > Filters page
You can use only single season filter name in the one value.
Additional info.
Please note, if you will activate the "Multiple days" selection or "Range days" selection in the General Booking Settings page at calendar section, so all these conditions will be based on the "first" day of that selection in the calendar.
You need to define the times selection in booking form at the Booking > Settings > Form page in a way like this:
<p class="times_section">Select Start times:<br />[select starttime class:start_selection "All day(s) booking@@00:00" "08:00" "08:30" "09:00" "09:30" "10:00" "10:30" "11:00" "11:30" "12:00" "12:30" "13:00" "13:30" "14:00" "14:30" "15:00" "15:30" "16:00" "16:30" "17:00" "17:30" "18:00" "18:30" "19:00" "19:30" "20:00" "20:30" "21:00"]</p>
<p class="times_section time_duration_section">Select time duration:<br />[select durationtime class:duration_selection "All day booking@@24:00" "1 hour@@01:00" "2 hours@@02:00" "3 hours@@03:00" "4 hours@@04:00" "5 hours@@05:00" "6 hours@@06:00" "7 hours@@07:00" "8 hours@@08:00" "9 hours@@09:00" "10 hours@@10:00"]</p>
Please note, here is trick in start time selection. First option configured like this:
"All day(s) booking@@00:00"
Where value for this option "00:00" is means that entire day will be booked (its internal logic of Booking Calendar plugin).
2) Also you need to add custom JavaScript code, that will show the "duration of time", only in case, if you will select other value than "All day booking", and hide the times fields from the booking form, at all, if you select more than 1 day:
<script type="text/javascript">
    jQuery('.start_selection').on('change', function() {
       var start_time = jQuery(this).find(":selected").val();
	   if ( '00:00' == start_time ) {
       	  jQuery('.time_duration_section').hide();
		  jQuery('.duration_selection').val( '24:00' );
		  jQuery('.time_duration_section option:first').css('display', 'block');
	   } else {
          jQuery('.time_duration_section').show();
          jQuery('.duration_selection').val( '01:00' );
		  jQuery('.time_duration_section option:first').css('display', 'none');
	   }
     });
     jQuery(document).ready(function(){
		jQuery('.start_selection').val( '00:00' );
		jQuery('.duration_selection').val( '24:00' );
		jQuery('.time_duration_section').hide();
     });
     jQuery( ".booking_form_div" ).on('date_selected', function(event, bk_type, date) {
                   if ( ! jQuery( this ).is( ':visible' ) ) {
                      return false;
                   }
                   var dates_count =  date.split(',');
		   dates_count = dates_count.length;
		   if ( dates_count > 1 ) {
		       jQuery('.start_selection').val( '00:00' );
		       jQuery('.duration_selection').val( '24:00' );
		       jQuery('.times_section').hide();
		   } else {
		       jQuery('.start_selection').val( '00:00' );
		       jQuery('.duration_selection').val( '24:00' );
		       jQuery('.times_section').show();
			   jQuery('.time_duration_section').hide();
		   }
		 if (typeof(showCostHintInsideBkForm) == 'function') {
               showCostHintInsideBkForm( bk_type );
         }
     });
</script>
So full minimum booking form configuration can look like this:
[calendar]
<div class="form-hints">
          Dates:[selected_short_timedates_hint]  ([nights_number_hint] - night(s))<br><br>
          Full cost of the booking: [cost_hint] <br>
</div><hr/>
<div class="times-form">
	<p class="times_section">Select Start times:<br />[select starttime class:start_selection "All day(s) booking@@00:00" "08:00" "08:30" "09:00" "09:30" "10:00" "10:30" "11:00" "11:30" "12:00" "12:30" "13:00" "13:30" "14:00" "14:30" "15:00" "15:30" "16:00" "16:30" "17:00" "17:30" "18:00" "18:30" "19:00" "19:30" "20:00" "20:30" "21:00"]</p>
	<p class="times_section time_duration_section">Select time duration:<br />[select durationtime class:duration_selection "All day booking@@24:00" "1 hour@@01:00" "2 hours@@02:00" "3 hours@@03:00" "4 hours@@04:00" "5 hours@@05:00" "6 hours@@06:00" "7 hours@@07:00" "8 hours@@08:00" "9 hours@@09:00" "10 hours@@10:00"]</p>
<script type="text/javascript">
    jQuery('.start_selection').on('change', function() {
       var start_time = jQuery(this).find(":selected").val();
	   if ( '00:00' == start_time ) {
       	  jQuery('.time_duration_section').hide();
		  jQuery('.duration_selection').val( '24:00' );
		  jQuery('.time_duration_section option:first').css('display', 'block');
	   } else {
          jQuery('.time_duration_section').show();
          jQuery('.duration_selection').val( '01:00' );
		  jQuery('.time_duration_section option:first').css('display', 'none');
	   }
     });
     jQuery(document).ready(function(){
		jQuery('.start_selection').val( '00:00' );
		jQuery('.duration_selection').val( '24:00' );
		jQuery('.time_duration_section').hide();
     });
     jQuery( ".booking_form_div" ).on('date_selected', function(event, bk_type, date) {
                   if ( ! jQuery( this ).is( ':visible' ) ) {
                      return false;
                   }
                   var dates_count =  date.split(',');
		   dates_count = dates_count.length;
		   if ( dates_count > 1 ) {
		       jQuery('.start_selection').val( '00:00' );
		       jQuery('.duration_selection').val( '24:00' );
		       jQuery('.times_section').hide();
		   } else {
		       jQuery('.start_selection').val( '00:00' );
		       jQuery('.duration_selection').val( '24:00' );
		       jQuery('.times_section').show();
			   jQuery('.time_duration_section').hide();
		   }
		 if (typeof(showCostHintInsideBkForm) == 'function') {
               showCostHintInsideBkForm( bk_type );
         }
     });
</script>
     <p>First Name (required):<br />[text* name] </p>
     <p>Last Name (required):<br />[text* secondname] </p>
     <p>Email (required):<br />[email* email] </p>
     <p>Adults:  [select visitors class:col-md-1 "1" "2" "3" "4"] Children: [select children class:col-md-1 "0" "1" "2" "3"]</p>
     <p>[submit class:btn "Send"]</p>
</div>
It's possible at the Booking Calendar Business Small and Business Medium versions of Booking Calendar in update 4.1 or newer.
You can activate "Use check in/out time:" option at the General Booking Settings page.
Then in the sub-settings set the "Check in" time as 15:00 and "Check out" time as 10:00. (You can set the different times there, but be sure to set the "Check In" time older than "Check Out").
Save the settings page.
Now, your visitors will be able to use the same date as check in/out date for the different bookings, its mean if the some booking is finished on the specific date, other visitor can start the new booking on the same specific date.
The check in/out days in calendar will be marked as half booked (diagonal line) and not by clock icon as for the usual timeslots.
Please note, this option will apply globally to the all booking resources and will overwrite any time slots, if you will use them in the booking form.
If you are need to use just time slots in the booking form, so you are need to deactivate this option and configure the time slot selection at the Booking > Settings > Fields page. Please read more about the booking form fields configuration here.
If you're using the changeover days functionality, which allows half-day bookings, but you need specific booking resources to have time slots or full-day bookings, you can exempt certain pages from the changeover days functionality.
- Navigate to WP Booking Calendar > Settings General page in the "Calendar" section.
- Activate the option "Use changeover days" (this option is only available if you've enabled "Multiple" or "Range" days selection modes).
- Enable the option "Do not use changeover days on certain pages".
- Enter the relative URLs of the pages for which you do not want to use the changeover days functionality. Enter one URL per line. For example: "/page-no-change-over/".

Search Availability Setup
Available in update 10.1 of Booking Calendar Business Large and Booking Calendar MultiUser versions.
Search Availability Overview
This feature allows you to easily customize search availability for booking resources. Personalize search visibility and attributes by customizing options like summary text and thumbnail images to enhance user engagement in search results. Additionally, configure specific parameters for resource filtering in search forms, providing users with targeted and relevant search options. You can check example of search availability on this page.

Search for Specific Time Slots
Now you can search for specific time slots on particular dates or even a range of dates. This is a fantastic feature for appointment-based businesses, allowing clients to find available time slots for different service providers. Imagine searching for an available hair stylist, doctor, or other service provider on a specific date and time. You can even set an approximate date range (+/- N days from the desired date) to find appointments within a specific time slot. You can check example of search time availability on this page

Search Availability Configuration
The Booking Calendar plugin provides a flexible system for search available booking resources (your properties or services) on specific dates. You can filter search results using various parameters, such as the maximum number of persons or additional attributes, which you can define in the search form as select boxes.
Capacity Feature
Before starting the configuration of search form availability, you should review the "Capacity Concept" for booking resources. The Capacity feature allows you to set capacities for your booking resources, either for the entire day or for specific times within a day. This means you can control the number of bookings allowed for each day or for specific time slots.
For example, you could specify that your booking resource (calendar) can accommodate up to 10 bookings per day. Alternatively, if you use time fields in the booking form, each time slot can accommodate up to 10 bookings per day.
For detailed instructions on configuring capacity and availability for booking resources and to watch a video about this feature, refer to this guide.
Configuration of the Search Form
To configure the Search Form, please go to WP Booking Calendar > Settings > Search. A basic Search form might look like this:
<div class="well">
    <r>
        <c> <l>Check-in:</l> [search_check_in]
            <spacer>width:4em;</spacer>
            <l>Check-out:</l> [search_check_out] </c>
        <c>[search_button "Search"]</c>
    </r>
</div>

This example uses the shortcodes: [search_check_in] and [search_check_out] for selecting check-in and check-out dates, and [search_button "Search"] for the Search Button.
Please use the Help section on the right side of this page to find other available shortcodes you can use in the search form.
Publishing the Search Form
To publish the Search form, create a new page (or use an existing page) and insert the "Search Form" shortcode into this page.
You can refer to this general instruction on how to insert the Booking Calendar shortcodes into posts or pages in the standard WordPress editor or custom editors, such as Elementor.
A detailed description of the "Search Form" shortcode and the parameters you can use can be found on this page.


Example: [bookingsearch]
This shortcode will show the search form, and if you click on the "Search" button, the search results will be shown on the same page, as in this example.

If you need to display the search results on another page, you should use a shortcode like this:
[bookingsearch searchresults="https://your-server.com/search-results/"]
This parameter, searchresults='https://your-server.com/search-results/', defines the URL of the page where search results will be shown. Note that on this new page, you need to insert the search results shortcode. Please refer to the next section.
Publishing Search Results Shortcode
If you want to display the search results on a different page than the one with the search form, insert the following shortcode on the new page: [bookingsearchresults]

Configuring the Search Results
You can configure the search results on the WP Booking Calendar > Settings > Search page.

Please use the help section (located on the right side) for available shortcodes that you can use in the Search Results.
Enabling Booking Resources to Appear in Search Results
To show booking resources in search results, enable them on the WP Booking Calendar > Resources > Search Availability > Searchable Resource Setup page.
Open the WP Booking Calendar > Resources > Search Availability > Searchable Resource Setup page and, for each specific booking resource you want to show in search results, enable the toggle and click the "Save changes" button.

Note that on this page, you can define the URL to the existing pages with booking forms for each specific booking resource. This URL should direct users to the pages where they can find the booking form for a specific booking resource, where visitors can make bookings. This is essentially the URL of the page where visitors will be redirected after clicking the "Book Now" button in search results.
Use this shortcode for the "Book Now" button on the WP Booking Calendar > Settings > Search page: [search_result_button "Book Now"]

Configuring Title, Excerpt, and Image for Booking Resources in Search Results
To configure the image, title, and excerpt (a small description) shown in search results near each booking resource, open the WP Booking Calendar > Resources > Search Availability > Searchable Resource Setup page and click on the "Excerpt / Image" tab.

For each booking resource, enter:
- Title: The title corresponding to the shortcode [search_result_title] used in the search results form on the WP Booking Calendar > Settings > Search page.
- Excerpt: A small description shown next to the booking resource in search results, corresponding to the shortcode [search_result_info] used in the search results form.
- Image: Paste the Image URL or click the "Configure" button next to the "Image URL" field to upload a new image or select an existing one.
At this point, the basic setup for search availability is complete. You should have already published the search form and be able to see the search results with images and descriptions. After clicking the "Book Now" button next to a specific booking resource in the search results, you should be redirected to the page with the booking form for that specific resource.
Advanced Configuration of the Search Results
Searching Booking Resources with Specific Capacity
This section explains how to configure and use search results for booking resources with specific capacities.
For a detailed guide on configuring capacity for specific booking resources, please refer to this guide.
If you have booking resources with specific capacities, such as several rooms of the same type in a hotel or several available slots for a meeting, you can use this shortcode in the search form (at WP Booking Calendar > Settings > Booking Form page):
[search_quantity "1" "2" "3" "4"]
This will display a select box in the search form.

For example, if you need to search for two available rooms of the same type for specific dates or need to book two available spaces for a meeting, you can use this shortcode along with booking resources with specific capacities. When you select the option "2" in the search form, the system will show booking resources with at least two available slots (rooms or spaces, etc.).
This shortcode is useful only for booking resources with a specific capacity higher than one. If you have only single booking resources (where capacity = 1), you can omit this shortcode.

Example of showing search results when searching for two available rooms in booking resources with specific capacity (e.g., a hotel with several rooms of the same type):

Searching Booking Resources by Custom Parameters
If you need to search for availability based on custom parameters, such as location or other custom search filters, follow these steps:
For example, if you have several properties in different locations and need to search for available properties in a specific location:
- Define a custom parameter with a value (such as location) on the WP Booking Calendar > Settings > Search page in the "Search Filter" tab for each booking resource. Click the "Configure Search Filter" button next to each booking resource.

- Create a new search filter named "location" (this name must be the same for all booking resources) with values like "USA," "France," etc.

- Repeat this step for all booking resources and save changes.

-
Open WP Booking Calendar > Settings > Search page. Add the new search filter selectbox with the name "location" and values such as "USA," "France," etc. Example: <c><l>Location:</l> [selectbox location "Any@@" "Spain" "France" "United States@@USA"] </c>


Now, you can search by specific location in your search form. Note that it can be any other parameter configured in the search form and on the WP Booking Calendar > Resources > Search Availability > Searchable Resource Setup page.

Search Filter Parameters: Tips and Tricks
When configuring search filter parameters on the WP Booking Calendar > Resources > Search Availability > Searchable Resource Setup page for specific booking resources, you can add several search parameters with the same name but different values. This way, a booking resource will appear in search results if any of the specified values match the user's selection.
For example, you might have a search filter for "amenities" with several values like "wifi," "parking," etc.

If you need to show booking resources that can accommodate an exact number of visitors, you need to define the search filter parameter for the specific booking resource like this: visitors_number = 2

If in the search form you use the filter select box to show booking resources with visitors_number = 4, the system will not show the booking resource from the previous example. Only when you select "2" in the search parameter will the system show the search result from the previous example, which has the search filter configured as visitors_number = 2.
What if we need to show all booking resources where the number of visitors can be 2 or more?
In this case, for all booking resources, define the search filter as greater than or equal to a specific value: visitors_number >= 2

Example of configuration for several booking resources:

Additional Parameters for the Search Form
Some additional useful parameters that you can enable and configure at the bottom of the WP Booking Calendar > Settings > Search page include:

- Sort Search Results By: Select the sorting method for search results.
- Date Format: Choose the date format for check-in/out fields in the search form.
- Disable Days Auto Selection: Check this box to prevent automatic selection of days in the calendar after redirection from search results.
- Auto-open Checkout Calendar: Automatically opens the checkout calendar after selecting a date in the check-in calendar.
- Check-in/out Dates Required: Requires users to select check-in and check-out dates in the search form. If disabled, searches will proceed based on other criteria, even if no dates are chosen.
- Search Results Title: Set a title for the search results. Use [result_count] to display the number of search results.
- Nothing Found Message: Message displayed when no search results are found.
- Extended Search Results Title: Set the title for additional search results outside the selected dates, showing matches within a range of +/- N days from the search dates. Use [result_count] to display the number of search results.
Sync
1) Requirements. This functionality available in the Booking Calendar update 8.0 or newer version.
So if you are using some older paid version of Booking Calendar, then you can request the new update of Booking Calendar on this page: https://wpbookingcalendar.com/request-update/
2) Requirements. Additionally for ability to import bookings from external websites, like Airbnb, Booking.com, HomeAway, TripAdvisor, VRBO, FlipKey and any other calendar that uses .ics format, you will be need to install Booking Manager plugin update 2.0 or newer ( https://wordpress.org/plugins/booking-manager/ ).
3) Getting URL of .ics feed. Now, when you have installed both plugins, you can start configuring of import events/bookings from external website.
First of all you need to get URL of .ics feed, from where you want to import the events/bookings.
Let make example based on Google Calendar. At other websites, you need to check help documentation where exactly you can find URL of .ics feeds: Airbnb, Booking.com, HomeAway, TripAdvisor, VRBO, FlipKey
3.1) Open Google Calendar then mouse over specific calendar and click on settings icon at right side near specific calendar, then click on "Settings and Sharing" link.

3.2) Scroll to "Integrate calendar" section, and copy URL of "Secret address in iCal format"

4) Inserting Booking Manager import shortcode(s). You will be need to insert the Booking Manager Shortcode for importing of events into some post or page.
The easiest way todo this is clicking on "Booking Manager" button in edit content toolbar:

Then in popup dialog switch to the "Import .ics feed into WPBC" tab.
Paste URL to your .ics feed in specific feed, and configure other parameters, like booking resource (in paid versions), where you want to import bookings, start and end date of import and other parameters.

Please read more about manual configuration of Booking Manager import shortcode at this page.
5) Publish such page(s)

Please note, now, when someone will visit this page, the import process from this specific .ics feed will start into the booking resource, which you have specified in booking manager shortcode.
When you will visit such page, so then you will see how many bookings was imported:

6) CRON. Its means that you need to visit such page periodically for start importing of bookings that can be created at other website. The best way its to configure CRON at your server for periodic access such page(s) and import of bookings from different sources. Please read more about CRON .
Probably you will be need to contact your server administrator or support of hosting, if you will have some difficulties with configuring CRON at your server.
Repeat steps 3 - 6 for different .ics feeds from different sources and for different booking resources (in paid versions of Booking Calendar).
7) TIP. As you can see from Booking Manager Shortcode, you can define in shortcode different URL to .ics feed and specific booking resource (in paid version). Using such shortcodes in different pages give a great flexibility to import from different .ics feeds (sources) into the same resource. Like one page for import from Airbnb and other page with different shortcode for importing from booking.com or Google Calendar. Also you can define different time interval in your CRON for accessing different pages and its means to start import of bookings with different intensity.
1) Requirements. This functionality available in the Booking Calendar update 8.0 or newer version.
So if you are using some older paid version of Booking Calendar, then you can request the new update of Booking Calendar on this page: https://wpbookingcalendar.com/request-update/
2) Requirements. Additionally for ability to export bookings into external websites, like Airbnb, Booking.com, HomeAway, TripAdvisor, VRBO, FlipKey and any other calendar that uses .ics format, you will be need to install Booking Manager plugin update 2.0 or newer ( https://wordpress.org/plugins/booking-manager/ ).
3) Export URLs. Now, when you have installed both plugins, you can start configuring of export bookings into external website.
Please open the Booking > Settings > Sync > Export -ics page.
Configure URLs for each booking resources (in paid versions). In the Booking Calendar Free version, you will see field for configuring URL for your one Default booking resource. Then click on Save changes button.

4) Import .ics in external website. Now you need to check documentation of each other external website, of how to start import of .ics feeds into specific services: Airbnb, Booking.com, HomeAway, TripAdvisor, VRBO, FlipKey
Important! Please note, once you have imported specific .ics feed into external website or application, its does not mean that this operation will be executed periodically. You need to check documentation of specific service (like AirBNB), for ability to import such .ics feeds periodically for having your bookings in external website always up to date.
Example of how to import .ics files in Google Calendar.

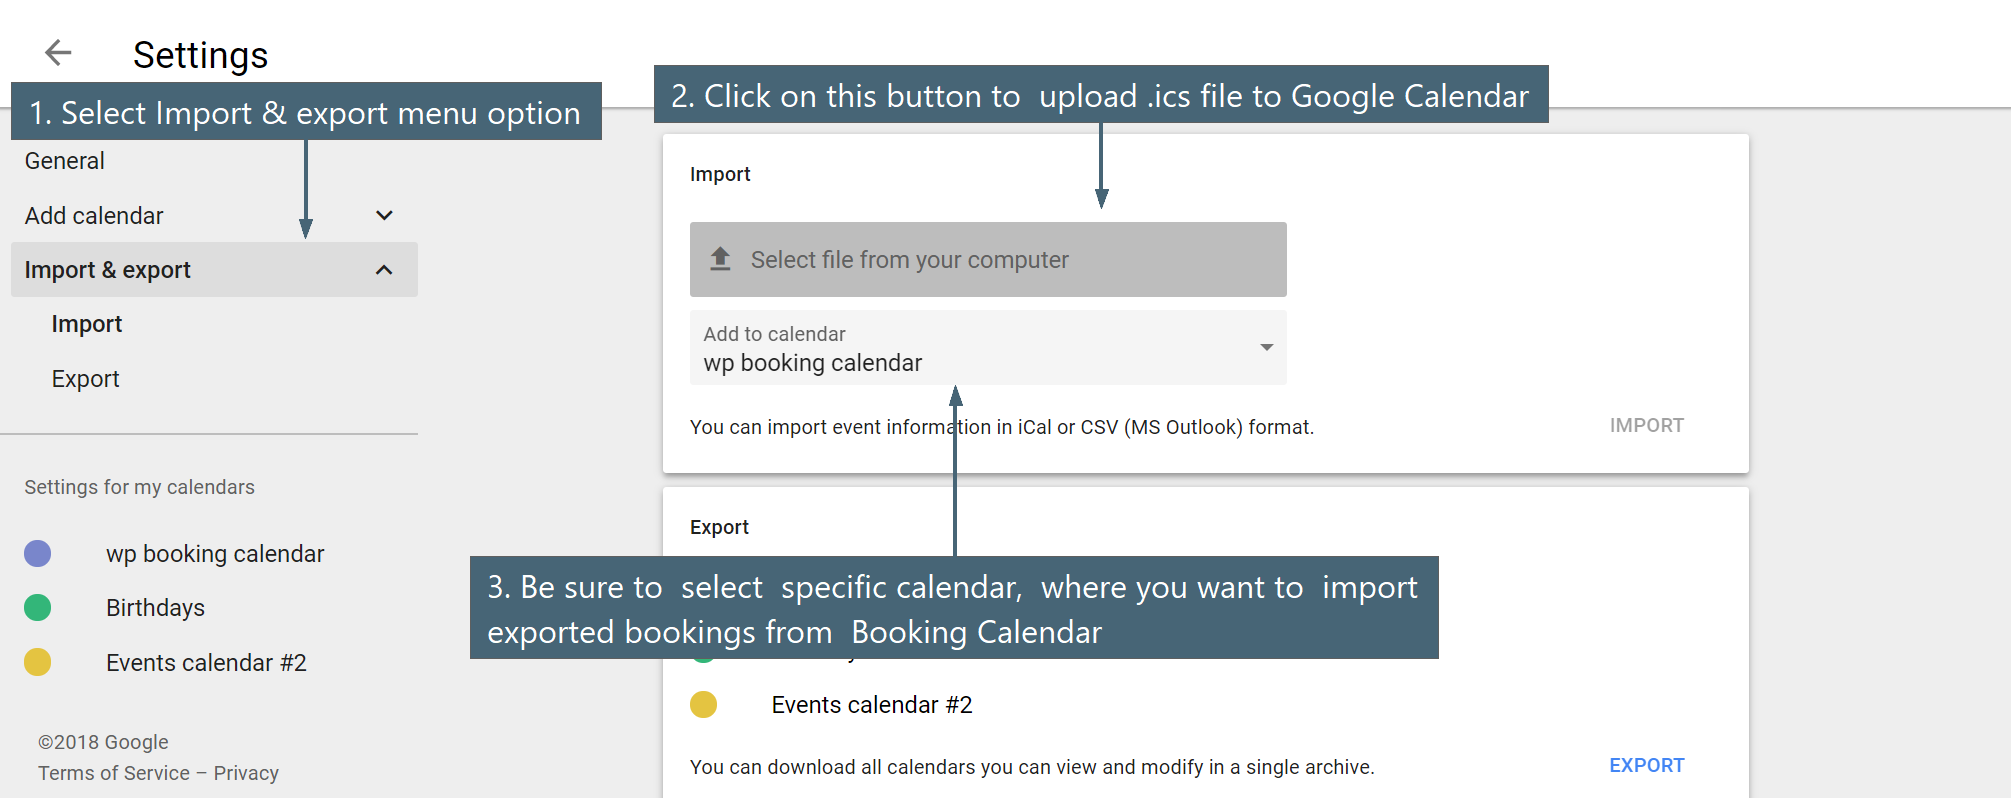
If you get error during generating .ics feed or getting just empty space instead of .ics feed.
In case, if you start import of .ics feed into Google Calendar by URL "Other Calendars > Add by URL", then in the point #3 you need to configure URL that ending with wpbm.ics. For example:
/ics/apartment2/wpbm.ics1) So please try to configure link with wpbm.ics at the end of links at the Booking > Settings > Sync > "Export - .ics" page, like this:
/apartment2ics/wpbm.icsAfter this click on icon near specific .ics feed url (check in point #3 in first screenshot point #3), its will open new .ics feed in new browser window. And you have to see .ics feed. Basically in browser window you have to copy full URL and then use it in other services.
2) If you still have an issue. Please recheck your error.log in your server configuration, about any relative errors.
If you can not find error.log file, please contact support of your hosting company about helping in finding this file.
Just to recheck about the reason of this issue. May be you have not activated some PHP module.
3) Be sure that you are using latest versions of Booking Calendar and Booking Manager.
What fields are exported from Booking Calendar to .ics feed?
Booking Calendar export bookings via .ics feeds by assigning these booking form fields to the fields in .ics feed:
SUMMARY
In the Booking Calendar Free version assign to 'SUMMARY' field in .ics feed, one of exist fields from your booking form, that can have names like this 'name', 'firstname', 'secondname', 'lastname'
In the paid versions of Booking Calendar possible to define, what exactly field from the booking form to assign to 'SUMMARY' field in the .ics feed. You can define it at the Booking > Settings General page in "Admin panel" section in the option "Booking title (admin panel)"
DESCRIPTION
Booking Calendar export all bookings details (that you have defined as fields at the Booking > Settings > Form page) to this field 'DESCRIPTION' in the .ics feed.
Please note, in the paid versions, all such bookings details defined at the "Content of booking fields data" form at the Booking > Settings > Form page.
Please note, the import process is working in that case, when some visitor is open your website page with booking import shortcode.
For start import of .ics feeds in "automatic" way you need to configure the CRON script at the server, for periodically accessing the page with booking import shortcode.
A typical UNIX cron system runs in this order:
- A time tied to an action occurs.
- Cron runs the action tied to that time.
With WordPress Cron, it works a little differently:
- A visitor comes to any page on your WordPress website.
- WordPress Cron checks each cron event to see whether the scheduled time has been passed.
- If the scheduled time for that event was passed, then WordPress Cron executes any actions tied to that event.
The detail description about Linux style of CRON commands you can check here. Other example of other CRON commands for other periods of time you can find here.
But usually you can configure your cron script via your server administration panel, like ISP Manager or Cpanel, in easier way via menu and not the commands. Help info about configuration of CRON script in ISP Manager server administration panel you can check here or here (older versions). Help info about configuration of CRON script in Cpanel server administration panel you can check here or here. For more info, please contact support of your hosting. Hosting support should know exactly what server administration panel you are using at your server, and how to configure your CRON script. Note. We do not provide support of configuration CRON at your servers.
Check how to setup the Cron job or read more about Hooking WP-Cron Into the System Task Scheduler, if you are WordPress developer.
You need to define the CRON command to access the page with your import .ics feeds shortcodes, during each 1 hour (or other reasonable period of time). So CRON script will access the page with import .ics feeds shortcodes in your website, and during these times, will be start of import process, from your other services.
Example of CRON command (for every 1 hour to run):
0 * * * * wget -qO- https://your-server.com/your-page-with-import &> /dev/nullInstead of "your-server.com" use your website DNS. In other words the URL like this https://your-server.com/your-page-with-import , it's URL to the page at your website, where you have inserted into the content of this page the import .ics feed shortcode. Check more about import .ics feeds shortcodes.
Each .ics feed can contain info about the event in following fields:
- Event Title
- Event Description (optional field)
- Location
and dates of event, of course.
1) During import of .ics feed from external source into the Booking Calendar, you can assign each such specific field to one of exist fields in the booking form. You can make this assignment at the Booking > Settings > Sync > "General" page in "Import > Assign events fields to specific booking form field" section.
Please note, email field here is not required (but this field is required for the Booking Calendar). So that's why during import of events from .ics feed into the Booking Calendar created new email field and assigned your "Administrator email" from your WordPress website.
2) During export of events from the Booking Calendar into the .ics feed, Booking Calendar assign following values to standard .ics feeds fields: "Title" and "Description".
If you are using the Booking Calendar Free version, so then plugin export into "Title" field following fields (if fields with such names exist in your configuration at Booking > Settings > Form page): 'name' 'firstname' 'secondname' 'lastname'.
In paid versions of Booking Calendar, plugin export into "Title" field of specific event, - configured "Title" of booking that is showing in Calendar Overview (timeline) page in booking pipelines. This configuration you can find at the Booking > Settings General page in "Booking Admin Panel" section, in option "Booking title (admin panel)" - default title of bookings in calendar view mode at Booking Listing page.
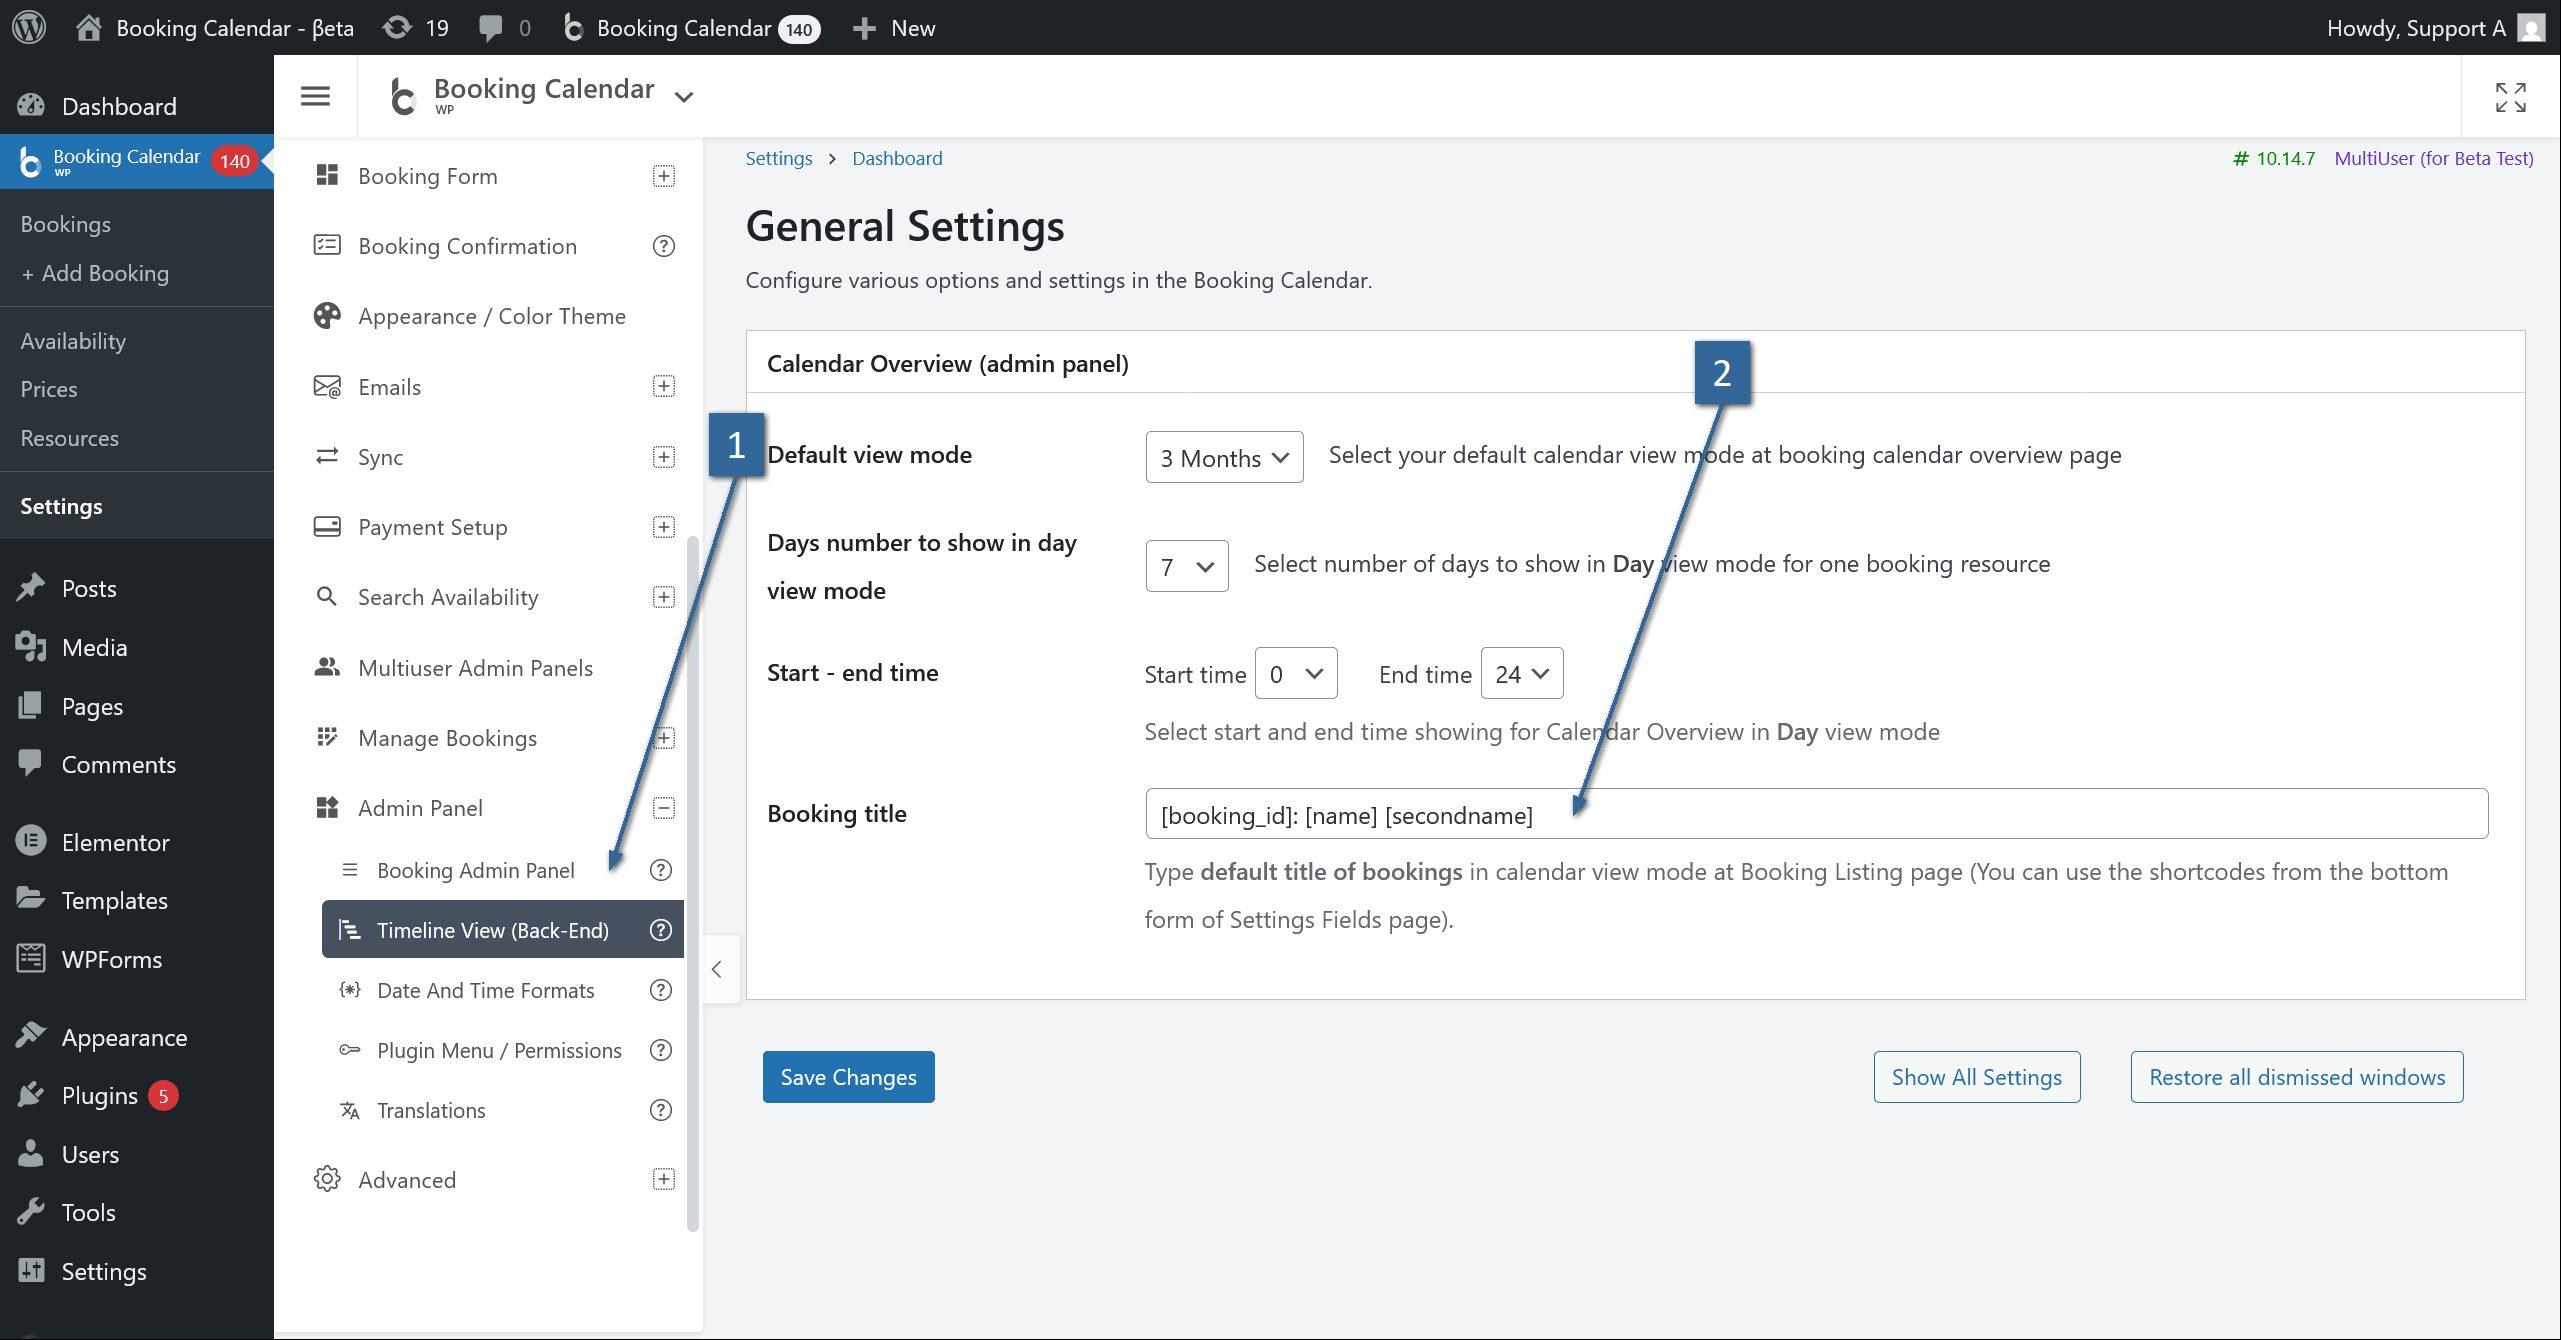
As "Description" field, Booking Calendar export all booking data of specific booking. In paid versions of Booking Calendar its configuration of "Content of booking fields data" form from Booking > Settings > Form page.
If you need to remove any booking data (in "Title" and "Description" fields) in your exporting .ics feed, then you can activate this option "Remove booking details in exported .ics feed" at the Booking Manager plugin at menu "oPlugins Panel" > General Settings page. In this case, system will export only booked dates into the .ics feed without any additional details. this option available in Booking Manager update 2.0.12 or newer.
P.S. In case, if you need to make some your customization of such import / export process, so then you can find needed info for import in this file: ../wp-content/plugins/booking-manager/core/wpbc/wpbm-bc-import.php
function function wpbm_ics_import_start( $attr )and for export in this file: ../wp-content/plugins/booking-manager/core/wpbc/wpbm-bc-export.php
function wpbm_export_ics_feed__wpbm_ics( $param = array( 'wh_booking_type' => '1', 'wh_trash' => '' ) ) { P.S.S. Disclaimer. Unfortunately we can not start, right now, some personal customization or custom development, because almost have no free time. Check more about new features here https://wpbookingcalendar.com/faq/need-new-feature/
Please note, if you will modify the source code of the Booking Calendar, we will not guaranteed the correct work of plugin and do not support it.
01. To get Google Calendar API key please follow this instruction:
- Go to Google Developer Console: https://console.developers.google.com. And then click on Credentials link.

- If you do not have projects yet, please click "Create Project".

- Give your project a name and click "Create".

- Click on "Create credentials" to expand dropdown list and select "API Key".

- Click on your "API Key" to edit it.

- Copy "API Key" (later we will paste it into Google API Key field at Booking > Settings > Sync > Google Calendar Events Import page in your WP admin panel). Then be sure to select "Key restriction" as "None" and click on Save button.

Please be sure that you have NOT restricted the Google API key, otherwise its can be reason of not ability to import events.
- Now in the sidebar click on "Library", and then click on "Calendar API" link


- Click on "ENABLE" link to enable your Google Calendar API


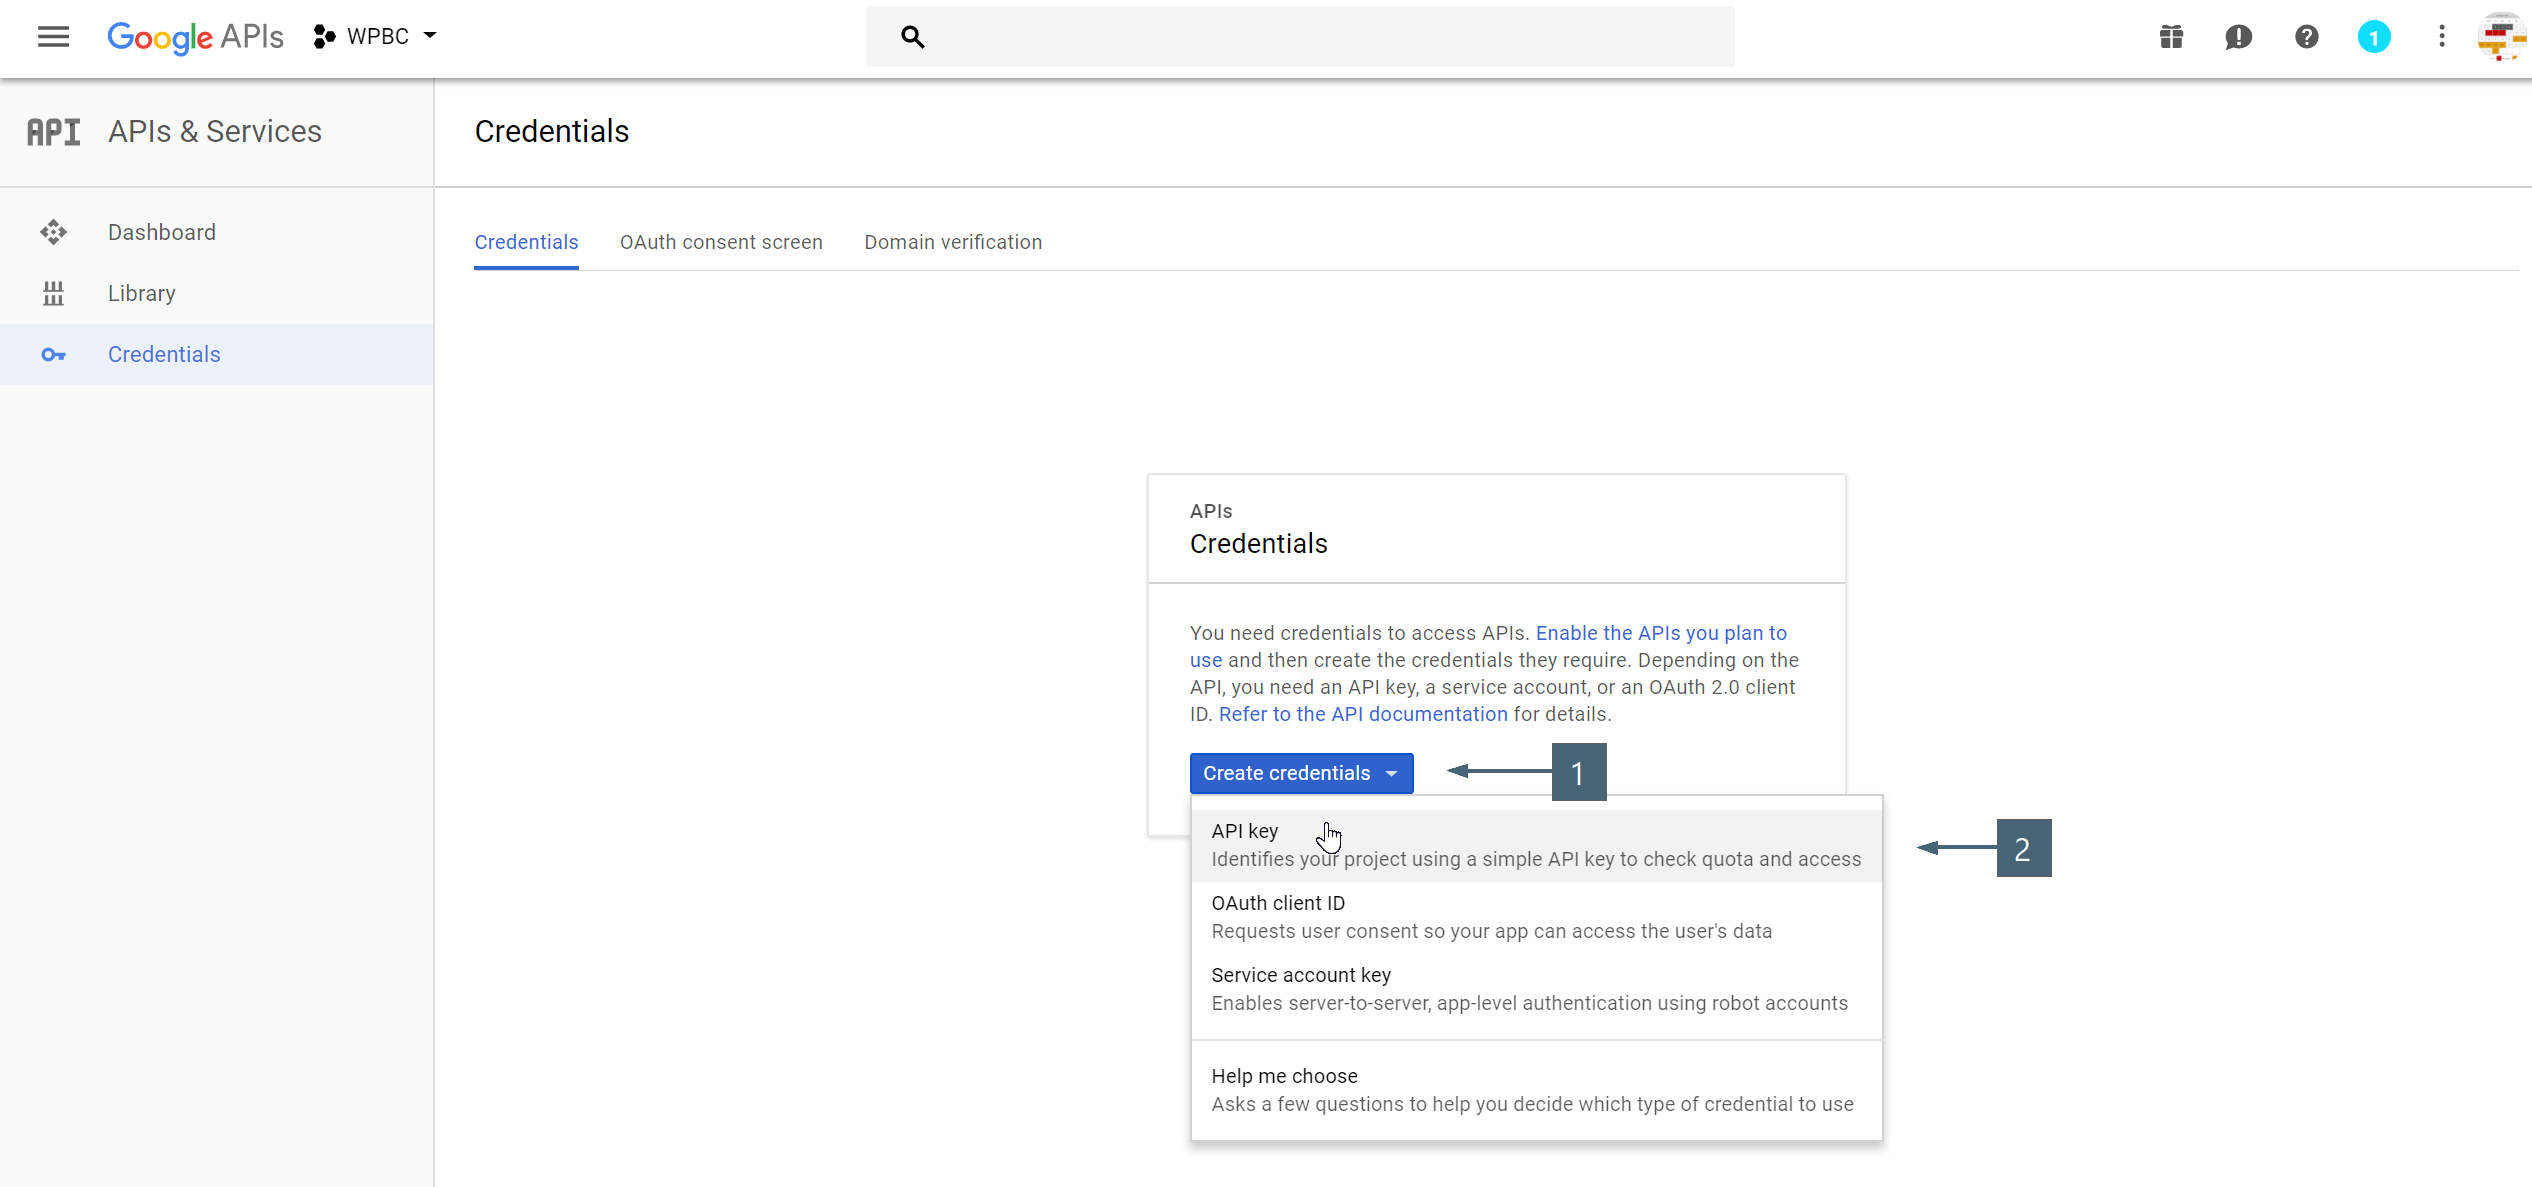

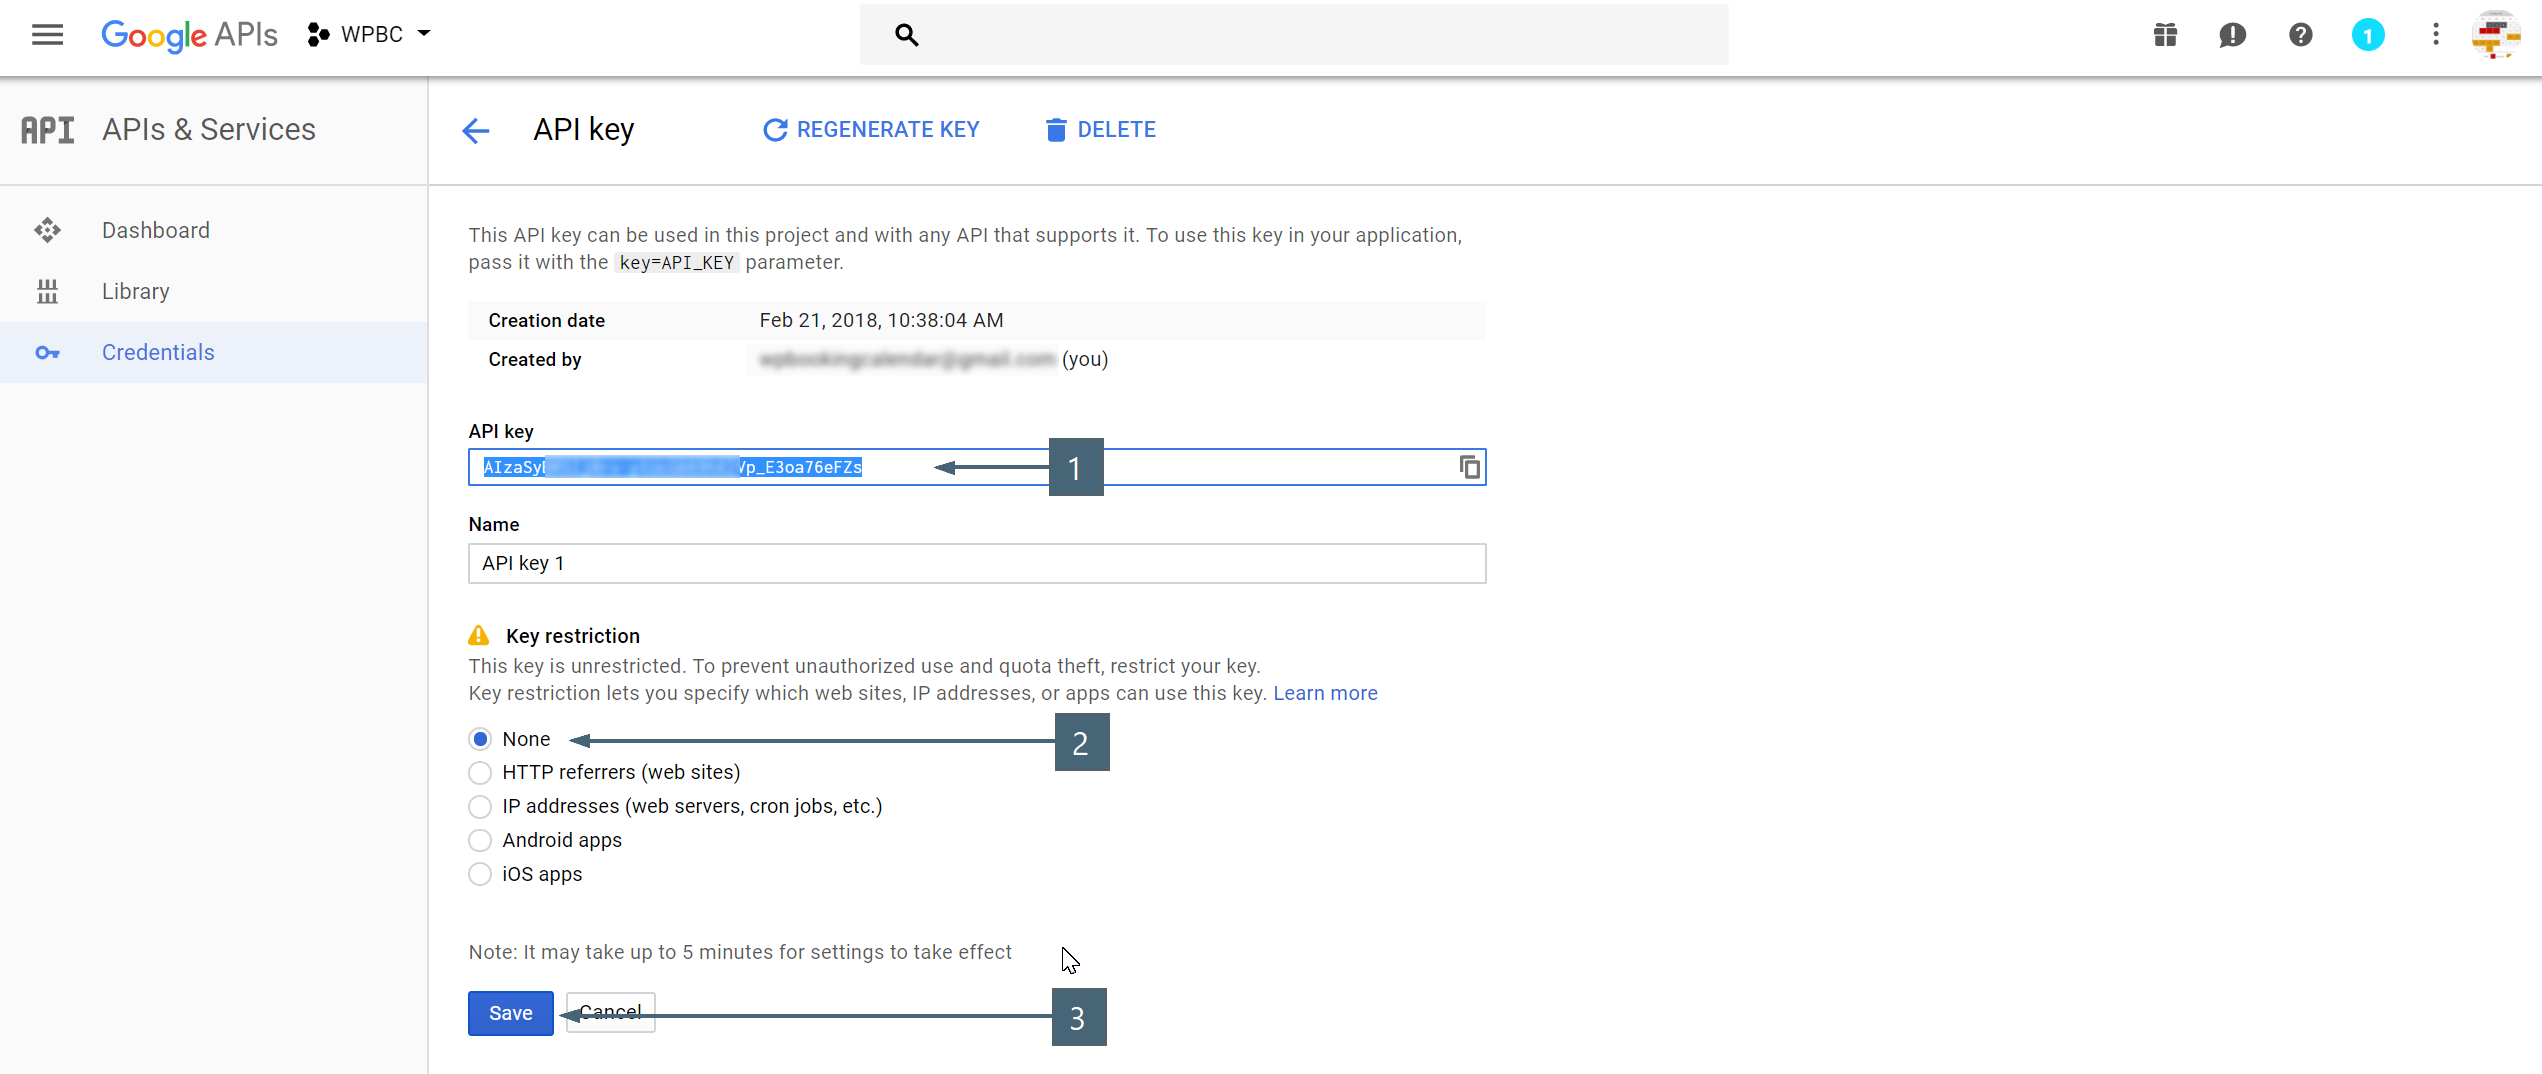


02. Set Your Calendar to Public:
- Navigate to your Google calendars.
- Open the settings for the calendar.


- Navigate to Access permissions section. Click the checkbox to "Make available to public". Do not select other option (be sure that was selected "See all events details"). Save settings.


03. Find Your Calendar ID:
- Navigate to your Google calendars.
- Open the settings for the calendar.
- Now copy the Calendar ID to use in the Booking > Settings > Sync > Google Calendar Events Import page in your WP admin panel for "Calendar ID" field(s).
Please be sure to use the Calendar ID in format like XXXXXX@group.calendar.google.com (or XXXXXX@gmail.com)
Do not use the entire XML feed URL (starting from http) and do not use simple ID (term before @), like: XXXXXX.

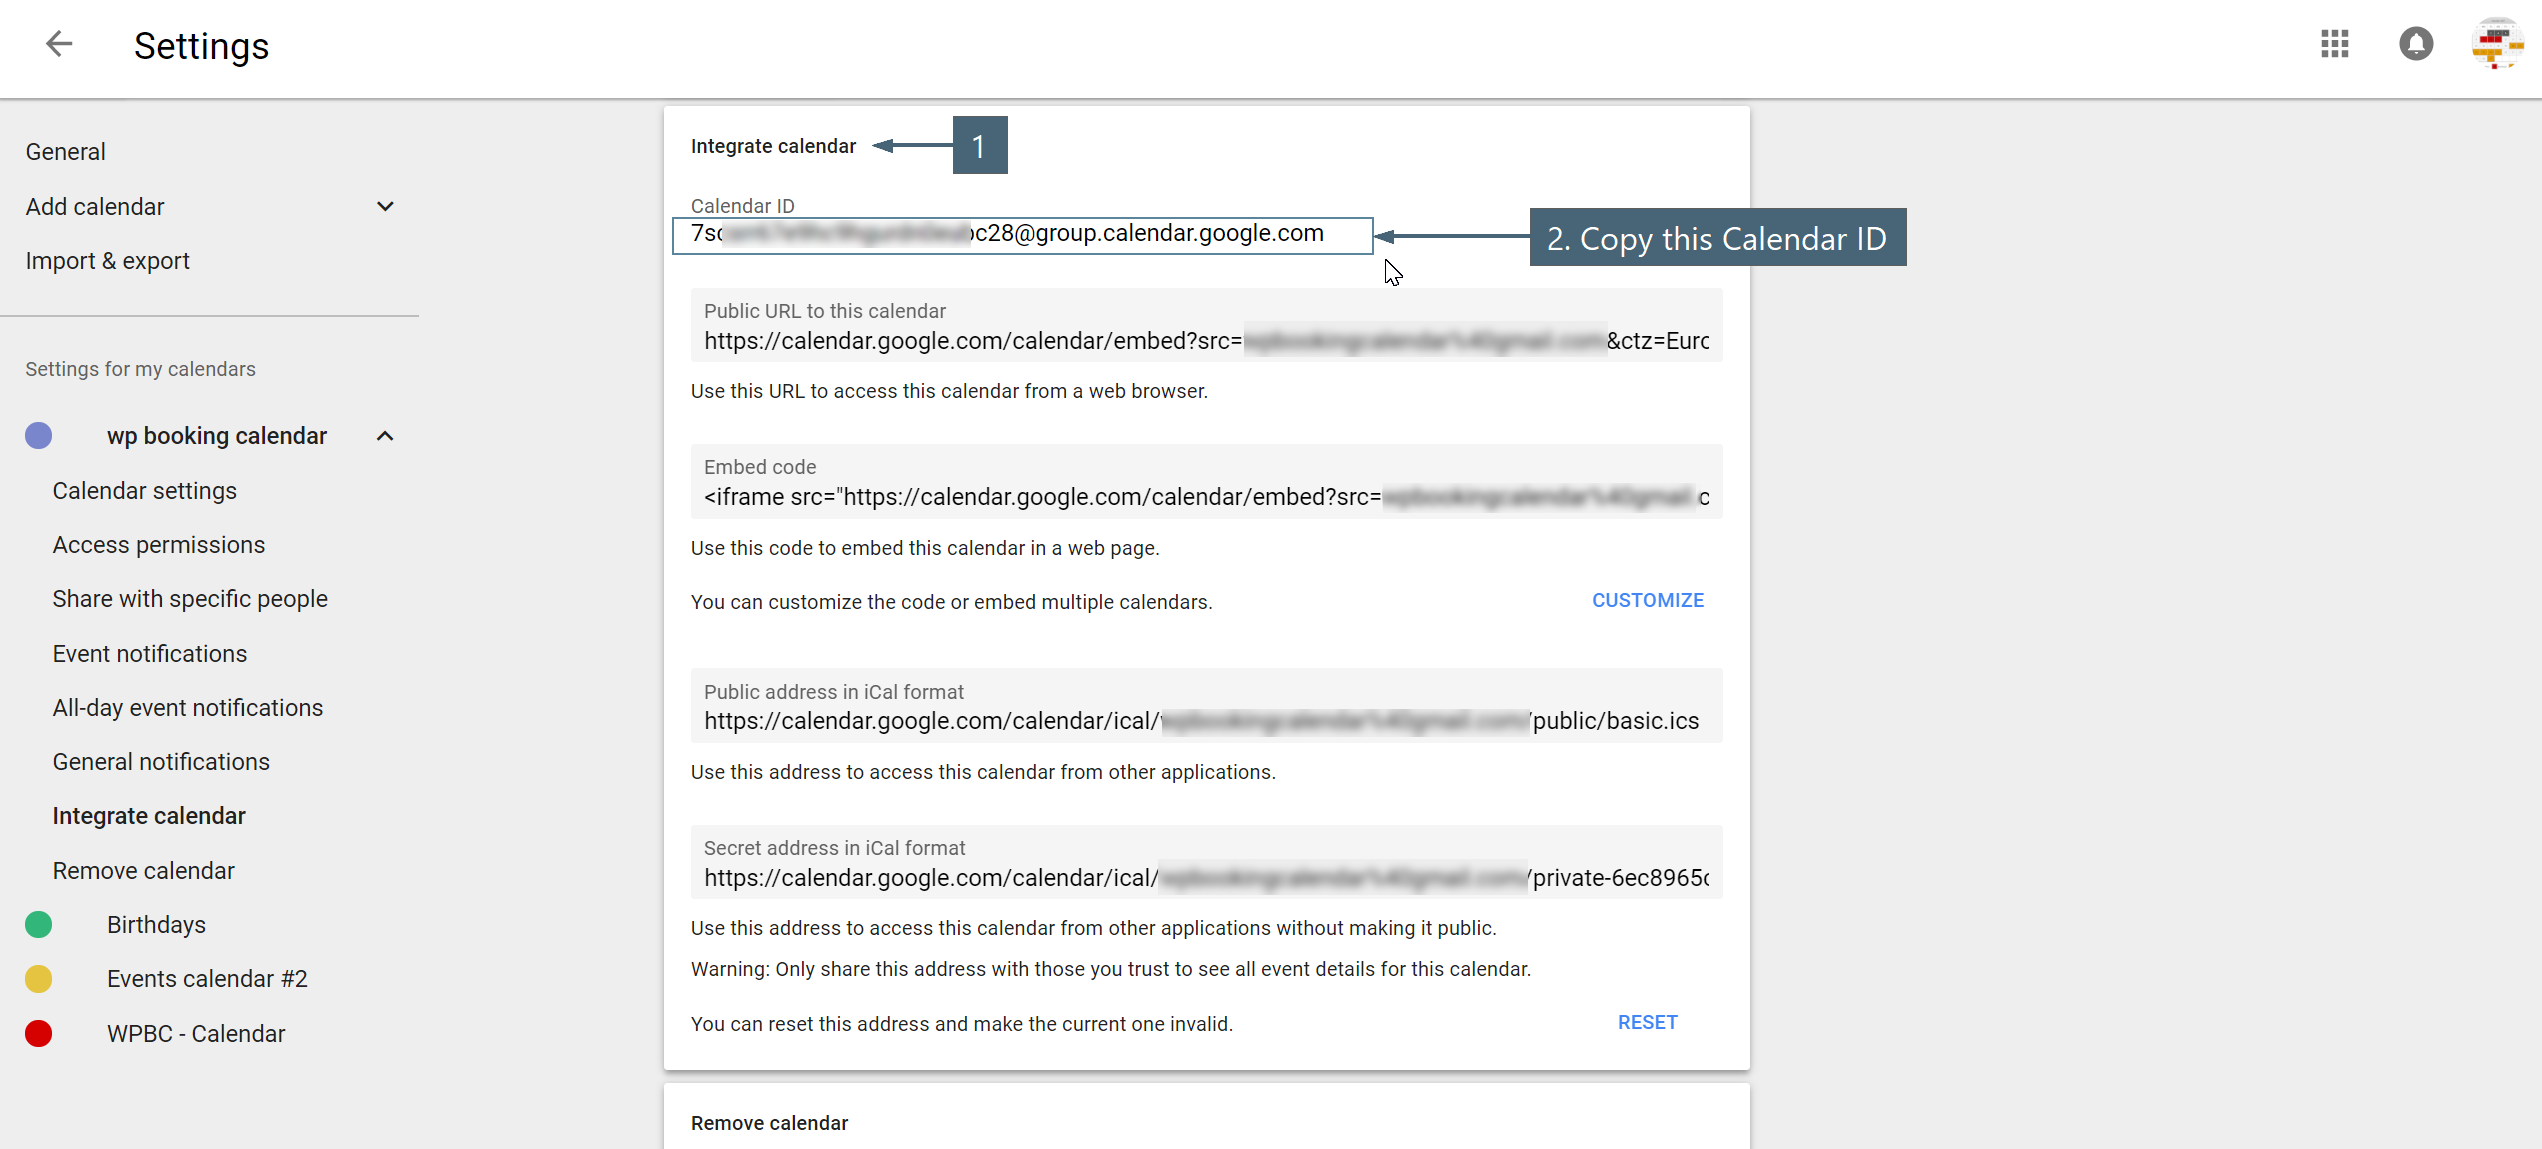
04. Test Import of Google Calendar Events:
- Open your WordPress admin panel and Navigate to Booking > Settings > Sync > Import Google Calendar Events page.

- Paste your Google API Key and Google Calendar ID into specific fields. Important! Please be sure that you do not paste any white spaces at the beginning or ending of API Key or Google Calendar ID. Save the changes.
In the paid versions of Booking Calendar you can assign at this page different Google Calendar ID for the different booking resources.

- Open Booking Listing page and switch to the "Actions toolbar", then click on "Import" button.

- In popup dialog configure your parameters (during first test import, please be sure that you selected time interval, where for sure exist your Google Calendar Events). And then click on Import button.

- You have to see your imported events. Reload the page to see them as bookings.

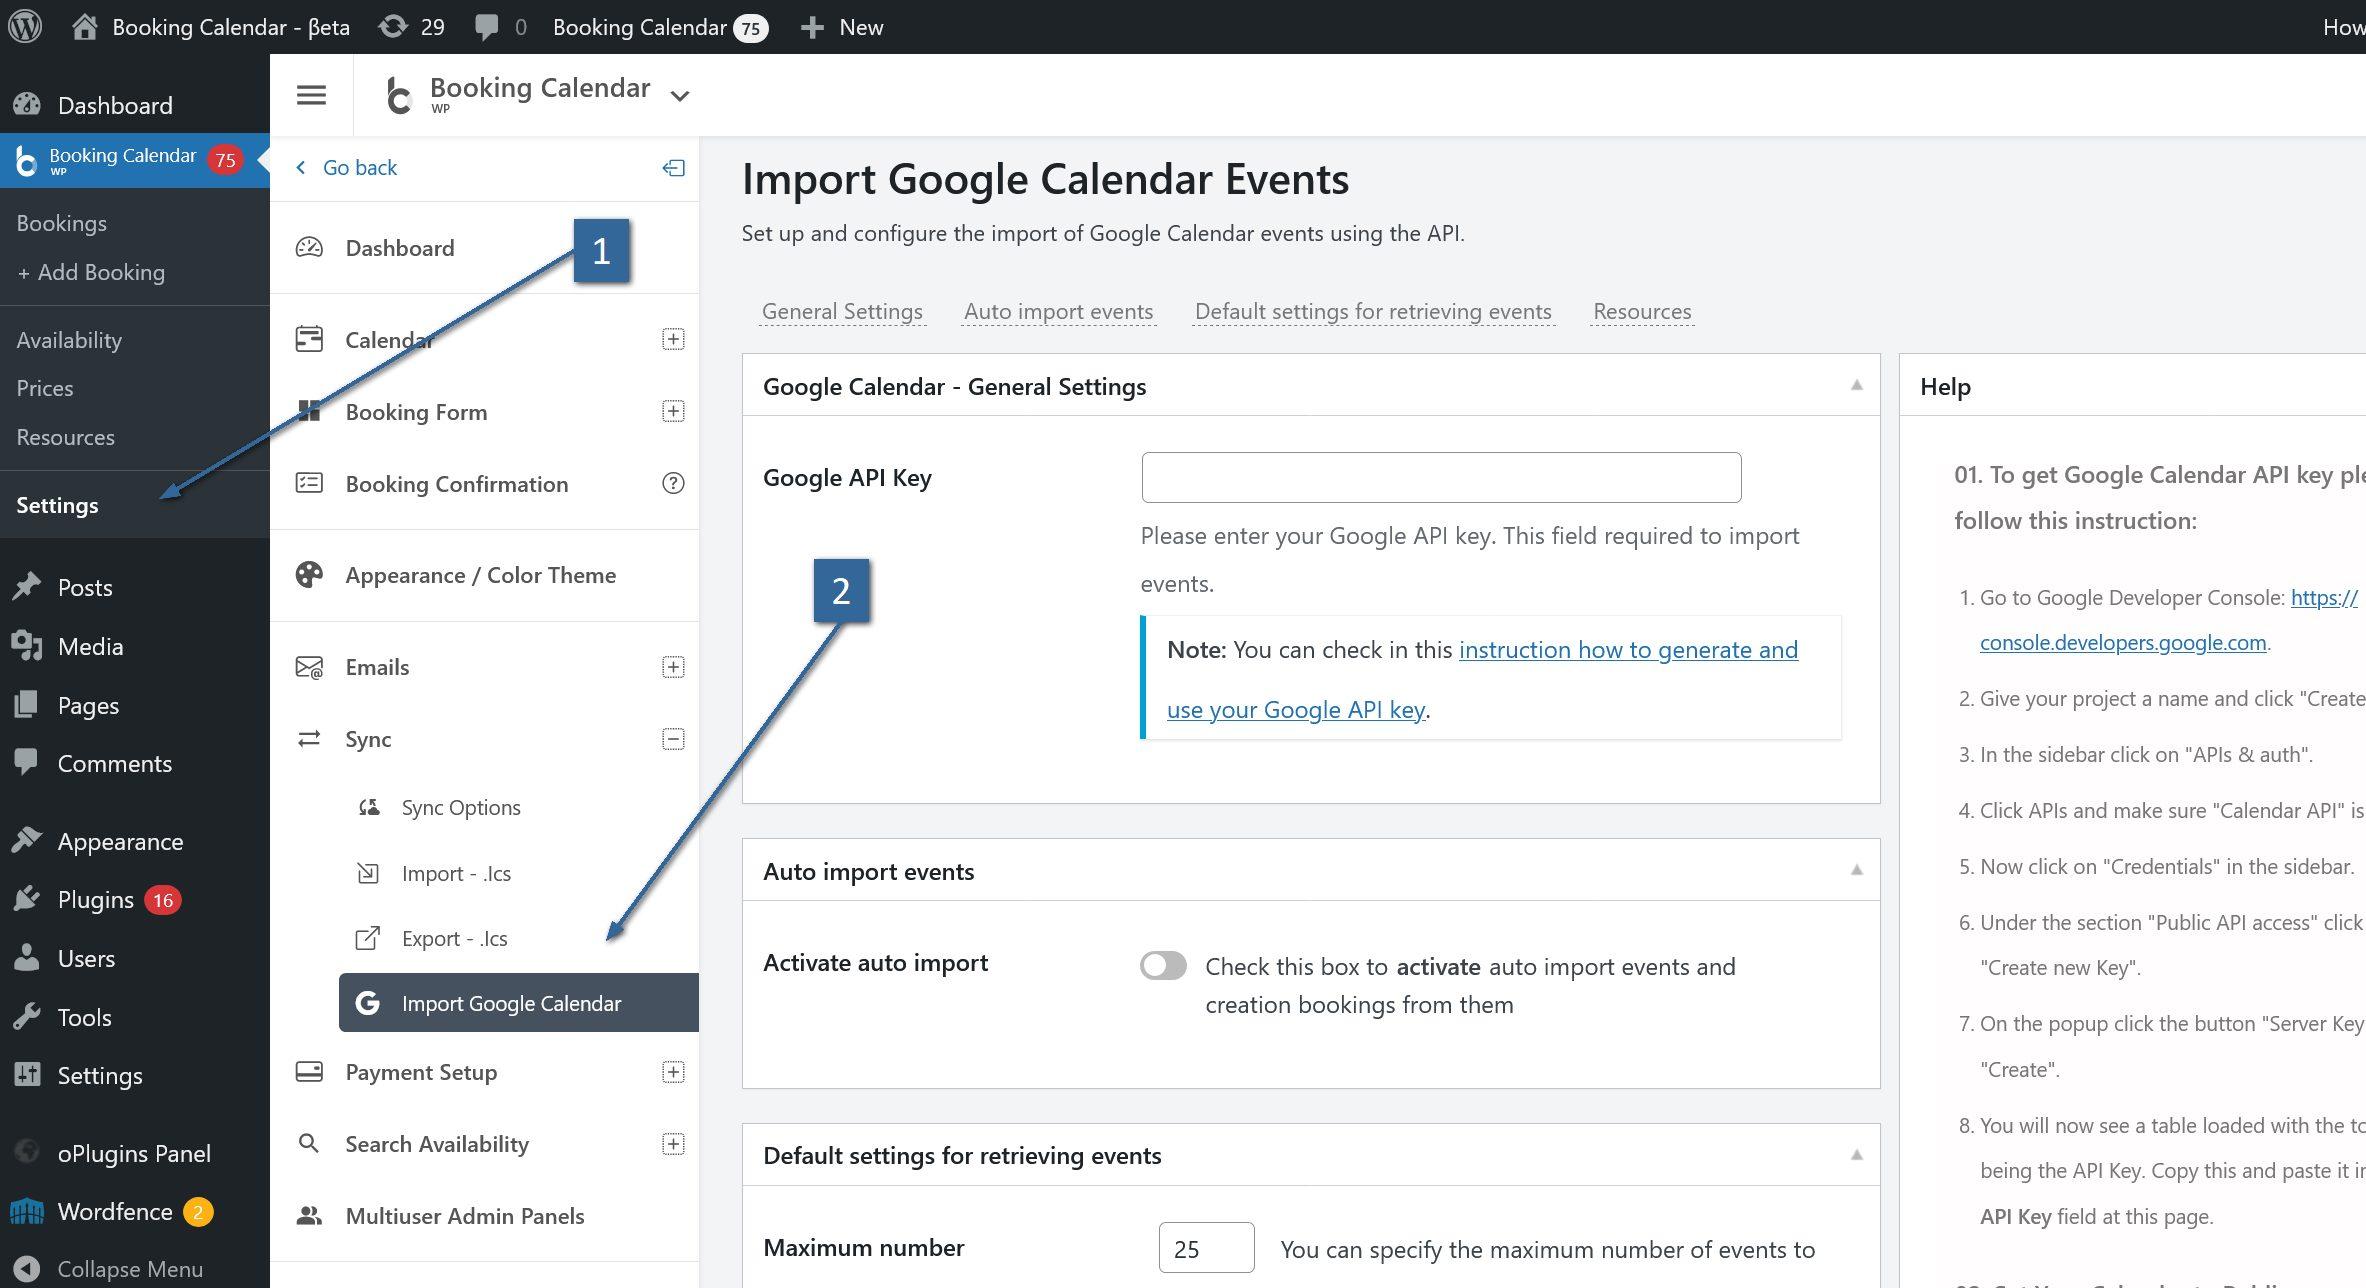
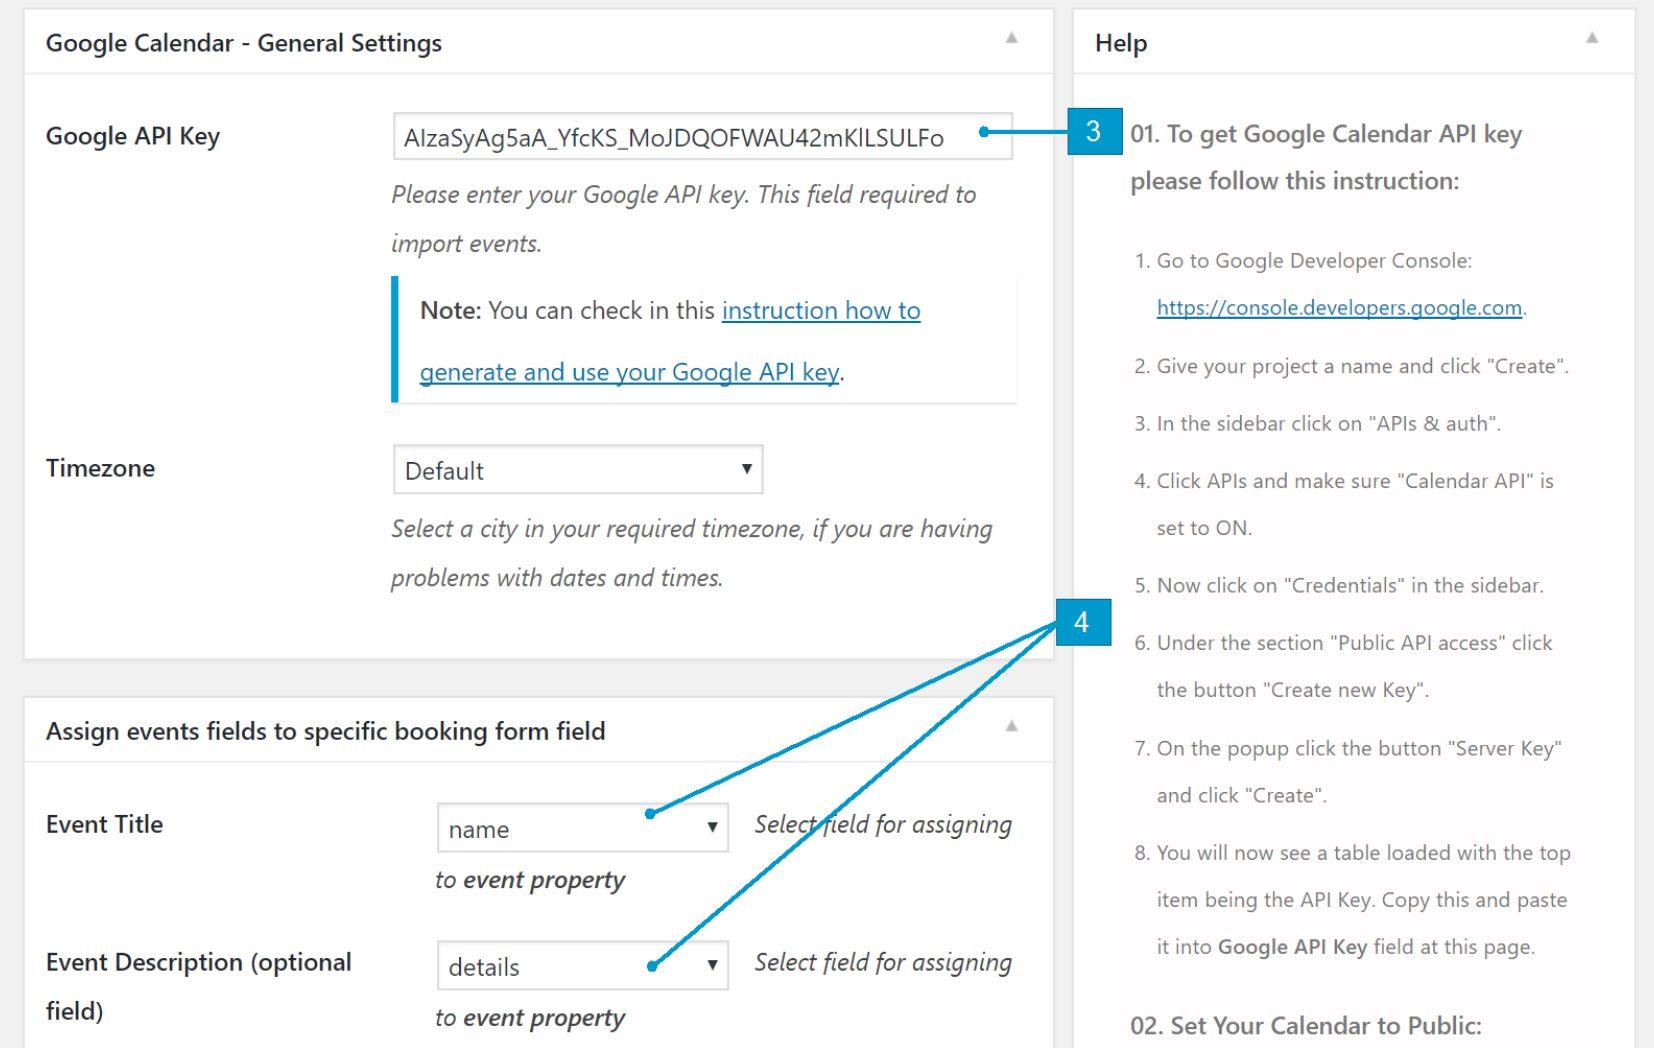

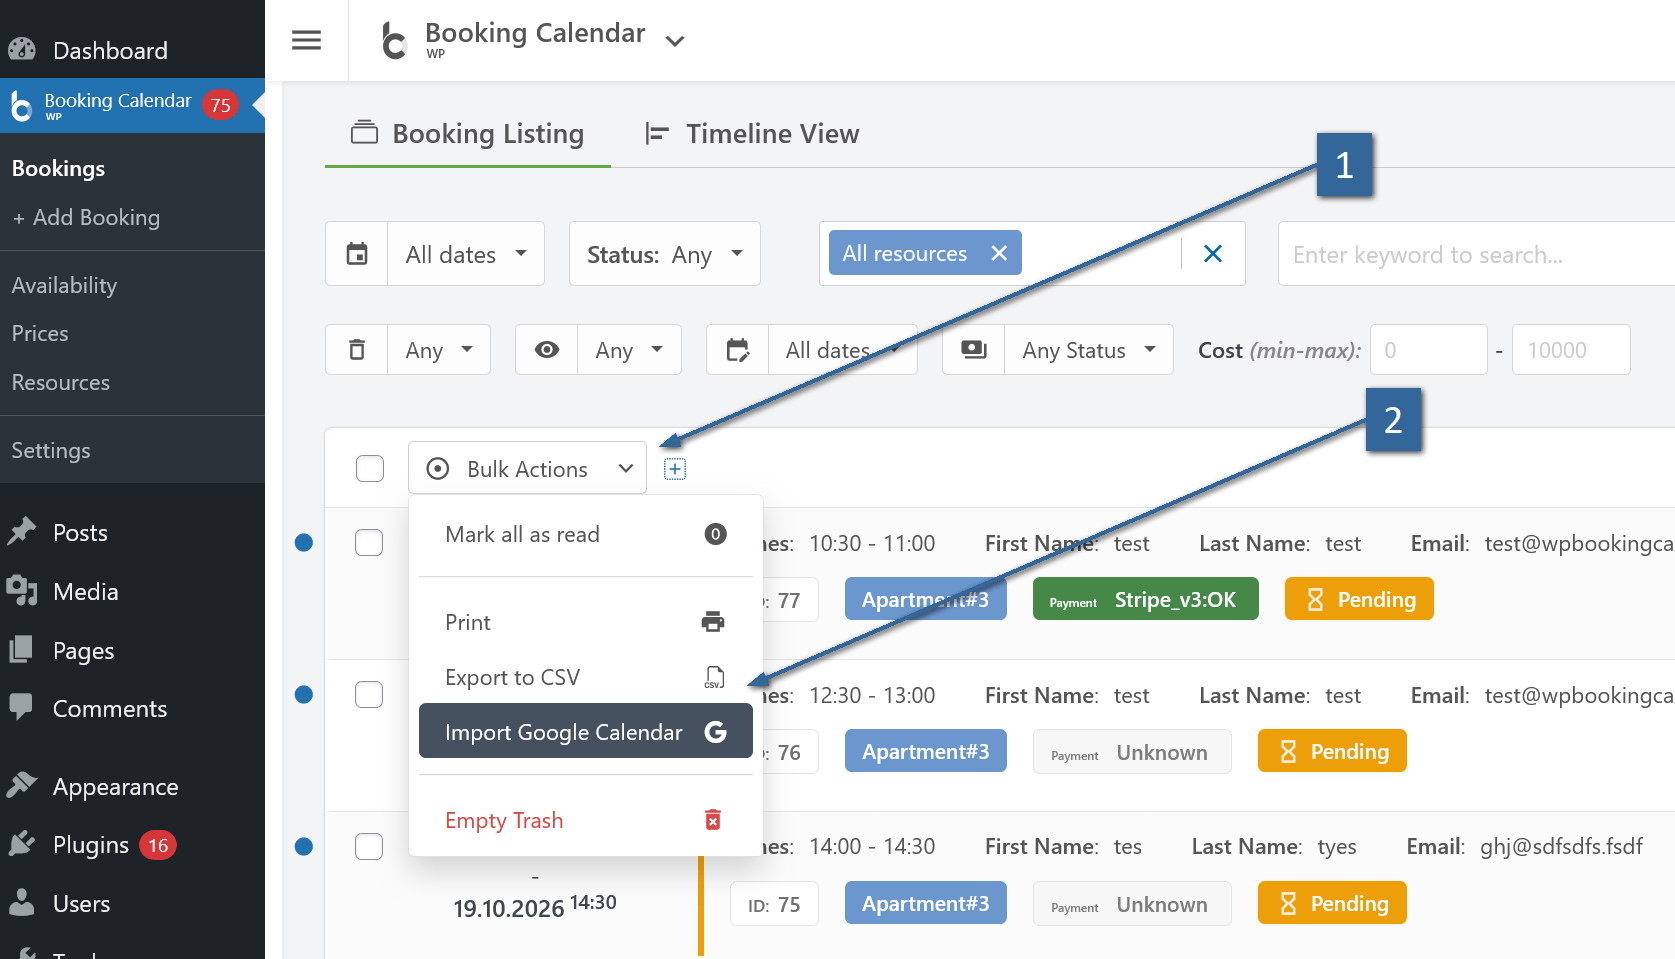


Typically, exporting from Booking Calendar to Google Calendar isn't directly supported. However, there's a workaround:
- Open the settings for your specific Google Calendar.
- Select "Add calendar" and then choose "From URL."
- Define the URL to the .ics feed from Booking Calendar.
You can find this URL on the page: WP Booking Calendar > Settings > Sync > "Export - .ics" page.
Please note: Google Calendar imports events from such .ics feeds only twice per day.

If you see an error like "This iCal URL is invalid" while exporting bookings from your Booking Calendar to Airbnb (or other services), even though online validators (like icalvalidator.com or icalendar.org) show that the .ics feed is valid, the issue may be related to the inclusion of time information in the feed.
As of April 4, 2025, Airbnb does not support time-specific entries in the .ics feed. This means that the inclusion of specific times in your .ics file can cause the error.
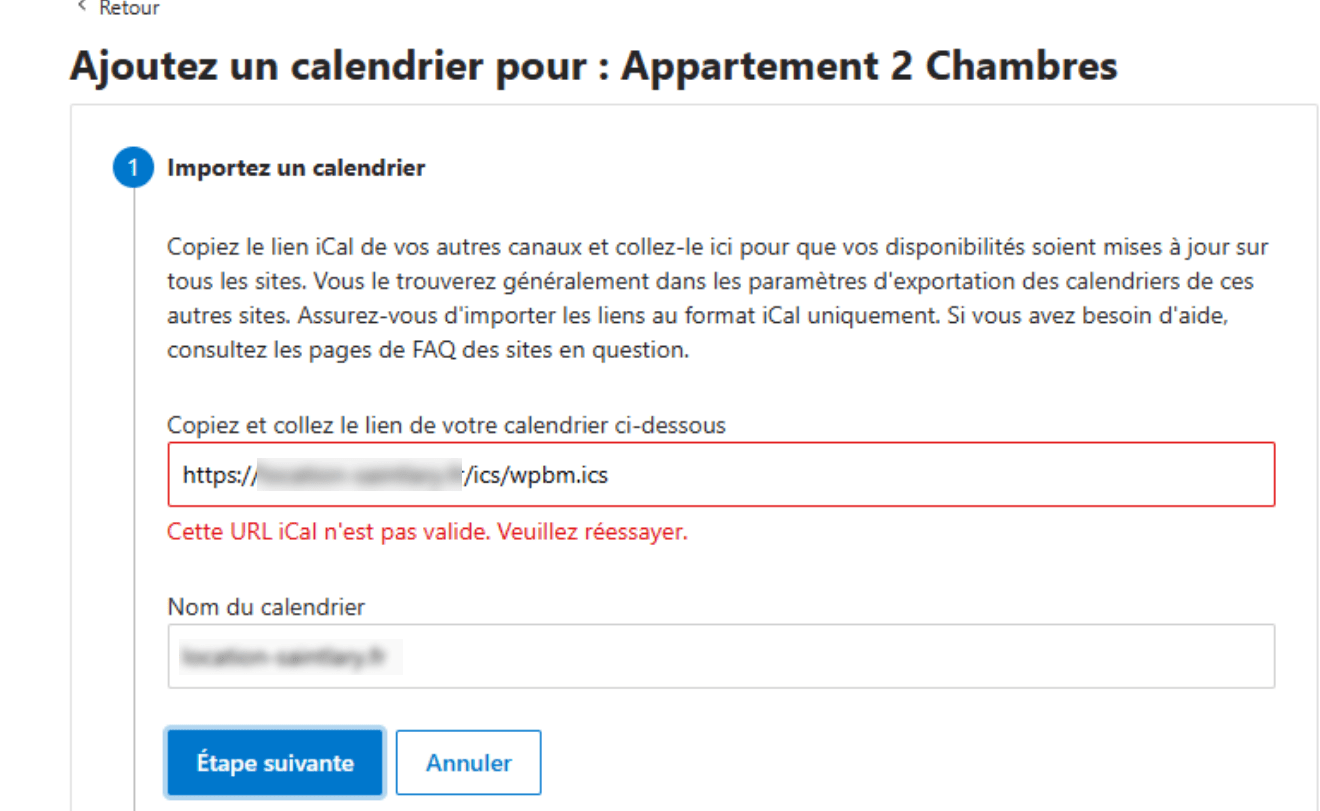
Unsupported Format:
If your exported .ics file includes entries like the following, Airbnb will not accept them:
Start: 20250809T000000 (Sat, 09 Aug 2025 00:00:00 GMT)
End: 20250817T000000 (Sun, 17 Aug 2025 00:00:00 GMT)
ID: 2025-08-09-00
Supported Format:
Airbnb only supports full-day bookings in the .ics feed. For example, the correct format should be:
Start: 20250809 (Sat, 09 Aug 2025 00:00:00 GMT)
End: 20250817 (Sun, 17 Aug 2025 00:00:00 GMT)
ID: 2025-08-09-00
How to Export Full-Day Bookings in Booking Manager:
Be sure to use latest update of Booking Manager 2.1.12 or newer.
To ensure your Booking Manager exports only full-day bookings, follow these steps:
1. Go to the oPlugins Panel > Settings > General Settings.
2. Enable the option for full-day bookings.
3. Click Save Changes.
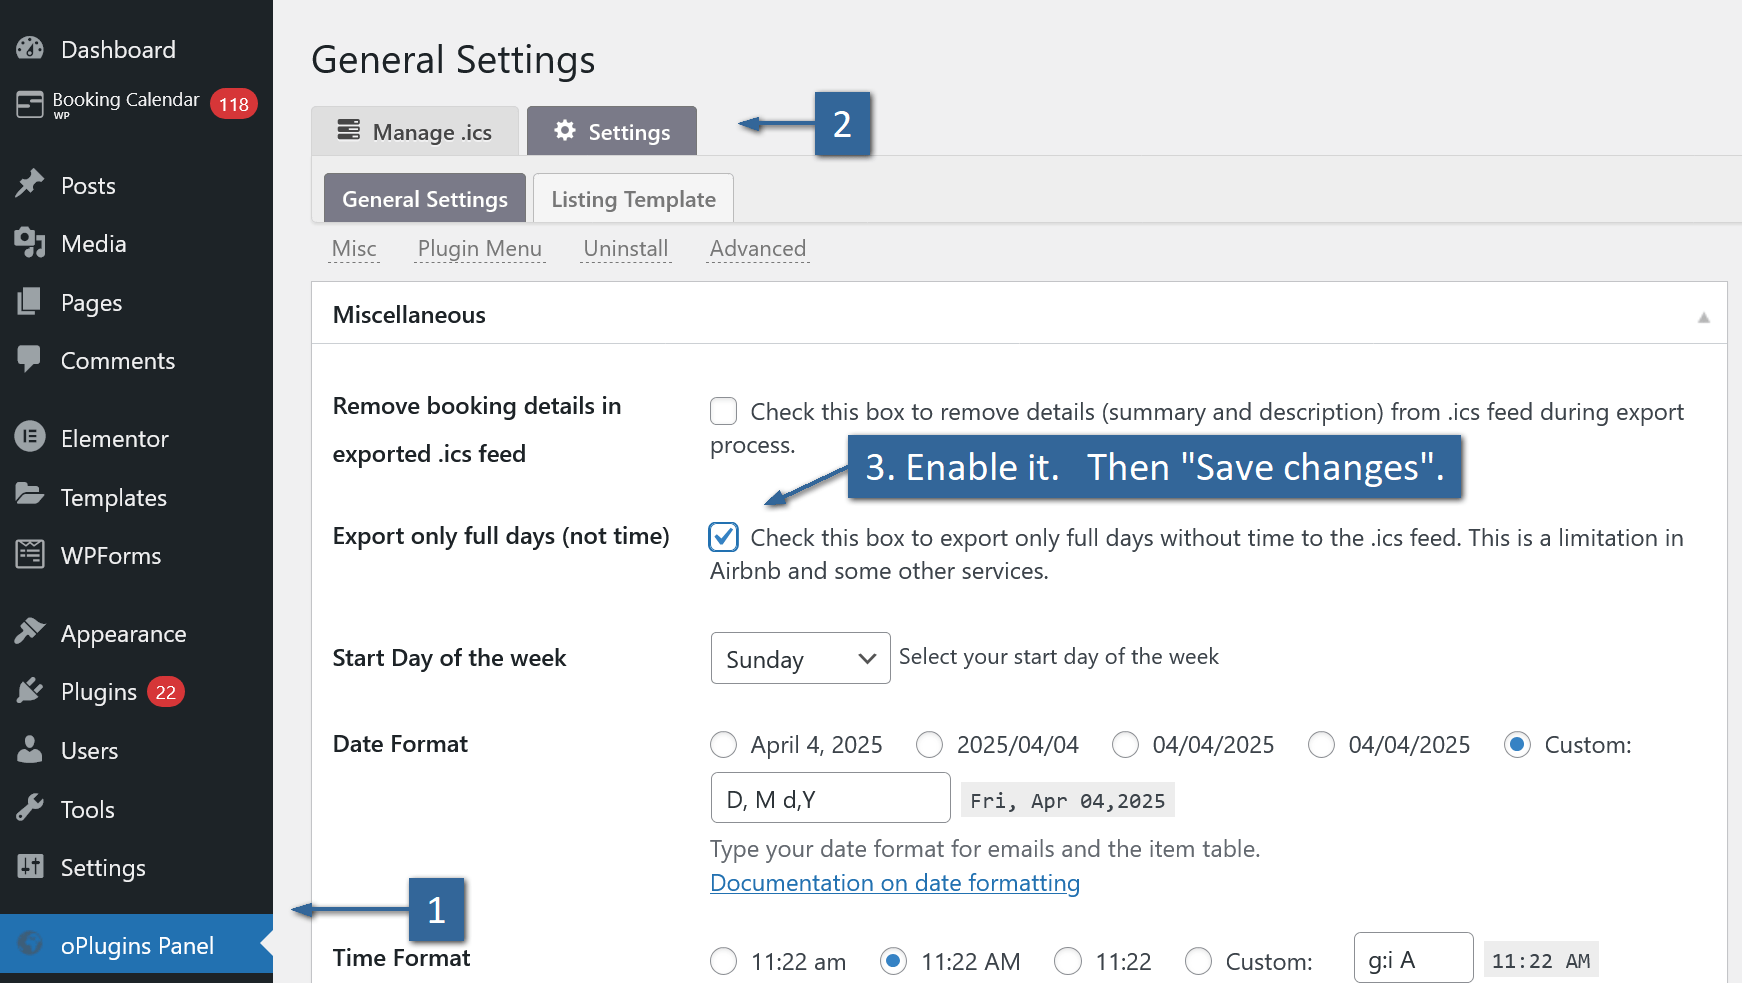
Now, Booking Manager will export only full-day events to the .ics feed, removing any time-specific information.
Handling Bookings with Specific Time Slots:
If you have a booking with specific start and end times, like:
Start: 20250809T121000 (Sat, 09 Aug 2025 12:10:00 GMT)
End: 20250809T140000 (Sat, 09 Aug 2025 14:00:00 GMT)
Booking Manager will export it as a full-day booking, converting the times as follows:
Start: 20250809 (Sat, 09 Aug 2025 00:00:00 GMT)
End: 20250810 (Sun, 10 Aug 2025 00:00:00 GMT)
This ensures the booking is compliant with Airbnb's full-day format.
Styles and CSS customization
The latest versions of the Booking Calendar plugin define calendar skin styles using CSS custom properties (variables). This makes it easier to customize colors and layout styles for your calendar.
Where to Find the Calendar Skins
Each calendar skin is a CSS file located in this folder: ../wp-content/plugins/booking/css/skins/
Here is an example of a typical skin file:
/* ------------------------------------------------------------------------------------------------------------------ */
/* Child calendar theme    of    "/css/skins/24_9__light.css"                          C O L O R    S K I N           */
/* ------------------------------------------------------------------------------------------------------------------ */
@import url("24_9__light.css");
/* Color Scheme: - 25_5 Square 2 */
:root {
	--wpbc_cal-day-cell-border-radius: 11%;
	--wpbc_cal-day-cell-border-width: 2px;
	--wpbc_cal-day-bg-color-opacity: 7%;
	--wpbc_cal-selected-day-bg-color-opacity: 80%;
	--wpbc_cal-text-general-size: 15px;
	--wpbc_cal-text-cost-size: 60%;
	--wpbc_cal-text-header-size: 13px;
	--wpbc_cal-text-weekdays-size: 10px;
	--wpbc_cal-text-prev-next-links-size: 25px;
	--wpbc_cal-main-background-color: #fff;
	--wpbc_cal-header-text-color: #000;
	--wpbc_cal-text-prev-next-links-color: #555;
	--wpbc_cal-text-weekdays-color: #555;
	--wpbc_cal-unavailable-day-color: var(--wpbc_cal-main-background-color);
	--wpbc_cal-unavailable-text-color: #d4d4d4c7;
	--wpbc_cal-available-day-color: #fdfffb;
	--wpbc_cal-available-text-color: #463a3d;
	--wpbc_cal-approved-day-color: #6a595e;
	--wpbc_cal-approved-text-color: #716266;
	--wpbc_cal-pending-day-color: #c7b8ae;
	--wpbc_cal-pending-text-color: #a79c95;
	--wpbc_cal-selected-day-color: #5b89c5;
	--wpbc_cal-selected-text-color: #fff;
	--wpbc_cal-hover-day-color: #7195c6;
	--wpbc_cal-hover-text-color: #436593;
	--wpbc_cal-timespartly-day-color: #879d56;
	--wpbc_cal-timespartly-text-color: #879d56;
	--wpbc_cal-day-cells-padding: 2px;
}
Calendar Skin CSS Variables – Description
- --wpbc_cal-day-cell-border-radius: Controls the roundness of the day cell corners. Higher value = more rounded corners.
- --wpbc_cal-day-cell-border-width: Sets the thickness of the border around each day cell.
- --wpbc_cal-day-bg-color-opacity: Defines the background transparency level of normal days (0% = fully transparent, 100% = fully solid).
- --wpbc_cal-selected-day-bg-color-opacity: Controls the background transparency of selected days.
- --wpbc_cal-text-general-size: Sets the base font size for general calendar text.
- --wpbc_cal-text-cost-size: Defines the font size for the cost text inside a date cell (in percentage of general size).
- --wpbc_cal-text-header-size: Sets the font size for the month and year header text.
- --wpbc_cal-text-weekdays-size: Specifies the font size for the weekday labels (e.g., Mon, Tue, etc.).
- --wpbc_cal-text-prev-next-links-size: Controls the font size of the previous/next month navigation arrows.
- --wpbc_cal-main-background-color: Background color of the entire calendar area.
- --wpbc_cal-header-text-color: Text color used for the calendar’s month and year header.
- --wpbc_cal-text-prev-next-links-color: Color of the previous and next navigation arrows.
- --wpbc_cal-text-weekdays-color: Color of the weekday labels at the top of the calendar.
- --wpbc_cal-unavailable-day-color: Background color for days that are unavailable for booking.
- --wpbc_cal-unavailable-text-color: Text color for unavailable days.
- --wpbc_cal-available-day-color: Background color for available (bookable) days.
- --wpbc_cal-available-text-color: Text color used on available days.
- --wpbc_cal-approved-day-color: Background color for days with approved bookings.
- --wpbc_cal-approved-text-color: Text color for days with approved bookings.
- --wpbc_cal-pending-day-color: Background color for days with pending bookings.
- --wpbc_cal-pending-text-color: Text color for days with pending bookings.
- --wpbc_cal-selected-day-color: Background color of a day cell that is currently selected by the user.
- --wpbc_cal-selected-text-color: Text color of the selected day.
- --wpbc_cal-hover-day-color: Background color shown when hovering over a day with the mouse.
- --wpbc_cal-hover-text-color: Text color shown on a hovered day.
- --wpbc_cal-timespartly-day-color: Background color for partially booked time slots (used in time-slot mode).
- --wpbc_cal-timespartly-text-color: Text color for partially booked time slots.
- --wpbc_cal-day-cells-padding: Padding inside each day cell (space between text and cell border).
How to Customize the Calendar Style
To change the calendar's appearance, modify only the values of CSS variables (--wpbc_*) within the skin file. Avoid editing other CSS files used by the calendar, as these may be overwritten during plugin updates or may cause layout issues.
How to Keep Your Changes Safe
To make sure your custom styles are preserved after plugin updates:
- Save your custom skin file in: /wp-content/uploads/wpbc_skins/
- Apply your custom skin via: WP Booking Calendar > Settings > Appearance / Color Theme
Alternatively, you can add your CSS directly into your theme's stylesheet. For more info, see this guide: How to edit the file in WP menu (CSS Theme Editor).
Important: Clear Your Browser Cache
After making style changes, clear your browser cache to ensure the updated styles are loaded properly. Also please clear all minimized CSS and JavaScript files and cached pages or posts.
If you need to set some dates in calendar with different color (for example Holidays), then you can do this customization.
Example of changing color for 14th of February 2025.
Please add the CSS to your Theme Editor settings or in your external CSS file of your theme.
You can check how to add own CSS customization to CSS Theme Editor here: https://wpbookingcalendar.com/faq/how-edit-file-in-wp-menu/
Here's the code you need to add:
.datepick-days-cell.date_available.sql_date_2025-11-14 {
  --wpbc_cal-available-day-color: #4F11AA;
}
Where CSS class .sql_date_2025-11-14 define the DATE in format 2025-02-14.
And this variable --wpbc_cal-available-day-color: #4F11AA; define color of available date (in non legacy calendar skins).
Please do not forget to clear the browser cache before testing these changes.

By default the "partially booked dates" (its means bookings for specific time-slot and available in Booking Calendar Business Medium or higher versions) is showing with small calendar icon at the bottom right side in each specific day cell, where exist bookings for specific time-slot. Because such bookings for time-slots can have pending or approved status, system also change background color for such dates.
Such workflow can be confused for some customers and sometimes need to show only calendar icon, but leave background color for such dates the same as for available dates. For having such view, you will be need to make some small fix in your calendar skin.
1) First of all, please check what calendar skin is active in your system. You can check it at the Booking > Settings General page in Calendar section. Please note, you calendar skin can be located at ../{Booking Calendar Folder}/css/skins/ or at ../{Booking Calendar Folder}/inc/skins/
2) Because you will be need to make fix, probably you need to create your own calendar skin in specific separate folder ( /wp-content/uploads/wpbc_skins/ ), its will save your customization during future updates of plugin. Please check how todo this here.
3) You will be need to add to the bottom of your calendar skin the CSS code for redefinition background color and text folor for such days.
For example for the "Premium Marine" calendar skin, this color can look like this:
.block_hints .block_time,
.datepick-inline .timespartly {
    background-color: #789;
}
.datepick-inline .timespartly.date_available a{
    color:#fff;
    font-weight: 600;
    text-shadow: 0 -1px 0 #333;
}
For other calendar skins, there will be different colors. In any way you can check what color you need to set there by checking section
/* A V A I L A B L E - BACKGROUND */and
/* A V A I L A B L E - Text A */in your active calendar skin.
After saving your calendar, skin (if you was creating your own calendar skin), please open the Booking > Settings General page and select for "Calendar Skin" your new calendar skin file. Then save changes.
Please do not forget to clear browser cache before testing these changes.
Applies to: Availability-based coloring requires Business Medimum / Large or higher (capacity per calendar available in Booking Calendar Business Large version).
Skins: Works with all modern (non-legacy) calendar skins.
Why: Help visitors instantly see which dates have more/less availability and which dates belong to different price (seasonal rate) tiers.
How it works
Modern skins expose CSS hooks on each day cell:
- Availability level: .reserved_days_countN (where N is the availability level for that day, capacity-aware).
- Seasonal rate: rate class on the day (e.g., .rate_50, .rate_100).
Set the CSS custom property that the skins read: --wpbc_cal-available-day-color
Apply it to available days with selectors like:
.datepick-days-cell.date_available.reserved_days_countN {
  --wpbc_cal-available-day-color: ...
}
Tip: For exact class names present on your site, right-click a date -> Inspect in your browser.
Example: color ranges by availability (capacity = 10)
/* Booking Calendar 10.10+ — availability-based coloring on modern skins */

/* Low–medium availability (1–7) */
.datepick-days-cell.date_available.reserved_days_count1,
.datepick-days-cell.date_available.reserved_days_count2,
.datepick-days-cell.date_available.reserved_days_count3,
.datepick-days-cell.date_available.reserved_days_count4,
.datepick-days-cell.date_available.reserved_days_count5,
.datepick-days-cell.date_available.reserved_days_count6,
.datepick-days-cell.date_available.reserved_days_count7 {
  --wpbc_cal-available-day-color: #eb5; /* amber-ish */
}

/* Higher availability (8–10) */
.datepick-days-cell.date_available.reserved_days_count8,
.datepick-days-cell.date_available.reserved_days_count9,
.datepick-days-cell.date_available.reserved_days_count10 {
  --wpbc_cal-available-day-color: #1A5; /* green-ish */
}
Adjust to your capacity: If your calendar’s capacity isn’t 10, add/remove the
.reserved_days_countNselectors so the ranges match your actual maximum.
Example: color by seasonal rates (e.g., €50 vs €100)
Use the rate classes you see in your markup (replace .rate_50 / .rate_100 with yours):
/* Seasonal rate-based colors */
.rate_50 .wpbc-cell-box {
  --wpbc_cal-available-day-color: #795;
}
.rate_100 .wpbc-cell-box {
  --wpbc_cal-available-day-color: #8a1;
}
Precedence tip: If you want rate colors to override availability colors, place the
rate rules after the availability rules or use a more specific selector
(e.g., .datepick-days-cell.date_available.rate_100 .wpbc-cell-box).
Clear caches & test
- Clear your browser cache.
- Purge any caching plugin/CDN caches.
- Reload the calendar page and verify the colors across dates.
Troubleshooting
- No color changes? Make sure you’re on a modern (non-legacy) skin, your CSS is loading,
and you’re targeting.datepick-days-cell.date_available(not booked/blocked states).
- Capacity differs? Expand or shrink the
.reserved_days_countNselectors to match your real capacity.
- Rate classes don’t match examples? Inspect a date cell to find the exact
.rate_*(or slugged)
class used on your site, then update the CSS selectors.
You can define showing calendar months in several rows in "option" parameter of Booking Calendar shortcode, during inserting this shortcode into your page or post. Please read more about this configuration here.
This customization is only for the Booking Calendar Free version. In the paid versions, you can easily configure booking form fields and their style at the advanced form configuration at the Booking > Settings > Fields page.
Customization.
1) Please add this CSS to your Theme Editor settings. You can check how to add own CSS customization to CSS Theme Editor here.
Here's the CSS code you need to add to set the Labels (text near input fields) color as white:
.booking_form .control-label {
  color: #FFF;
}
Of course instead of white color #FFF you can set some other color. For black labels, please use #000 insteaf of #fff.
Please do not forget to clear the browser cache before testing these changes.
2) In the same way possible to change the color of text inside of the text fields, text-area elements and select-boxes.
CSS for setting text color as white
.booking_form_div select,
.booking_form_div textarea,
.booking_form_div input[type="text"],
.booking_form_div input[type="email"] {
  color: #FFF;
}
CSS for setting text color as black:
.booking_form_div select,
.booking_form_div textarea,
.booking_form_div input[type="text"],
.booking_form_div input[type="email"] {
  color: #000;
}
Important! Please note after update of plugin to the newer version update, you will be need to make this fix again, because all Booking Calendar files will be overwritten.
3) In case if you need to update the colors of the buttons in the booking form, please use the CSS similar to this:
.wpbc_container .wpbc_button_light,
.wpbc_container.wpbc_container_booking_form .wpbc_button_light {
	box-shadow: none !important;
	border: 0 !important;
	border-radius: 0 !important;
	background-color: #B78F60 !important;
	color: #fff !important;
}
.wpbc_container .wpbc_button_light:hover,
.wpbc_container .wpbc_button_light:focus {
	background-color: #3C3C3B !important;
}
Translations
How to Translate Booking Forms, Email Templates, and Settings in Booking Calendar
Important for Booking Calendar 10.15.6 or newer:
If you are using the latest Booking Calendar version, you no longer need to use language shortcodes inside the same booking form.
Instead, for booking forms, you can create separate custom booking forms in the required languages and use the correct booking form on the corresponding language page.
Important:
This recommendation applies only to booking forms.
For email templates and other translatable text options in the Booking Calendar settings, you still need to use the [lang=LOCALE] shortcode method.
Recommended Method for Booking Forms in Booking Calendar 10.15.6 or Newer
The easiest way to configure booking forms in different languages is to create a separate custom booking form for each language.
- Create one custom booking form in the first language, for example English.
- Create another custom booking form in the second language, for example French, Spanish, German, or any other language.
- Open the page in the required language.
- Insert the booking shortcode with the corresponding booking form.
For example, use the English booking form on the English page, and use the French booking form on the French page.
This method is simpler, easier to manage, and avoids the need to configure multiple language sections inside the same booking form.
However, this method is only for the booking form layout and form field labels.
For email templates, search settings, confirmation messages, and other text options in the Booking Calendar settings, use the language shortcode method described below.
Using Language Shortcodes for Emails and Other Settings
Paid versions of Booking Calendar support multilingual configuration for email templates and other text options in the settings.
The active language depends on the current website locale.
Booking Calendar supports multilingual plugins such as WPML and Polylang, which can dynamically change the website locale.
When the locale changes, Booking Calendar can show the corresponding translated text section.
Language Shortcode Format
Use the following shortcode to start a translation section for a specific language:
[lang=LOCALE]
Replace LOCALE with the locale code of the required language.
For example:
fr_FRfor Frenchde_DEfor Germanes_ESfor Spanishit_ITfor Italian
Important Note About the Default Language
English is the default language in Booking Calendar.
You should start the email template or text option with the English version first, without adding a [lang=...] shortcode at the beginning.
After the default English section, you can add additional language sections separated by the [lang=LOCALE] shortcode.
You can configure more than two language sections if needed.
Simple Example
Example of an English and French translation of the “Thank you” message:
Thank you for your booking.
[lang=fr_FR]
Je vous remercie de votre réservation.
Example of a Multilingual Email Template
You can configure multilingual email templates at:
Booking Calendar > Settings > Emails
For example:
Hello,

Thank you for your booking.

[lang=fr_FR]

Bonjour,

Merci pour votre réservation.
Alternative Method for Booking Forms: Using Language Shortcodes
In paid versions of Booking Calendar, it is also possible to use language shortcodes inside the same booking form.
However, if you are using Booking Calendar 10.15.6 or newer, we recommend creating separate custom booking forms for each language instead.
This older method can still be useful if you prefer to keep all language versions inside one booking form configuration.
Example of a booking form configured in English and French:
[calendar]

<p>First Name (required): [text* name]</p>
<p>Last Name (required): [text* secondname]</p>
<p>Email (required): [email* email]</p>
<p>Visitors: [selectbox visitors "1" "2" "3" "4"]</p>
<p>Details: [textarea details]</p>
<p>[submit "Send"]</p>

[lang=fr_FR]

[calendar]

<p>Prénom (obligatoire): [text* name]</p>
<p>Nom (obligatoire): [text* secondname]</p>
<p>Email (obligatoire): [email* email]</p>
<p>Visiteurs: [selectbox visitors "1" "2" "3" "4"]</p>
<p>Détails: [textarea details]</p>
<p>[submit "Envoyer"]</p>
Important:
When translating the booking form, keep the same form field names in all language sections.
For example, if the English form uses [text* name], the translated form should also use [text* name].
Only the visible labels and button text should be translated.
Translating Other Text Options
You can use the same language shortcode method for other text options in the Booking Calendar settings, including search form text and other configurable messages.
For example, multilingual configuration can be used at:
- Booking Calendar > Settings > Emails
- Booking Calendar > Settings > Search
- Other text-based options in the Booking Calendar settings
Summary
For Booking Calendar 10.15.6 or newer, the recommended solution for booking forms is to create separate custom booking forms for each language and use the correct form on the corresponding language page.
For email templates and other translatable settings, continue using language shortcodes such as [lang=fr_FR], [lang=de_DE], or [lang=es_ES].
> Settings > Search page, etc..
Please note, the Booking Calendar sends the email in settings of your active website locale, or in selected locale.
If you approve the booking from the booking Listing page, the system will send the email in the locale of your active admin panel (of your user).
If you want to send this email in a different language, then you need to select a specific language near a specific booking by clicking on the "Globe" icon, and then click on the Approve button. Please check the attached screenshots.
Click on this button to change the locale.
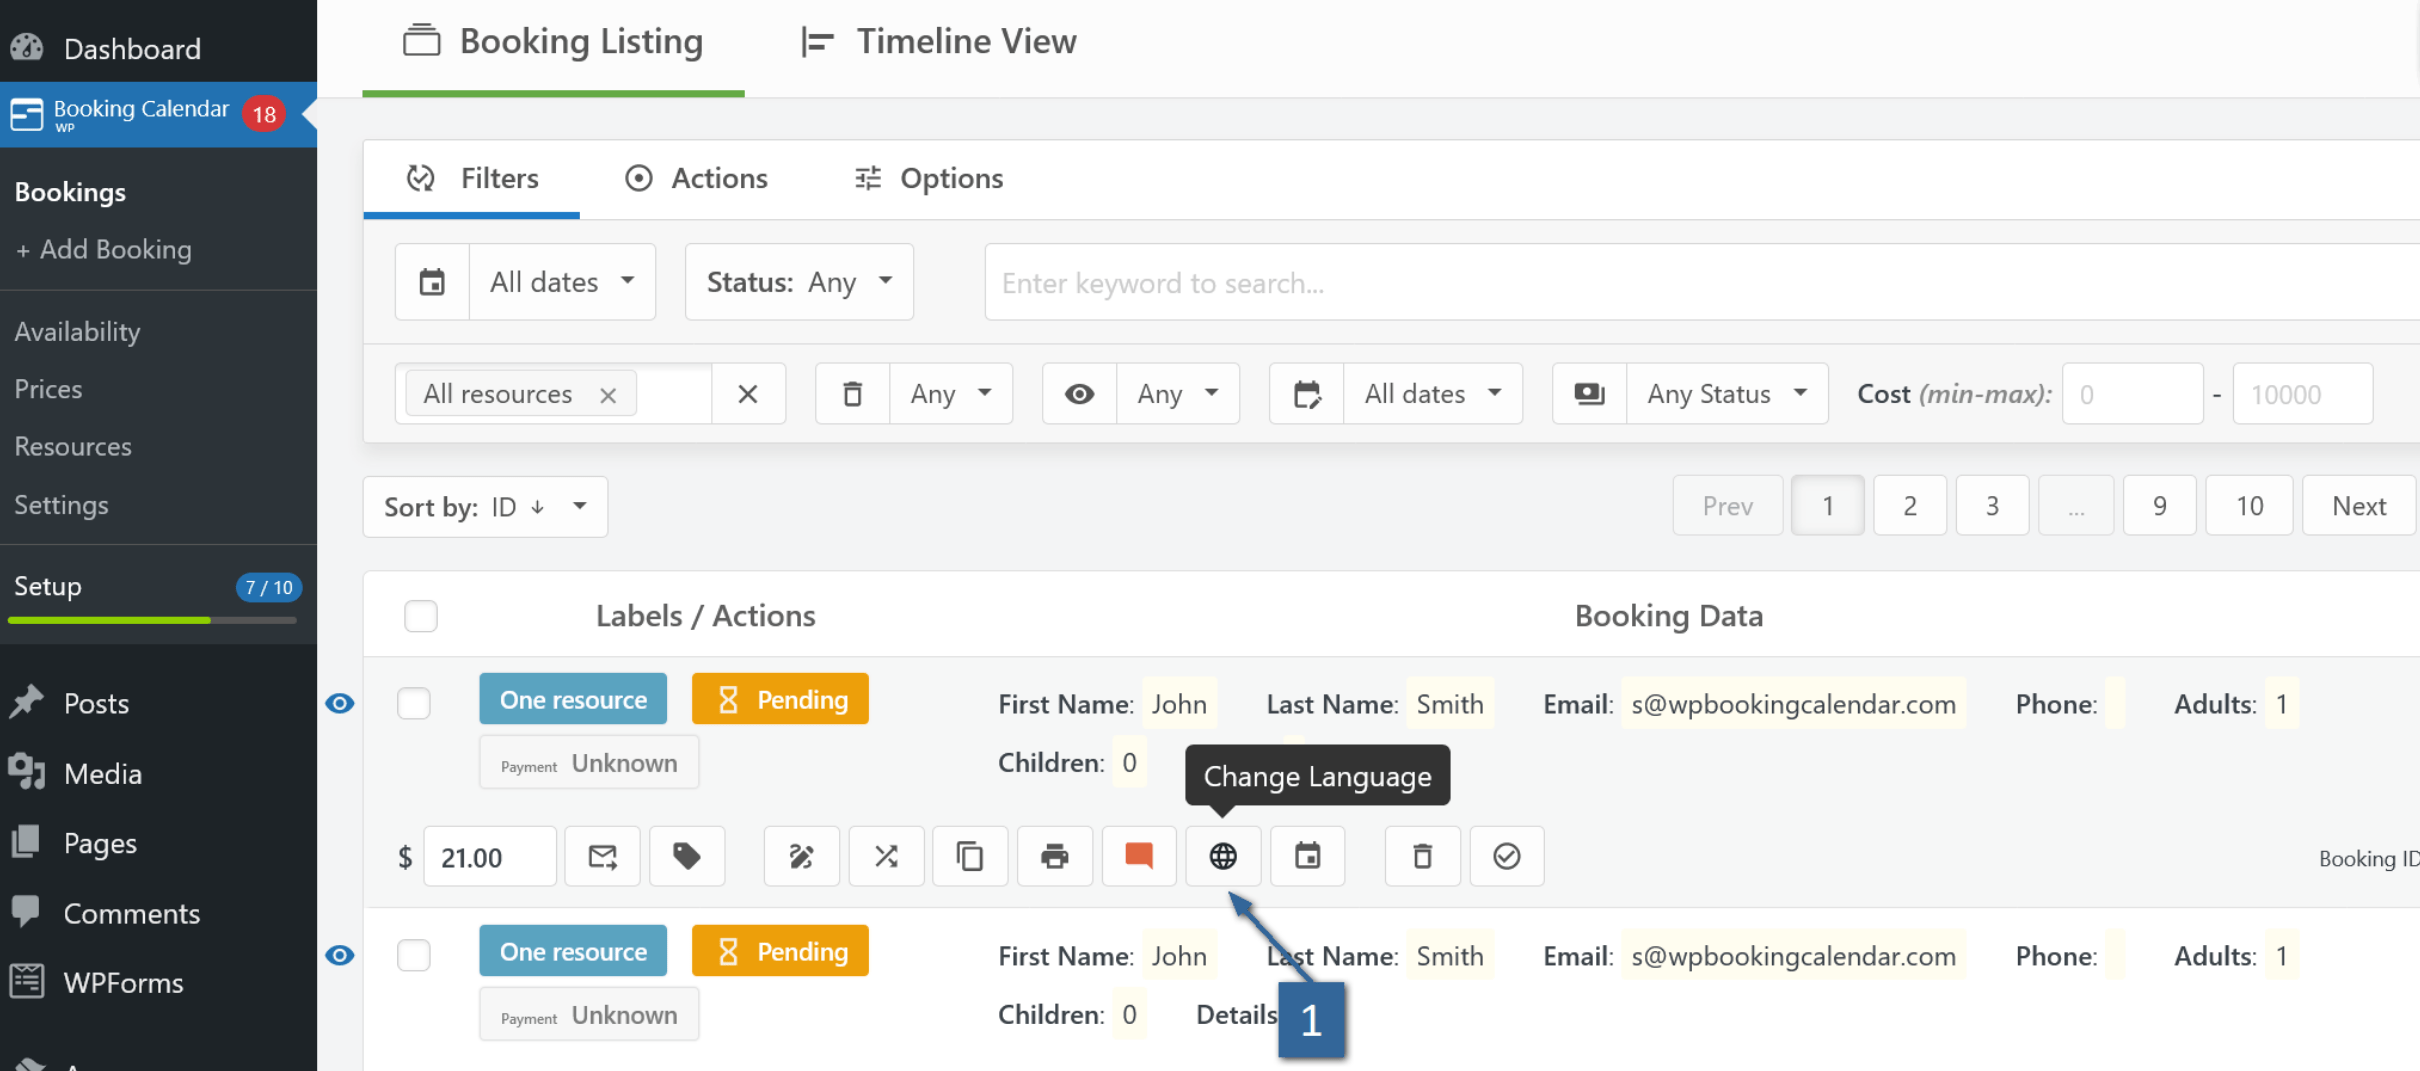
Switch locale
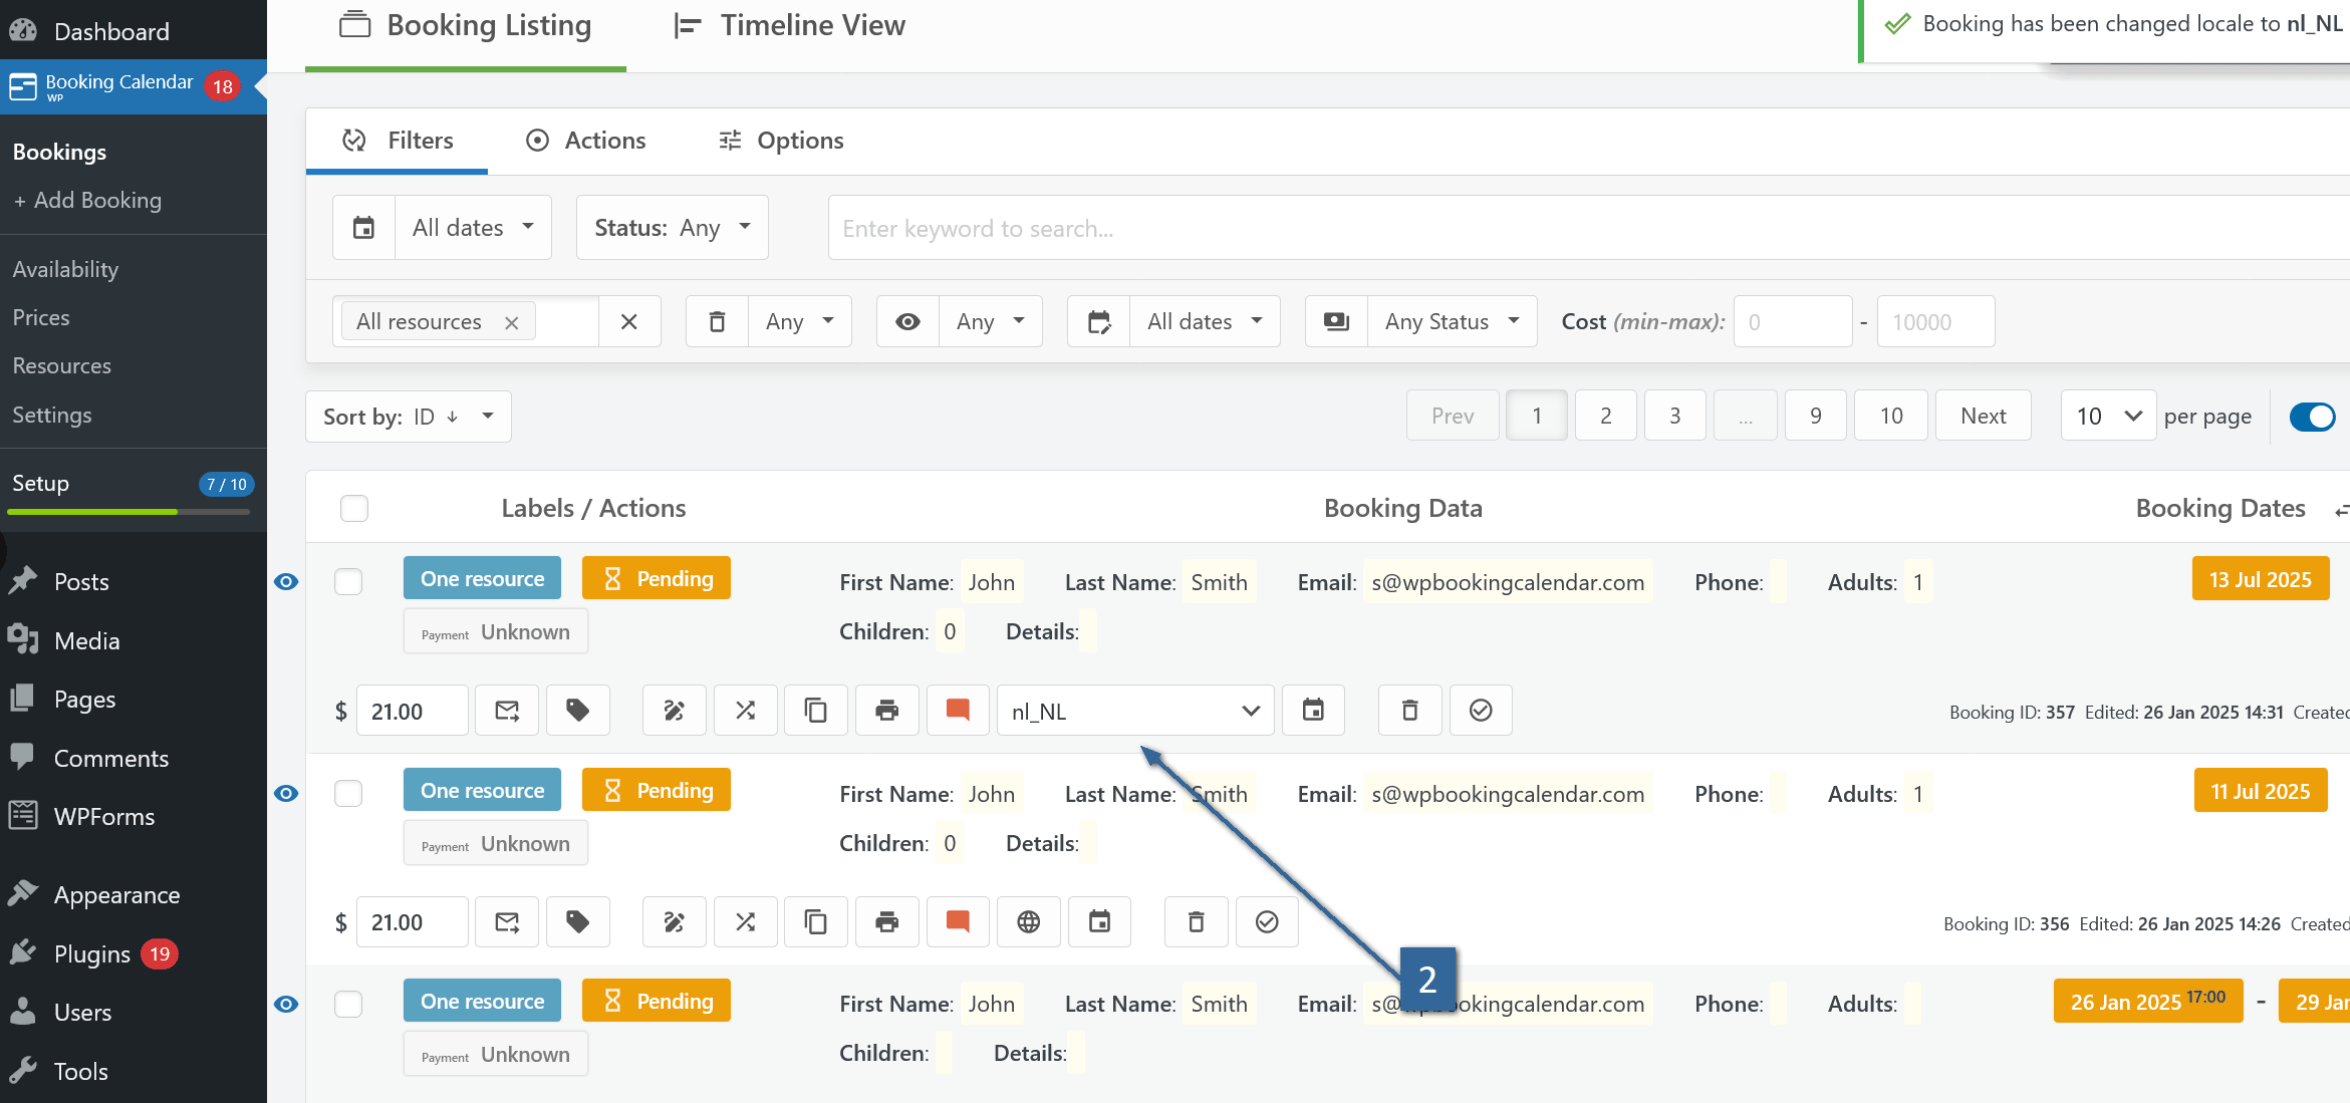
Approve the booking (or make other action).
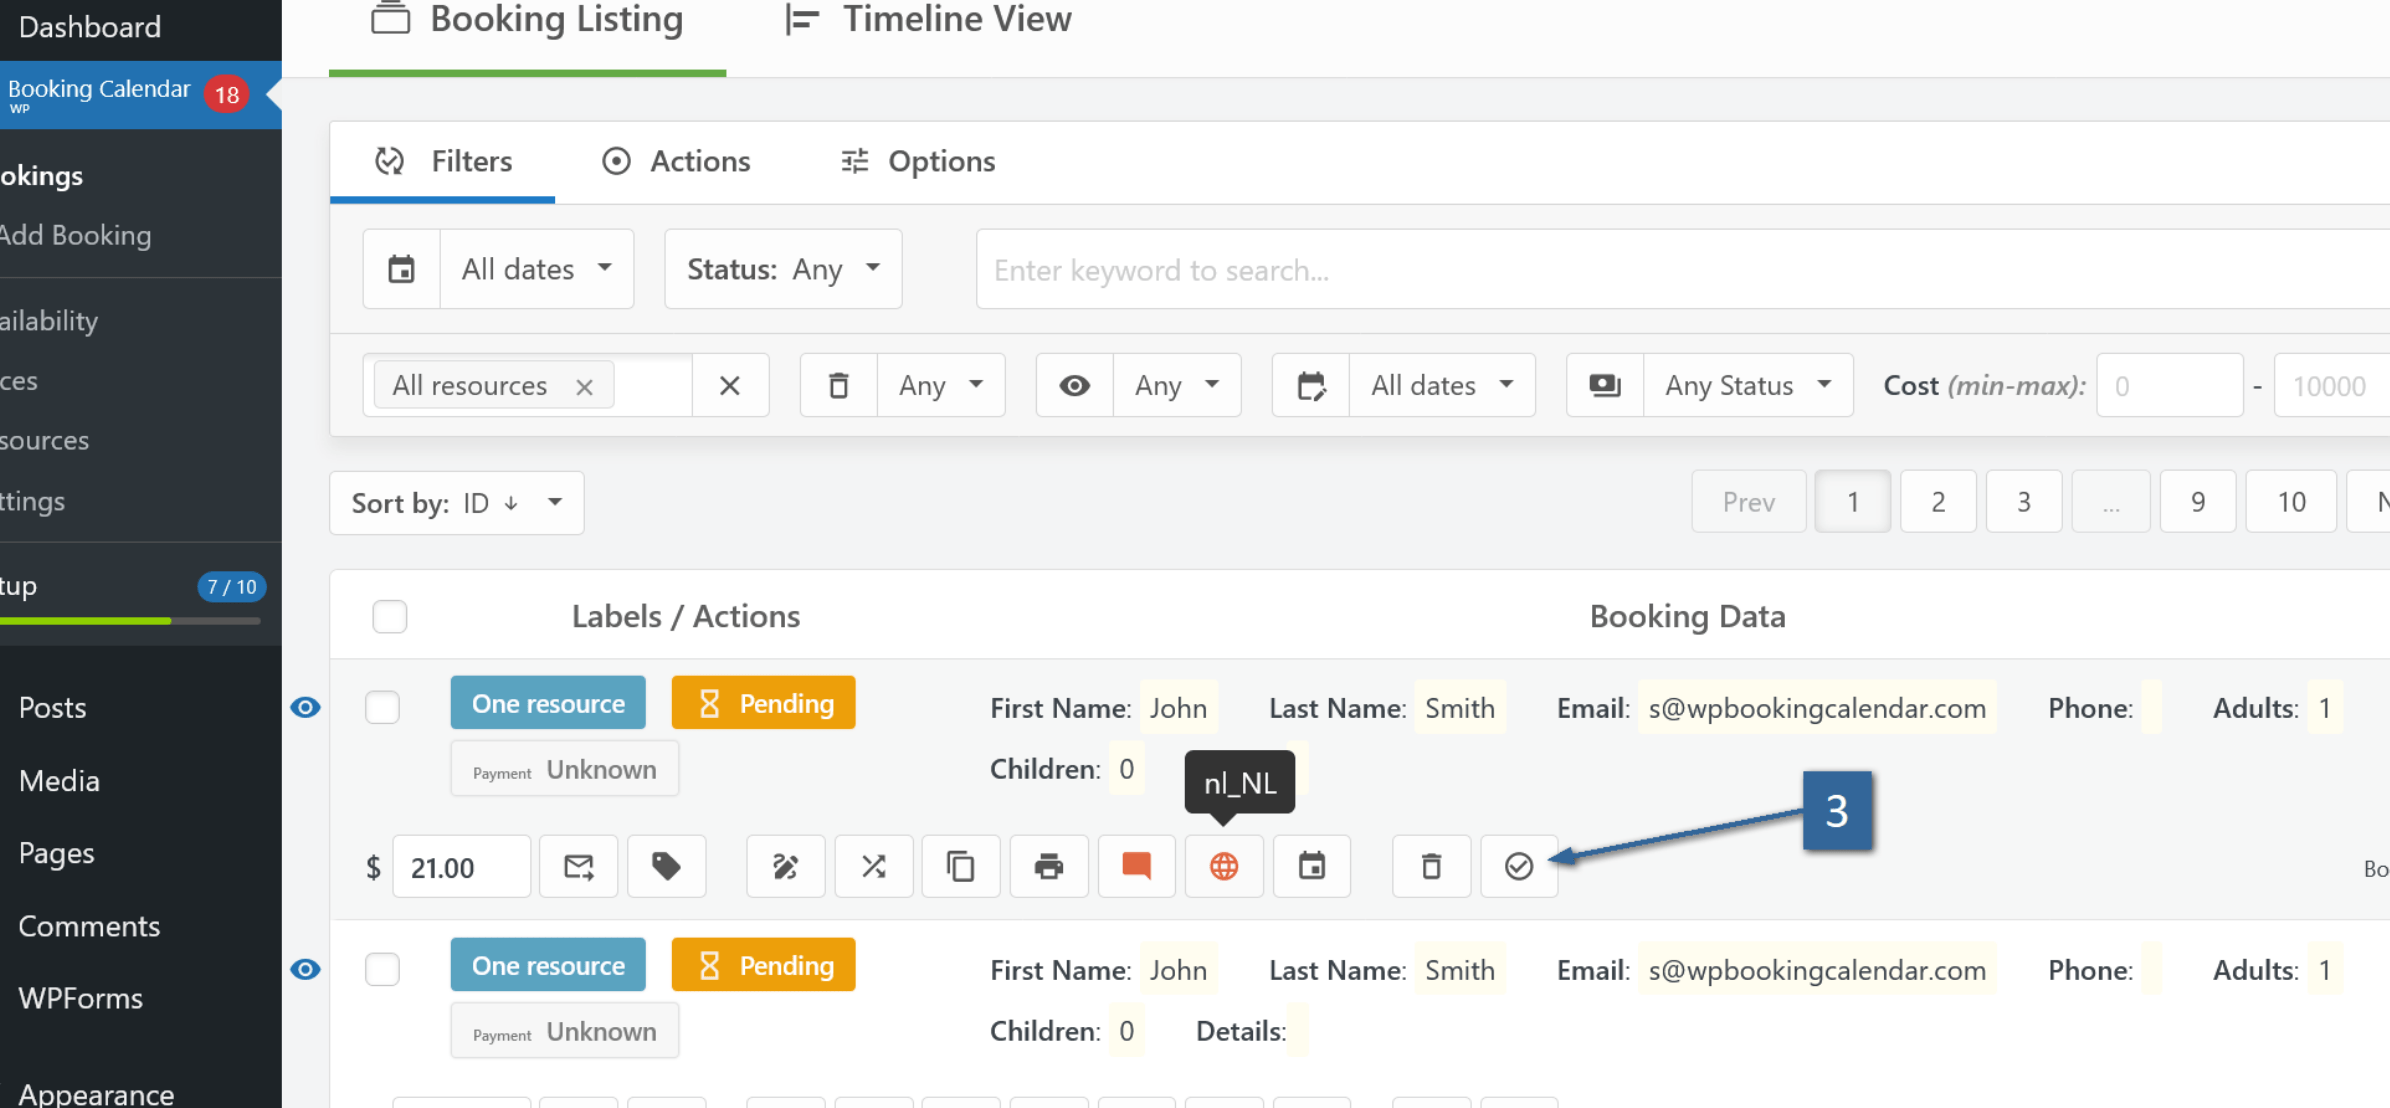

To update the local translation files in the Booking Calendar plugin, follow these steps:
- Navigate to WP Booking Calendar > Settings General page in the "Translation" section.
- For the option "Firstly load translation," select the "Local" value.
- Click on the "Save Changes" button.
After saving the changes, click on the "Update Translations" button. Wait for the system to download and update the translation files. Once the update is complete, test the new translation to ensure it is working correctly.
To select a specific language in WordPress admin panel:
- Open the WordPress > Settings > General page.
- In the "Site Language" option, select your preferred language.
OR
- If you use a translation plugin, select the specific language from the menu of your translation plugin.
In case you need to update the existing local translation of the plugin, please follow these steps:
- Download Necessary Tools: Before starting the translation of the WordPress plugin, ensure you have the Poedit application. You can download it for free from here. Additionally, download the original translation files from here. Extract the contents of the archive to access the PO and MO translation files. The PO file contains the source translation files, while the MO file contains the compiled translation files. Edit the specific PO file corresponding to your website's locale. For example, the German translation file may be named as booking-de_DE.po, and the Spanish translation file may be named as booking-es_ES.po. Find the full list of locales in WordPress on this page.
- Placeholder Variables: Be attentive to placeholders for variables such as %s, %d, %f, etc. Ensure that you maintain the placeholders in the same position as in the original translation line. The number of placeholders must be consistent with the original translations. For more detailed information about placeholders for variables in translations, check here.
- Using Poedit:
- Start the Poedit program.
- Click on "Browse Files" or select File > Open from the menu, or press Ctrl + O.
- Find the specific PO file of Booking Calendar, such as booking-nl_NL.po.
- Locate untranslated or incorrectly translated terms and update the translations.
- Ensure that you do not set specific translation lines as "Need to work" or "Fuzzy." You can check this under the "Edit" menu > "Translation need to work" (Ctrl + U).
- Save the file after translation.
- Send Updated Translation: Send your updated translation file (*.po) to info@wpbookingcalendar.com. We will update the translation on the server. Once updated, you can update this translation in the WP Booking Calendar > Settings General page in the "Translation" section, as described in this FAQ guide.
Follow these steps to create a new translation of the WordPress plugin:
- Download Necessary Tools: Before starting the translation of the WordPress plugin, ensure you have the Poedit application. You can download it for free from here. Additionally, download the original translation files from here.
-
Using Poedit:
- Start the Poedit program.
- Select File -> New catalog from POT file from the menu and choose the POT file for translation, usually located inside the languages folder, which you downloaded at previous point.
- Type a description for your translation.
- Enter the name of the PO file. The name consists of two parts:
- The filename of the plugin (in this case, "booking").
- The Locale (for example, for Spanish translation: "es_ES"). So, the name would be "booking-es_ES.po". Find the full list of locales in WordPress on this page.
- Save the file to the "languages" folder of the plugin.
-
Translation Process:
- Begin the translation.
- Placeholder Variables: Be attentive to placeholders for variables such as %s, %d, %f, etc. Ensure that you maintain the placeholders in the same position as in the original translation line. The number of placeholders must be consistent with the original translations. For more detailed information about placeholders for variables in translations, check here.
- Ensure that you do not set specific translation lines as "Need to work" or "Fuzzy." You can check this under the "Edit" menu > "Translation need to work" (Ctrl + U).
- Save the file after translation.
-
Submit Your Translation:
- Send your updated translation file (*.po) to info@wpbookingcalendar.com. We will update the translation on the server. Once updated, you can update this translation in the WP Booking Calendar > Settings General page in the "Translation" section, as described in this FAQ guide.
On the Booking Listing page exist ability to change language (locale) of emails, that will send to visitor during approving or declining of the booking. But how to detect language/locale of webpage, from where visitor submit the booking.
Here is instruction how to do this.
Please open the Booking > Settings > Fields page and add to the booking form this shortcode and JavaScript code:
<div style="display:none;"> Active Language: [text active_language class:wpbc_lang_field]</div>
<script type="text/javascript">
 jQuery(document).ready(function(){
    var wpbc_active_locale  = _wpbc.get_other_param('locale_active');
    jQuery('.wpbc_lang_field').val( wpbc_active_locale );
 });
</script>
Its will add to your booking form new field [active_language] and JavaScript for auto-inserting active locale into this field. Please note, this field is not visible for visitors, because of this CSS: style="display:none;"
Also you will be need to add to the "Content of booking fields data" form (its at the bottom of Booking > Settings > Fields page) this shortcode:
<strong>Active Language</strong>:<span class="fieldvalue">[active_language]</span><br/>For showing this field at the Booking Listing page.
There are 2 types of Booking Calendar translations.
1) One list of translations located at WordPress repository. Please note, these translations at your website should be located at: "../wp-content/languages/plugins/" folder.
2) Another list of translations located at the Booking Calendar website. You can download the original PO translations files from here. Please note, these translations at your website should be located at: "../wp-content/plugins/{Booking Calendar Folder}/languages/" folder.
By default Booking Calendar plugin try to use translations from "../wp-content/languages/plugins/",
if failed (not exist), then try to use translations from "../wp-content/plugins/{Booking Calendar Folder}/languages/" folder.
This behavior is possible to change at the Booking > Settings General page in the Translation section.
You can check instruction how to make or update local plugin translation files at this page.
Translations available in paid versions of Booking Calendar:
French (France) 97.69% [ 2828 / 2895 ], fuzzy 46, not translated 21
Danish 88.08% [ 2550 / 2895 ], fuzzy 193, not translated 152
Dutch 78.55% [ 2274 / 2895 ], fuzzy 470, not translated 151
Norwegian (Bokmål) 72.85% [ 2109 / 2895 ], fuzzy 243, not translated 543
German 72.75% [ 2106 / 2895 ], fuzzy 580, not translated 209
Hungarian 67.18% [ 1945 / 2895 ], fuzzy 666, not translated 284
Korean 67.18% [ 1945 / 2895 ], fuzzy 661, not translated 289
Spanish (Spain) 61.83% [ 1790 / 2895 ], fuzzy 681, not translated 424
Portuguese (Brazil) 58.34% [ 1689 / 2895 ], fuzzy 790, not translated 416
Greek 58% [ 1679 / 2895 ], fuzzy 798, not translated 418
Turkish 57.24% [ 1657 / 2895 ], fuzzy 814, not translated 424
Italian 55.75% [ 1614 / 2895 ], fuzzy 726, not translated 555
Spanish (Mexico) 53.58% [ 1551 / 2895 ], fuzzy 868, not translated 476
Finnish 53.26% [ 1542 / 2895 ], fuzzy 877, not translated 476
Polish 53.23% [ 1541 / 2895 ], fuzzy 866, not translated 488
Romanian 52.78% [ 1528 / 2895 ], fuzzy 878, not translated 489
Swedish 52.47% [ 1519 / 2895 ], fuzzy 887, not translated 489
Arabic 51.99% [ 1505 / 2895 ], fuzzy 903, not translated 487
Russian 51.92% [ 1503 / 2895 ], fuzzy 1126, not translated 266
Bulgarian 50.36% [ 1458 / 2895 ], fuzzy 919, not translated 518
Slovenian 50.22% [ 1454 / 2895 ], fuzzy 925, not translated 516
Chinese (Taiwan) 48.88% [ 1415 / 2895 ], fuzzy 964, not translated 516
Portuguese (Portugal) 48.5% [ 1404 / 2895 ], fuzzy 950, not translated 541
Japanese 47.77% [ 1383 / 2895 ], fuzzy 461, not translated 1051
Chinese (China) 46.87% [ 1357 / 2895 ], fuzzy 951, not translated 587
Ukrainian 46.56% [ 1348 / 2895 ], fuzzy 961, not translated 586
Catalan 45.8% [ 1326 / 2895 ], fuzzy 888, not translated 681
Thai 45.7% [ 1323 / 2895 ], fuzzy 999, not translated 573
Hebrew 45.42% [ 1315 / 2895 ], fuzzy 988, not translated 592
Galician 44.25% [ 1281 / 2895 ], fuzzy 1040, not translated 574
Slovak 41.14% [ 1191 / 2895 ], fuzzy 961, not translated 743
Croatian 39.83% [ 1153 / 2895 ], fuzzy 980, not translated 762
Czech 39.69% [ 1149 / 2895 ], fuzzy 930, not translated 816
Chinese (Hong Kong) 23.49% [ 680 / 2895 ], fuzzy 286, not translated 1929
Using Booking Calendar
After activation of plugin, you are almost ready to use it.
Inserting the booking form into post or page (widget or any other place of your site)
Just open the edit post or edit page menu page or add new page or post and inside of the edit content toolbar click on Booking Calendar button (button with calendar icon). Inside of the configuration popup dialog configure the options, like number of visible month of calendar, inserting the booking form with calendar or just availability calendar (paid versions in additional will have possibility to select the specific booking resource, for having different booking availability calendars; in some versions also possible to select the custom booking form, or inserting the search form) and insert the booking shortcode into the content of post or page. Publish or update the post or page, open it at client side of site and you will be able to see and make bookings in the booking form.
You can also show the booking form or availability calendar using the booking calendar widget at your sidebar. So please open the WordPress widget menu page and configure the booking calendar widget.
It's possible to integrate the booking calendar form into the any other place of your site, using the special PHP code, please read more detail about this at the FAQ.
Checking new bookings.
After your visitors are made the booking at your site, you will receive the email about the new booking to the email, which you are set at the General booking settings page. You can check the booking at the "Booking listing" page of your WordPress admin panel. Each booking consist information about the dates of reservation data from booking form fields, ID of booking, date of booking creation, booking status, like approved or pending booking.
At the top of this page you can use the booking filter tab to show the bookings, which are fit to parameters of the booking filter.
Changing status of bookings (approve/decline/set pending/set as read).
You can approve, delete, set pending status, or mark as read for the single booking using the buttons at the right side of each booking at the "Booking Listing" page (mark the single booking as read, you can make by clicking on the "new" label at the left side of booking.
The same actions you can make at the multiple bookings, if you are select the multiple bookings, by setting checked the checkboxes at left side near each booking and using the specific button at the top of the page at "Actions tab".
Adding new booking.
You can add a new booking at the client side of site, as a regular visitor of your site, where you are inserted the booking form.
You can also add new booking at the admin panel at the "Add new booking" menu page. At this page you will see the same booking form as at client side.
Settings configuration of booking calendar.
You can configure the different settings of availability calendar, booking form or plugin options at the general booking settings page.
"Admin email" - default admin email for notifications about new bookings and other actions in a booking system.
"Show hints" - show / hide help hints, at the admin panel.
Expanded advanced settings of JavaScript loading
"Dissable Bootstrap loading at Client side" - if your theme or some other plugin is load the BootStrap JavaScripts, you can dissable loading of this bootstrap script by this plugin. Please do not activate this feature, if no any other plugin or theme is not loaded these scripts, otherwise can be some issues (issue - warning message about not selected days in calendar during reservation process, even if the dates are selected).
"Dissable Bootstrap loading at Admin side" - if your theme or some other plugin is load the BootStrap JavaScripts, you can dissable loading of this script by this plugin. Please do not activate this feature, if no any other plugin or theme is not loaded these scripts, otherwise can be some issues.
Expanded settings of powered by notice
"Powered by notice" - turn On/Off powered by "Booking Calendar" notice under the calendar in booking form.
"Copyright notice" - turn On/Off copyright notice at footer of site view.
"Calendar skin" - select the skin of booking calendar
"Number of months" - select your maximum number of scroll months at booking calendar. It's number of months, which you can scroll in calendar using the scroll month arrow in a header of calendar.
"Start Day of week" - select your start day of the week in calendar.
"Multiple days selection" - Activate or disable possibility to select single or multiple days in calendar. If you will leave this option unchecked so you will be able to select only one date in calendar.
"Unavailable days from today" - select number of unavailable days in calendar starting from today date. It's useful if you can not accept bookings for today or today and tomorrow days, etc...
"Unavailable days" - set the specific week days (Sunday / Monday / Tuesday / Wednesday / Thursday / Friday / Saturday) as unavailable days in calendars. This option is overwrite all other settings.
"CAPTCHA" - activate CAPTCHA inside of booking form.
Auto fill fields" - activate auto fill fields of booking form for logged in users.
"Show legend" - hide or show legend of dates under booking calendar.
"Show "thank you" message after booking is done" - activating showing of the message for the specific time, after visitor is made the reservation.
"New booking title" - mesaage what is showed after booking has done by visitor.
You can use this shortcode inside of that message: [lang=LOCALE] - start new translation section, where LOCALE - locale of translation
Example #1: [lang=fr_FR] - start French tranlation section.
Example #2: "Thank you for your booking.[lang=fr_FR]Je vous remercie de votre reservation." - English and French translation of some message.
"Showing title time" - time count in miliseconds for showing "new booking title"
"Redirect visitor to a new "thank you" page" - instead of showing message for specific time, the visitor will be redirected to a new page, after he will made the reservation, if this option is activated.
"URL of "thank you" page" - URL of "thank you" page.
"Bookings number per page" - select number of bookings per page in booking listing
"Bookings default order" - select your default order of bookings in the booking listing
"Default toolbar tab" - select your default opened tab in toolbar at booking listing page
"Date Format" - set your dates format, like "June 10, 2012" or "2012/06/10" or "06/10/2012" or "10/06/2012" or custom format (please check more info at documentation on date formatting). This date format is apply to the dates in emails and booking listing table.
"Dates view" - select default type of dates view at the booking tables. You can select sowing of all dates, or showing only check in and check out dates for the each reservation at the booking listing page and inside of email templates.
"Bookings Calendar menu pages" - select the minimum user access role to access for the specific page of admin booking panel.
"Delete booking data" - activate this option if you want to completly delete booking data during deactivation of plugin.
If you've upgraded to a paid version of Booking Calendar, follow these steps to maximize its functionality:
- Create Booking Resources: Start by creating booking resources for each of your properties or services on the Booking > Resources page. For more information on configuring booking resources, refer to the documentation on this page.
- Insert Booking Form: Once you've created your booking resources, you can insert the booking form for a specific resource (e.g., your property or service) into any posts or pages on your website. Learn how to insert the booking form or availability calendar into your pages or posts. You can also configure the Booking Calendar shortcode manually for more customization.
- Customize Settings: Finally, customize your settings such as form fields, email templates, prices and do Payment and availability configuration on the WP Booking Calendar > Settings pages to suit your specific needs.
The Booking Calendar MultiUser version have 2 types of the users: super booking admin and usual user.
The "first" WordPress admin user by default is "super booking admin" user.
So, firstly after activation of the plugin you have to see the booking panel for that user.
Then you are need to open the "general booking settings" page (this page is available only for the super booking admin users), then expand the User settings section at the right side and set the correct permissions (user roles) for the pages of the booking admin panel. Its required for the new WordPress users possibility to open the admin booking admin panel.
Now, you can create new WordPress user (the role of this user have to be higher or equal to the roles, which you are set at the previous step).
Now, you are need to open the Booking > Settings > Users page (you are have to be logged in as booking super admin user) and make activation of the booking admin panel for the new WordPress user.
Finally, you can log in as new WordPress user, and you will see own booking admin panel for this user. You can create new booking resource(s), configure the settings and insert the booking form(s) of this user into posts or pages, which is created by this user.
Workflow of configuration for do not have access of "Regular users" to Settings page and having unique configuration of booking form / Emails / Payments, as needed from view of super booking admin user.
So in case if you need to configure booking form field for regular user, and after this configuration block access to the settings field, you need to make following steps:
1) Please log in as "super booking admin user". I can suggest that this user have WordPress "Administrator" user role.
2) Open the Booking > Settings General page and set access level to "Settings" page as "Contributor" (or administrator).
3) Create new WordPress User (via standard WordPress admin panel), and set user role for this user as "Contributor" (or other user role, which you was set at point #2)
4) Open the Booking > Settings > Users page and activate booking admin panel for this new user as for "Regular user".
5) Now log in to WordPress admin panel as this specific "Regular user". Configure booking form fields and emails, and all other settings from Booking > Settings menu.
6) Log out and log in as "Super booking admin user". Now change "user role" for this regular user from "Contributor" to "Subscriber".
Now you can inform login and password of "Regular user" to real person.Now if this user will log in into the booking admin panel (WordPress admin panel), he/she will not have access to the Booking > Settings page, and will have booking form as you was configured previously.
Booking Calendar it's WordPress plugin, which make possible to make bookings of any properties or services at your site by visitors. Your visitors can select a date(s) in a calendar, fill the booking form and make a booking. The booking data will be storied in DB of your site and you can check and manage it (approve/decline/delete/... etc. ) at booking admin panel at your site, the email notifications about those actions can be sent to the administrator and to visitor emails.
You can insert the booking form with availability calendar into any post or page of your site or configure and activate the booking widget for your site sideboard.
The booking admin panel is consist from several pages:
"Booking Listing" - at this page you can view and filter any bookings, which was done by visitors. Also at this page you can make specific actions for the bookings (please check at the feature list and live demos, what actions are available in specific versions of Booking Calendar).
"Add new booking" - at this page, you can add new booking manually from admin panel.
"Resources" (paid versions only) - at this page you can manage the booking resources. Booking resources can be any properties (like a rooms or cars...etc.) or services, which is make possible to have individual availability calendar for the each resource.
The free version of Booking Calendar have only one default booking resource, that's why this admin page do not exist in free version. Depend from the version of Booking Calendar in sub pages of the Resource menu you can set the cost of booking resources, rates, availability, which is depend from the season filters, or even set cost dependence from the number of selected dates or cost dependence from selection of options in selectboxes or checkboxes from your booking form. You can also set the coupons for discounts.
Please check at the feature list and live demos, what features are available in specific versions.
"Settings" at this page you can configure the different settings for the availability calendar or booking form. The paid versions have several sub menu pages for the configuration of form fields of the booking form, configuration of email templates for the different action notifications, configure and activation the online payment form integrations, search form configuration and users management. Please check at the feature list and live demos, what features are available in specific versions.
Inside of the "Widget" WordPress menu page you can activate and configure the booking calendar widget(s). In the paid versions are possible to activate several booking calendar widgets, each for the different booking resource.
Inside of the edit "Post" or "Page" WordPress admin page, at the edit content toolbar you can find the "Booking Calendar" button for the insertion booking form or just availability calendar into post or page.
You can add a new booking to the system using the admin panel at the Booking > Add Booking menu page.
You can select the date(s) in a calendar fill the booking form fields and press the submit button for the creation of new booking.
Booking Calendar Personal and higher versions.
At the paid versions You can select the "booking resource" at the top of the page, so you can select at what exactly resource you are want to make the bookings.
Booking Calendar Business Medium/Large versions.
At the Business Medium/Large versions in additional you can select the specific custom form at the top of the page, so you be able to make the bookings for the specific booking resource, using the specific custom booking form.
Terms: add booking, new booking.
You can check, modify and change the status or other properties of the booking(s) at the Booking Listing admin menu page. Please open this page, at the top of the page you will see the Filters and Actions toolbar, and the table of booking listing.
Depends from the version there will be available different additional tools and features.
Filter tab.
Using they filter tab you can specify, what exactly booking(s) you are need to show.
"Apply" button - press this button after configuration of parameters in the filter tab, the parameters of filter will apply to the search results and new booking listing will show.
"Booking resources" selection - (deault value: "All resources"), you can select to show the bookings only from specific booking resource or from all booking resource. (available in paid versions only).
"Booking Status" selection - {Pending/Approved/All (default) }, select to show bookings only of specific status.
"Booking dates" selection - {Actual dates (default) /Today/Previous dates/All dates / Next dates (select the number of dates) / Prior dates (select the number of dates) / Check in - Check out }, select to show bookings, which was done for the specific date(s) or date ranges.
"Only new" - set pressed or unpressed "Read" status of the bookings, to show only new or all bookings.
"Creation dates" selection - {Today/All dates (default) / Prior dates (select the number of dates) / Check in - Check out }, select to show bookings, which was created at the specific specific date(s) or date ranges.
"Filter by keyword" text field - show the bookings, what have snide of the booking form the specific keywords. (available in paid versions only).
"Payment" selection - {All (default)/ Paid OK/ Unknown status/ Not Completed/Failed / Custom (text field)}, select to show bookings only with specific payment status. (available in Business and higher versions only).
Min. Cost - Max. Cost fields - set showing the bookings for the specific cost interval. (available in Business and higher versions only).
"Sort" - {ID/Resource/Cost } - set order of the bookings in the booking listing table.
"Save as Default" button - Save the actual applied filter settings as a default. (available in paid versions only).
"Booking ID" text search field - Search from at the top right side for the fast searching of the specific booking by ID.
Actions tab.
You can apply these actions for the specific selected bookings (the checkbox at the left side of each such booking have to be checked) a the booking listing.
Approve / Unapprove buttons - change the status of the specific selected bookings to "Approved" or "Pending".
Delete button - completely delete the specific selected bookings.
Read / Unread buttons - set the specific selected bookings as read/unread. If you are set the specific bookings as read, the icon "New" at the left side near each bookings will hide. You can make also this operations on the specific single bookings by clicking on the icon "New" at the left side of booking.
Print button - show the print layout of the current visible page of booking listing. (available in paid versions only).
Export button - export the bookings of the current visible page of booking listing to the CSV format. (available in paid versions only).
Export All button - export the bookings from all pages of booking listing to the CSV format. (available in paid versions only).
Emails sending (checkbox) - set checked or unchecked this checkbox, if you are want that the email is sending or not sending for the specific actions, like: Approve/Unapprove, etc... This interface element is located under the Actions tab at the right side of page.
Booking Listing table.
The booking listing table have a several Columns: ID, Labels, Booking Data, Booking Dates, Actions.
ID collumn.
In the "ID" column in the fields of each booking you can see the ID of the specific booking, the date and time of creation of this booking. Also at this collumn is exist the checkbox for selections of specific booking(s) for the fuser actions using the tools from the Actions tab.
In additional at the left side you can find the "New" icon for the upcoming bookings. This icon is clickable, so you can disable the status of new (unread) for the specific single booking.
Lables collumn.
At this column you can see the status labels of the specific booking, like pending/approved or payment statuses (available in Business and higher versions only).
Data collumn.
At this field you can see the all data about the specific booking from your billing form:
First Name:Victoria Last Name:Smith Email:victoria@server.com Address: City: Post code: Country: Phone:(044)458-77-88 Number of visitors: 2 Children: no Details: Please, reserve an appartment with fresh flowers.
Booking dates column.
In this collumn you can see the bookings dates. Please note, at the head of the collumn you can find the icon for the activating extended dates showing:
for example: June 21, 2012, June 22, 2012, June 23, 2012
And normal dates view:
for example: June 21, 2012 - June 23, 2012
Actions collumn.
Cost settings - view or edit the cost of the specific booking (available in Business and higher versions only).
Send payment request - button for sending payment request to the visitor by email (available in Business and higher versions only).
Edit booking - edit the specific booking data at the admin panel (available in paid versions only).
Edit/create note to the booking - add or edit the note for the specific booking (available in paid versions only).
Approve/Unapprove - Instant changing the status of the single booking.
Delete - Completely erase specific booking.
Change resource - change the booking resource for the specific booking (available in paid versions only).
Change payment status - change the pay,ent status for the specific booking (available in Business and higher versions only).
Developer API
Currently, there isn't a full API available for the Booking Calendar plugin. While some hooks do exist, they are not yet thoroughly documented. We are actively working on improving this and plan to include better documentation and a more comprehensive API in future updates to facilitate smoother integrations.
Despite the current limitations, the plugin does offer some useful functions and hooks that may serve your purpose. You can find these in the file located at `../wp-content/plugins/booking/core/wpbc-dev-api.php`. This file contains valuable functions and hooks that might be helpful for your specific needs.
To create a new booking, you can use the `wpbc_api_booking_add_new` function.
Example #1:
	$booking    = array(
		'dates' => array( '2027-06-24', '2027-06-24', '2027-06-25', '2027-06-26' ),
		'data'  => array(
			'secondname' => array( 'value' => 'Rika', 'type' => 'text' ),
			'name'       => 'John',
			'email'      => array( 'value' => 'rika@cost.com', 'type' => 'email' ),
		)
	);
	$booking_id = wpbc_api_booking_add_new( $booking['dates'], $booking['data'] );
For the pro version, you can specify the ID of the booking resource (calendar) where you want to save the booking:
	$booking         = array(
		'dates'       => array( '2027-08-24', '2027-08-25', '2027-08-26' ),
		'data'        => array(
			'secondname' => array( 'value' => 'Smith', 'type' => 'text' ),
			'name'       => 'John',
			'rangetime'  => array( 'value' => '14:00 - 16:00', 'type' => 'selectbox-one' ),
			'email'      => array( 'value' => 'rika@cost.com', 'type' => 'email' ),
		),
		'resource_id' => 3,

	);
	$booking_id      = wpbc_api_booking_add_new( $booking['dates'], $booking['data'], $booking['resource_id'] );
Please note that both examples will create new bookings only if the dates (and times, if provided) are available in the destination booking resource (calendar). If you want to create a new booking without checking for date/time availability and create the booking in any case, use the new parameter as shown in this example:
	$booking    = array(
		'dates'       => array( '2027-08-24', '2027-08-25', '2027-08-26' ),
		'data'        => array(
			'rangetime'  => array( 'value' => '14:00 - 16:00', 'type' => 'selectbox-one' ),  // Define booked time-slot.
			'name'       => 'John',                                                          // Simple configuration.
			'secondname' => array( 'value' => 'Smith', 'type' => 'text' ),                   // Advanced configuration.
			'email'      => array( 'value' => 'John@cost.com', 'type' => 'email' ),
		),
		'resource_id' => 3,
		'options'     => array(
			'save_booking_even_if_unavailable' => 1,  // [0 | 1]  if 1 - skip checking if the dates/times are available.
		),
	);
	$booking_id = wpbc_api_booking_add_new( $booking['dates'], $booking['data'], $booking['resource_id'], $booking['options'] );
Here is way to programmatically check the availability of specific dates and times for any booking resource.
You can use the `wpbc_api_is_dates_booked` function for this purpose.
Here’s an example of how to check a time slot on 2027-08-24 from 15:00 to 16:00 for booking resource with ID = 3:
$booking         = array(
	'dates'       => array( '2027-08-24 15:00:01', '2027-08-24 16:00:02' ),
	'resource_id' => 3,
	'params'      => array( 'is_use_booking_recurrent_time' => false ),
);
$is_dates_booked = wpbc_api_is_dates_booked( $booking['dates'], $booking['resource_id'], $booking['params'] );
if ( $is_dates_booked ) {
	// Booked.
} else {
	// Available.
}
And here’s an example for checking several full dates (2027-08-24, 2027-08-25, and 2027-08-26) for booking resource with ID = 3:
	$booking         = array(
		'dates'       => array( '2027-08-24 00:00:00', '2027-08-25 00:00:00', '2027-08-26 00:00:00' ),
		'resource_id' => 3,
		'params'      => array( 'is_use_booking_recurrent_time' => false ),
	);
	$is_dates_booked = wpbc_api_is_dates_booked( $booking['dates'], $booking['resource_id'], $booking['params'] );
	if ( $is_dates_booked ) {
		// Booked.
	} else {
		// Available.
	}
To insert the booking form on your website, please follow these steps carefully. First, identify the specific type of shortcode you intend to use for your booking form. This will ensure the correct form is displayed. Find more information at this page.
Once you have identified the shortcode, open your theme's PHP file for editing. A common file to edit is `single.php`, but it may vary depending on your theme's structure and where you wish the form to appear.
Insert the following code into the PHP file to display the booking form:
<?php echo do_shortcode("[booking resource_id=1 nummonths=1]"); ?>Please note that you can replace [booking resource_id=1 nummonths=1] with the specific shortcode you identified in step 1. After inserting the code, save the changes to your PHP file.
How to Edit CSS in the Theme Editor
The location of the CSS section for editing CSS files depends on your theme.
For standard Classic Themes, it is usually located in the "Appearance > Theme Editor" section.

However, in the new WordPress Block themes, it can be found in "Appearance > Editor > Styles". Then, within the Style Widget (located on the right side of the editor), there is an "Additional CSS" section at the bottom for editing CSS. The exact path may vary depending on the theme. (It was explained using the default Twenty Twenty-Four theme as an example).

How to Edit Plugin files
WordPress update 4.9 or newer.
Since update 4.9 of WordPress, its was updated interface of editing plugin files via WordPress admin panel.
1) Now, you can open WordPress admin panel, then
2) Open WordPress > Plugins > Editor menu
3) In the top right side for option "Select plugin to edit" select "Booking Calendar" plugin (please note, if you have several versions of Booking Calendar (for example, Booking Calendar Free version as deactivated version and paid version, so you will see both options there, and you need to select correct, activated version of your version of Booking Calendar) and click "Select" button
4) Now at right side you can see files and folders of plugin, you can select specific file to edit and make your customization,
after this click on Save changes button.
5) Clear browser cache and test it.
WordPress update 4.8 or older.
1) Open the WordPress Plugins menu page.
2) Click on "Edit" link under the "Booking Calendar" plugin.
3) On the right side of that page, please find specific file, like this:
booking/css/client.css
Or some other that you require. Click on that link.
You will be need to edit URL in your browser and specify directly, what file to edit.
One restriction. (Booking Calendar Free version have name of plugin folder "booking", paid versions of Booking Calendar can have different names. For example Booking Calendar Personal version can have name of folder like this: booking.personal.7.0 (etc). So you will be need to change in URL this folder appropriately.
For example, if you need to edit this file: ../{Booking Calendar Folder}/core/admin/page-email-trash.php
Then you need to edit URL to this:
https://your-server.com/wp-admin/plugin-editor.php?file=booking/core/admin/page-email-trash.php
Important part here this path: ?file=booking/core/admin/page-email-trash.php
And in case, if you use some paid version, you will be need to replace folder name from "booking" to "booking.personal.7.0" or some other.
4) Make edit of this file.
5) Then click on "Update file" button to save changes.
6) Clear browser cache and test it.
Troubleshooting
If you're having trouble activating the new Booking Calendar Pro version after updating from the old paid version using the provided installation instruction, please follow these four troubleshooting steps:
1. Deactivate the old paid version of Booking Calendar.
2. Delete the old paid version of Booking Calendar from your WordPress.
3. Install and activate the Booking Calendar Free version. You can either do this as shown in the attached screenshot, or download and install it separately from the WordPress directory.
4. Finally, activate the new Booking Calendar Pro version.
Please be sure that option "Render Blocking Js" in WP Fastest Cache > Settings page is UNCHECKED.
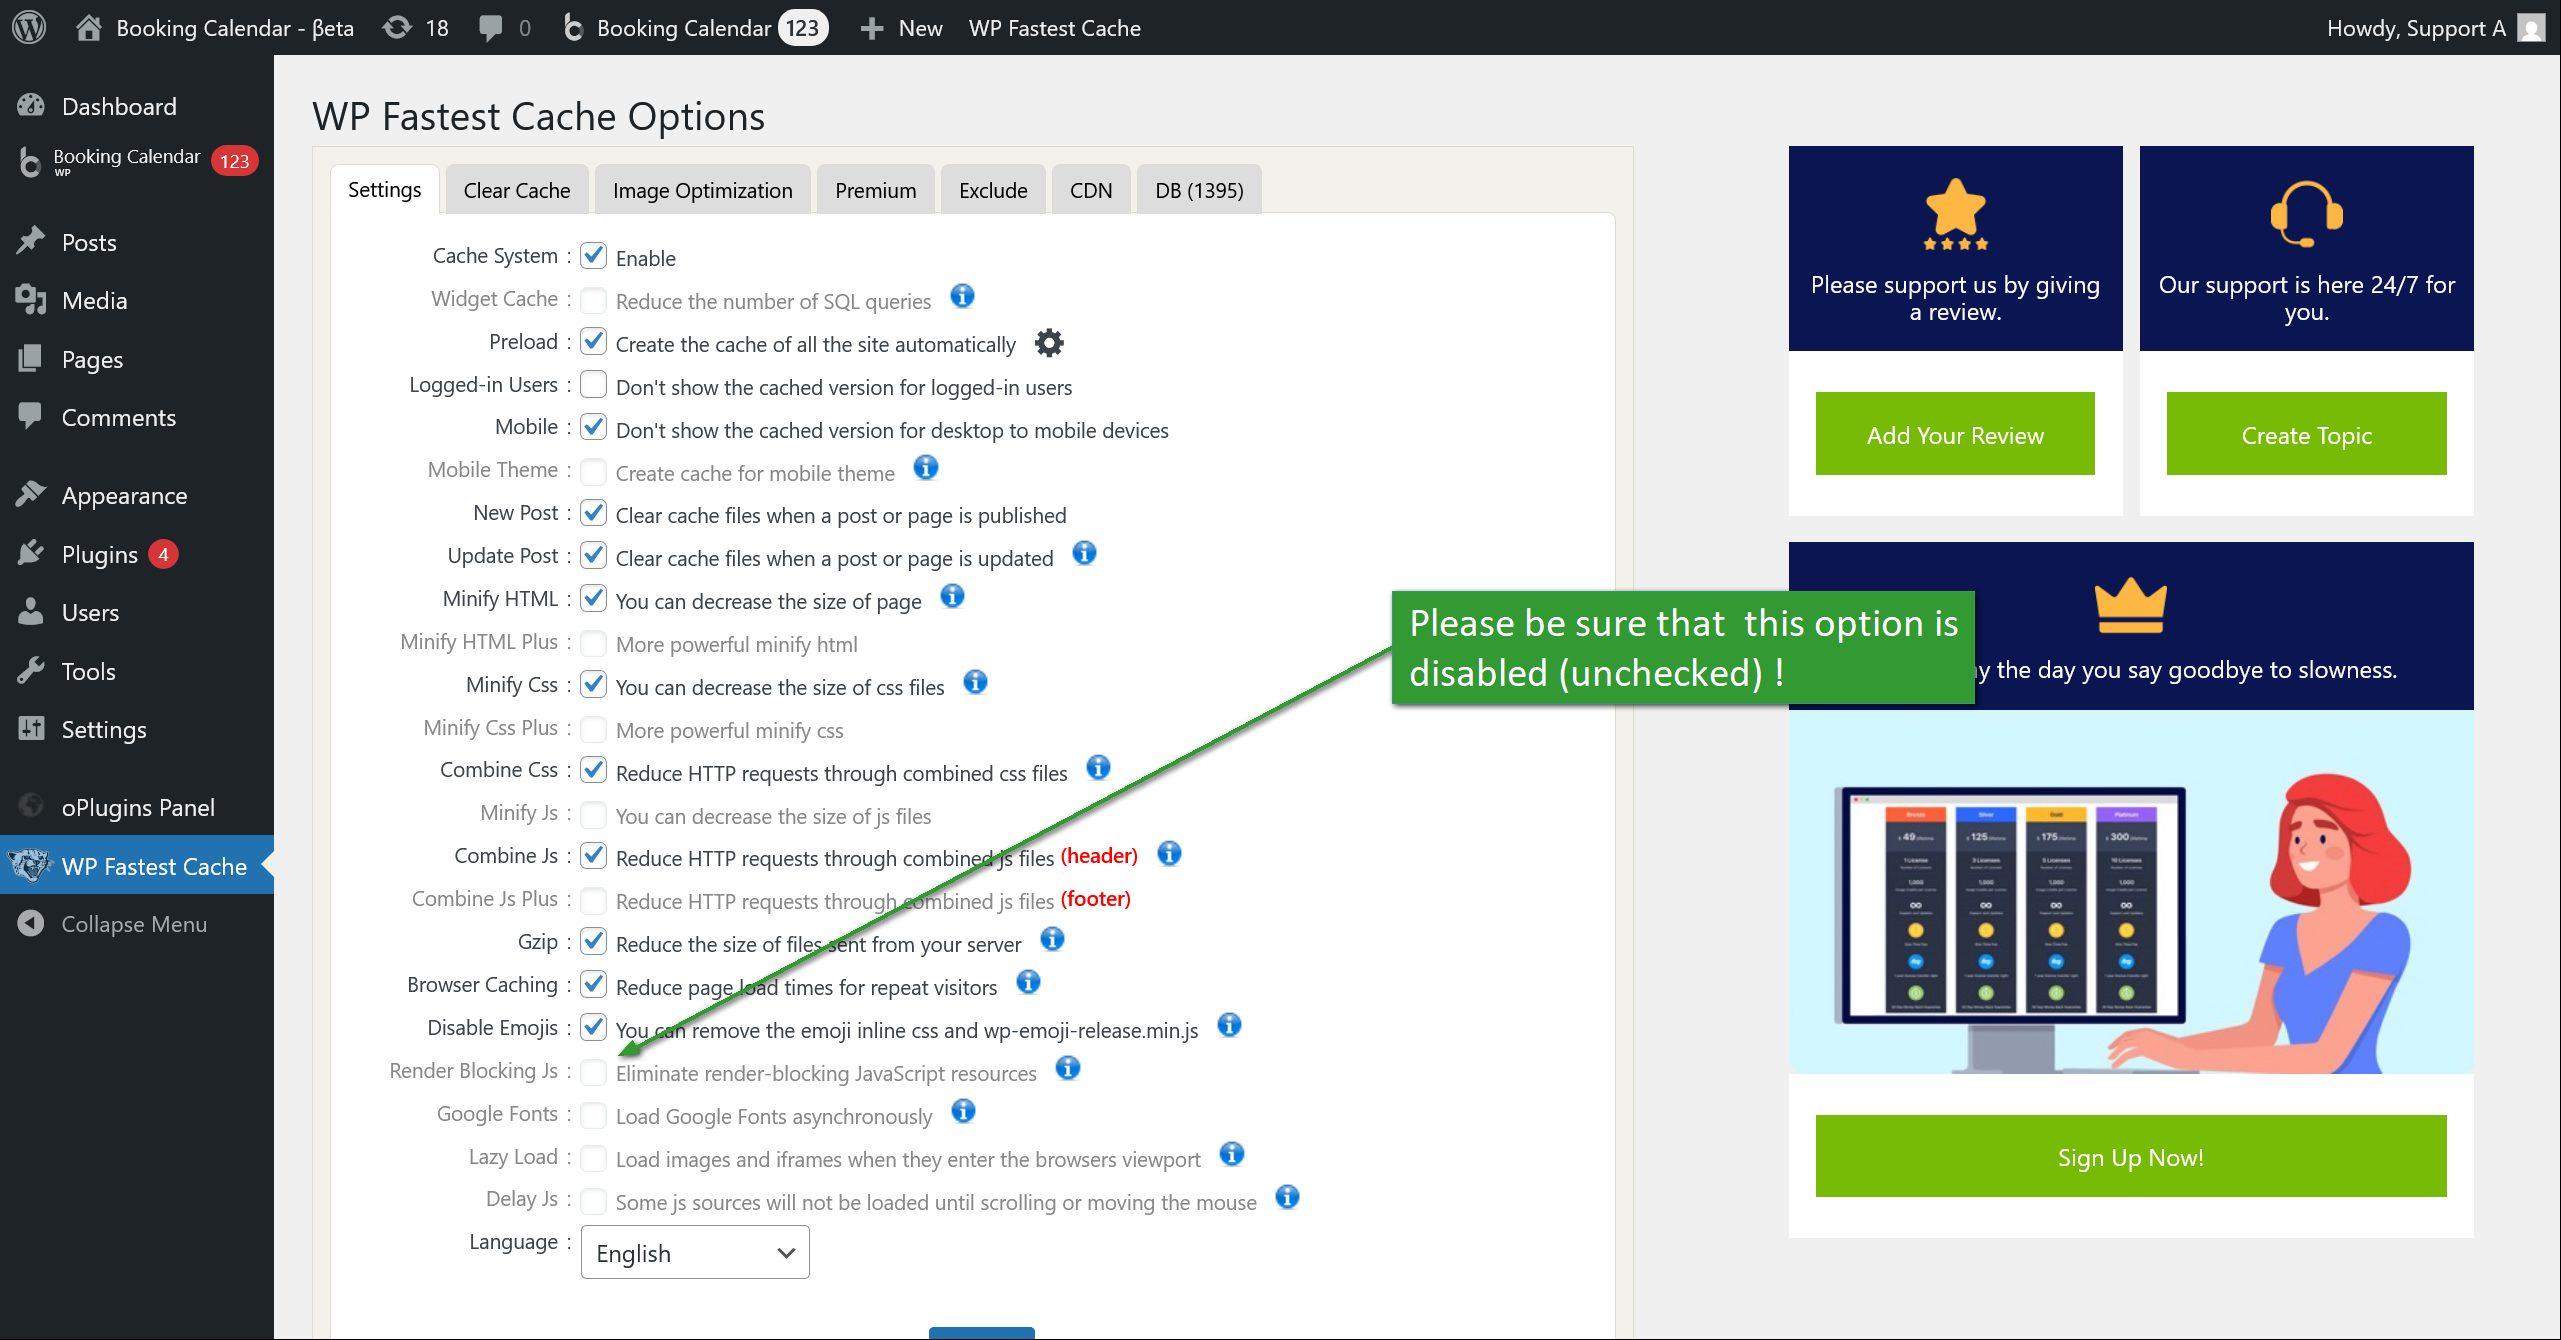
Last updated: December 18, 2025
If your Booking Calendar form stopped loading right after updating Elementor to v3.33.5, and you now see
CSS/JavaScript printed inside the form (instead of being applied/executed), this is almost always caused by
where the shortcode was inserted.
What changed in Elementor 3.33.4 / 3.33.5 (why this happens)
Elementor 3.33.5 includes a security fix that tightens code security enforcement in the
Text Editor widget. Elementor 3.33.4 includes similar security enforcement changes.
After these updates, when you paste Booking Calendar output/shortcode into the Elementor Text Editor widget,
Elementor may sanitize, strip, or escape parts of the output.
Typical result: the
<style>/
<script> wrappers disappear, and the remaining CSS/JS becomes plain text in the page.
Because the JavaScript does not execute, the calendar never initializes.
Symptoms you may see
- The calendar stays on a loading frame, or never renders interactive dates.
- CSS appears as plain text inside the booking form.
- JavaScript appears as text (often wrapped by
<p>...</p>).
- In the page source, you can find the script content, but it is not inside
<script>tags.
- You may see a warning like: "You have added the same calendar (ID = X) more than once..." (this is a separate issue; see below).
Fix (recommended): do not use Elementor Text Editor for the Booking Calendar form
Option A: Use Elementor Shortcode widget (recommended)
- Open the page in Elementor Editor.
- Locate the widget where you inserted the Booking Calendar shortcode (usually Text Editor).
- Remove that Text Editor widget, or cut the shortcode out of it.
- Drag the Shortcode widget into the page.
- Paste your Booking Calendar shortcode into the Shortcode widget (exactly as provided by Booking Calendar).
- Click Update.
- Clear caches (plugin/server/CDN) and test the page in an incognito/private window.
This keeps the shortcode output in the correct rendering pipeline and avoids Text Editor sanitization.
Option B: Use the native Booking Calendar Elementor widget (best UX)
If you have the Booking Calendar Elementor widget available:
- Open the page in Elementor.
- Add the Booking Calendar widget.
- Select your booking resource/calendar, form type/template, and other options.
- Update the page and test.
This is the most robust method because the widget renders the booking form without relying on pasted code.
Important extra check: make sure the same calendar is not added twice
If you see a message like "You have added the same calendar (ID = X) more than once on this page",
it can also prevent correct loading (conflicting IDs, duplicate initialization, overwritten variables).
Check these common "double insert" places
- The booking form is placed in the page content and also in a header/footer template.
- The shortcode is inside a popup, sticky element, or a mobile/desktop duplicate section.
- The shortcode exists in two different Elementor widgets (one hidden by responsive settings).
Keep only one instance of the same resource ID on a single page.
If you need custom styling or custom JavaScript
Because Elementor 3.33.5 tightened the Text Editor widget, do not inject scripts/styles through Text Editor.
Use one of these instead:
- Custom CSS (Elementor Pro) for styling adjustments.
- WordPress Appearance → Customize → Additional CSS.
- Your theme/child-theme stylesheet, or Booking Calendar’s styling options.
- For JavaScript: Elementor Custom Code (Pro) or a small custom plugin/snippet that enqueues a script properly.
Quick troubleshooting checklist (if it still does not load)
- Replace Text Editor with Shortcode widget (most important).
- Ensure only one calendar with the same ID exists on the page.
- In Elementor: go to Tools and run Regenerate CSS & Data, then clear caches.
- Temporarily disable optimization/minify plugins to test (JS combining can break initialization timing).
- Check browser console errors (press F12 and open the Console tab).
FAQ
Why did it work before the Elementor update?
Because Elementor 3.33.5 introduced stronger security enforcement in the Text Editor widget.
This can sanitize code-like output and break inline CSS/JS needed for dynamic widgets like booking calendars.
Can I keep using Text Editor if I want to format text around the shortcode?
Yes. Place your text in Text Editor widgets above/below, and put the booking form itself in a Shortcode widget
(or the Booking Calendar widget).
Should I rollback Elementor as a fix?
A rollback can help confirm the cause, but it is not a good long-term solution.
The clean fix is to change the widget used to embed the booking form.
If you have enabled the Booking details in popover option at WP Booking Calendar > Settings > Manage Bookings > Timeline (front-end), but the booking details popover is still not opening on the front-end, this is expected behavior in the paid versions of Booking Calendar (since update 10.14.10).
This functionality is disabled by default in paid versions to help prevent the unintended public exposure of booking data. After an extensive discussion with the Wordfence team regarding this issue, we decided to block this feature by default to provide maximum data security, since most websites do not need to show booking details publicly.
If you understand the security implications and still need to use this feature on your website, you can manually re-enable it by following the steps below.
How to re-enable the booking details popover
-
Update Booking Calendar Free and Pro to the latest versions.
Please make sure that both the Free and Pro versions of Booking Calendar are updated to the latest available versions.
If you need the latest Pro update, you can request it here:
https://wpbookingcalendar.com/request-update/ -
Open your
wp-config.phpfile.You can find this file in the root folder of your WordPress website.
-
Add the following line to your
wp-config.phpfile:define( 'WPBC_DISABLE_POPOVER_IN_TIMELINE', false ); -
Save the file and refresh your website.
After saving the changes, clear your website cache and browser cache if needed, then check the front-end timeline again.
Important note
Even though the constant name contains the word DISABLE, setting it to false will allow the popover functionality to work again on the front-end.
Please use this option carefully. If booking details are visible on public pages, sensitive booking information may become accessible to website visitors, depending on your timeline configuration and booking content.
Recommended placement in wp-config.php
It is usually best to add the constant before the following line in your wp-config.php file:
/* That's all, stop editing! Happy publishing. */Troubleshooting
- Make sure both the Free and Pro versions are fully updated.
- Confirm that the popover option is enabled in WP Booking Calendar > Settings > Manage Bookings > Timeline (front-end).
- Check that the constant was added correctly to
wp-config.php. - Clear all caching systems, including plugin cache, server cache, CDN cache, and browser cache.
- Test the front-end timeline again in an incognito/private browser window.
Summary
The Booking details in popover feature is blocked by default in paid versions of Booking Calendar for security reasons. To re-enable it, update both plugin versions and add the following constant to your wp-config.php file:
define( 'WPBC_DISABLE_POPOVER_IN_TIMELINE', false );This should restore the booking details popover on the front-end timeline.
- If something does not seem to be sending correctly, install the WP Mail Logging Plugin to check logs of email sending.
- Check SPAM / JUNK folder in your mail system.
- Check that you have activated and configured the email templates at the Booking > Settings > Emails page.
- For each email template (switch tabs at toolbar) recheck that you have correct email addresses.
- Option "Enable / Disable" at the specific email template must be checked.
- Field "From" at the specific email template must to have the same website DNS as your website.
Sometimes mail servers block emails, if the address "From" different from the domain of website, from where this email was sending. Please open the Booking > Settings > Emails page and recheck that field "From" have the same email as your website domain. For example: info@your-server.com and not like this your_email@gmail.com, where your-server.com it's your website domain.
- If you are using paid versions of Booking Calendar, please be sure to configure the email field at the Booking > Settings > Form page, like this [email* email]. Its default primary email field for booking form! Please do not use other names for this email field. For example: Email (required):[email* email]
- Optional. Try to set for field "To" in the "New (admin)" email template the same email that you was used in field "From" at this email template page.
- This is most common reason of not receiving emails!
In most situations you will need to install and configure some SMTP plugin.
We can recommend to install and configure the WP Mail SMTP plugin, but you can search and install any other SMTP plugin: https://wordpress.org/plugins/search/smtp/.Why you need to have SMTP plugin?
SMTP plugins have to fix your email deliverability by reconfiguring WordPress to use a proper SMTP provider when sending emails.This is a problem for a lot of WordPress sites because by default, WordPress uses the PHP mail function to send emails generated by WordPress.The issue is that most WordPress hosting companies don’t have their servers properly configured for sending PHP emails.
The combination of two causes your WordPress emails to not get delivered.It also can be a reason why your emails are marked as spam.
Please check more here.I need help with SMTP plugin configuration.
Because such plugins was developed by other companies and persons, please contact support of specific SMTP plugin about help in correct configuration of specific SMTP plugin. - Please try to test sending of emails by creation of new bookings at front-end side of your website (do not test it from sending test emails at Booking > Settings > Emails page).
- Check that your PHP mail function is working correctly. You can open your login page and try to retry the password, then check if you received email.
- If the issue still will exist , please try reconfigure Subject and Content of the email template. Make it simpler. May be because of some server restrictions, you are having blocking of sending these emails.
- Otherwise you can try to use some other SMTP plugins:
WP Mail SMTP (plugin support: https://wordpress.org/support/plugin/wp-mail-smtp/ )
Post SMTP mailer (plugin support: https://wordpress.org/support/plugin/post-smtp/ )
SMTP Mail (plugin support: https://wordpress.org/support/plugin/smtp-mail/ ) - Finally, please recheck your error.log and mail.log in your server configuration, about any relative errors.
If you having troubles with checking these files, please contact support of your hosting company about this.
If you use WP Optimize plugin, and you have issue of not showing calendar, but instead of that see the "Calendar loading...".
Probably in the Developer console you will see several lines such as this:
== WPBC VARS 10.1.2 [free] LOADED == wpo-minify-footer-4d836f9d.js:3429:3326
== WPBC VARS 10.1.2 [free] LOADED == wpo-minify-footer-4d836f9d.js:5426:3326
== WPBC VARS 10.1.2 [free] LOADED == wpo-minify-footer-4d836f9d.js:7948:3326
...
Here's how to resolve these issues:
- Update Your Booking Calendar to version 10.1.3 or newer
Ensure you have updated your Booking Calendar to version 10.1.3 or newer. This update addresses cache plugin issues.Important! After updating, clear all minimized CSS and JavaScript files and cached pages or posts.If you have a paid version, you can request the latest update on this page.
- For Booking Calendar Versions 10.1.2 or Older
1) Please open the WP Optimize > Minify > JavaScript menu and these rules to "Exclude JavaScript from processing":
*/plugins/booking*
*/jquery/jquery.min.js
*/jquery/jquery-migrate.min.js
2) If by some reason, you do not want to exclude those files, then please check these steps. But we reccomend todo steps from point #1.
In this case you need to open the WP Optimize > Minify > JavaScript menu
and deactivate this option: "Enable merging of JavaScript files".
Save changes.
Test it.


If you use the Divi theme and have issue of not showing calendar, but instead of that see the "Calendar loading..." message then follow these steps to fix this conflict.
- Update Your Booking Calendar to version 10.1.3 or newer
Ensure you have updated your Booking Calendar to version 10.1.3 or newer. This update addresses cache plugin issues.Important! After updating, clear all minimized CSS and JavaScript files and cached pages or posts.If you have a paid version, you can request the latest update on this page.
- For Booking Calendar Versions 10.1.2 or Older
Please open the Divi > Theme Options > General > Performance page and disable this option "Defer jQuery And jQuery Migrate".


If you use WP Rocket plugin, and you have issue of not showing calendar, but instead of that see the "Calendar loading...".
Here's how to resolve these issues:
- Update Your Booking Calendar to version 10.1.3 or newer
Ensure you have updated your Booking Calendar to version 10.1.3 or newer. This update addresses cache plugin issues.Important! After updating, clear all minimized CSS and JavaScript files and cached pages or posts.If you have a paid version, you can request the latest update on this page.
-
If you activated this option "Delay JavaScript execution" at the WP Rocket > File Optimization page in JavaScript Files section, then you need to add for the option "Excluded JavaScript Files" this value:
\/jquery(-migrate)?-?([0-9.]+)?(.min|.slim|.slim.min)?.js(\?(.*))?( |'|"|>)
/booking(.*)/(.*)
(.*)_wpbc(.*)
-
If you activated this option "Combine JavaScript files (Enable Minify JavaScript files to select)" at the WP Rocket > File Optimization page in JavaScript Files section, then you need to add for the option "Excluded Inline JavaScript" this value:
wpbcand add for the option "Excluded JavaScript Files" this value:
/jquery(.*)
plugins/booking(.*)


Such issue can be because of some rules in your Wordfence Firewall.
Go to Wordfence - Tools - Live traffic.
Find the line(s) with the error: /wp-admin/admin-ajax.php 403, go over one line with the mouse and check "add parameters to permitted firewall list".
If during export bookings to CSV at the WP Booking Calendar > Booking Listing page you have 404 error, then check these steps:
- Go to: WordPress Settings > Permalink page. Please be sure that you set the "Permalink structure" option "Post name" instead of "Plain" value.
- Please double-check the root folder of your website for any .htaccess files. Make sure these files don't have security restrictions affecting link generation. It's a good idea to reach out to your hosting support for assistance, as they are more knowledgeable about potential security restrictions.
- Take a look at any other security plugins in the WordPress > Plugins menu that might be blocking the creation of the URL structure for the CSV feed. Try deactivating each active plugin one by one and test after each deactivation. If the issue persists, deactivate all plugins and switch to the default WordPress theme. Test again to see if this resolves the problem.
- Review your server's error.log for any related errors in your server configuration. If you can't locate the error.log file, contact your hosting company's support for assistance in finding this file.
- If the previous steps don't resolve the issue, it suggests there might be server configuration restrictions. In this case, only your hosting support or server administrator would know how to reconfigure your server to avoid blocking the generation of the CSV feed.
- Please inform your hosting support that the "CSV" file is not a physical file on your server; the script generates it on-the-fly.
- Please note, Booking Calendar generates virtual CSV feed form the php script. So it’s not the real file in the folder. It generates such feeds dynamically.
- System has to work in the same way as WordPress working with pages at your website. As you may know, you can have a link to some page like this: https://server.com/category/some-page/ . But it does not mean that you have a real file like category/some-page/index.html at your server. Your system accesses a general index.php file at the root of your website and then loads specific pages based on permalink structure.
- The same with CSV export in Booking Calendar, when the server tries to access the url, then the CSV feed is generated dynamically from the php file.
Kind Regards.
Issue
If you have the situation that calendar is not visible in your booking form but all other fields is visible.
And you are have JavaScript error, similar to this:
Uncaught TypeError: jQuery(...).wpbc_timeselector is not a functionor:
Error: jQuery("#calendar_booking" + bk_type).datepick is not a functionor:
TypeError: jQuery(...).datepick is not a functionReason
Reason of this issue is loading of jQuery library 2 times in your website.
The loading process is following:
1) Firstly is loaded the standard jQuery (ver 3.6) from WordPress (and its fine):
<script type='text/javascript' src='../wp-includes/js/jquery/jquery.js?ver=3.6.0' id='jquery-core-js'></script>2) Then load the scripts of the Booking Calendar, where is defined all functions, including the datepick funcion.
3) Then your theme (or some other plugin) load the jQuery again.
<script type="text/javascript" src="..../wp-content/themes/my_custom_theme/js/jquery.min.js"></script>This last load of the jQuery is overwrite all previously defined variables and we have this error.
Solution.
Please open the header.php (or footer.php) or functions.php file of your theme and comment the loading of the jQuery, to prevent load it for the second time.
Otherwise please contact support of your theme (or plugin) relative loading of jQuery library in correct way, relative to WordPress best practice and not load it directly in the header or footer files.
You can have this issue because of having some JavaScript error(s) at your website.
Probably some other plugin or actual theme generate JavaScript error. That's why the calendar do not show.
To recheck your page for JavaScript errors, open the browser console (usually to see JavaScript error(s) press Ctrl + Shift + J, check more here ).
If you will see the JavaScript error, you can see in description of the error, what plugin (or theme) generate this error. Otherwise you can check for some other known JavaScript errors in other other troubleshooting instructions.
You can also try to check about some conflict with some active plugin or actual theme.
Deactivate one by one all your active plugins at the WordPress > Plugins menu and test about the issue during each deactivation.
If its not help, please deactivate your active theme and active the default WordPress theme.
Issue with Exporting Bookings from Personal Websites to Booking.com:
Since March 2025, Booking.com no longer supports exporting bookings from personal or customer websites via .ics feeds. When you attempt to paste the .ics feed URL into the sync page on Booking.com, you will see an error message stating that the .ics feed is invalid, even if the feed has been validated through third-party validators like iCal Validator or iCalendar Validator.

What Happens When Uploading a Validated .ics Feed:
If you download a previously validated .ics feed (e.g., from Airbnb, which successfully imports into Booking.com) and upload it to your personal website, Booking.com will still show the same error indicating the .ics feed is invalid. This suggests that Booking.com validates .ics feeds based on the URL rather than the content of the feed.
Importing Bookings from Booking.com to Personal Websites:
It's important to note that while exporting bookings from personal websites to Booking.com is no longer supported, importing bookings from Booking.com into personal websites continues to work as expected. This means that if you wish to display your Booking.com bookings on your personal website, you can still import them via the provided .ics feed.
Supported Calendar Connections:
Currently, Booking.com's synchronization tool only supports export bookings from other OTAs (Online Travel Agencies), such as Airbnb, VRBO, TripAdvisor, Expedia, and Trip.com. Direct export from personal websites to Booking.com is no longer possible.
How to Sync Bookings with Booking.com:
To work around this issue, you can sync your bookings with an OTA like Airbnb. Once your bookings are synced with the OTA, you can then export them to Booking.com through the OTA platform.
Future Changes or Reinstatement of Support:
As of now, there is no indication that Booking.com will reinstate support for exporting bookings directly from personal websites. If this policy changes, Booking.com will likely notify users of the update.
Alternative Ways to Sync Bookings:
At the moment, the only available method for exporting bookings to Booking.com is through other OTAs that support .ics feeds. You can then sync the bookings from the OTA to Booking.com.sync the bookings from the OTA to Booking.com.
If you see only calendar at the page, so then probably you have inserted the shortcode for only "availability calendar"
[bookingcalendar type=1 nummonths=2]instead of shortcode for booking form
[booking type=1 nummonths=2]Please open the page with booking form for editing, then remove exist shortcode. After this switch from the "Visual" view mode to "Text" view mode your content editor. And then reinsert the Booking Calendar shortcode and test it.
You need to insert this shortcode:
[booking]Please note, this shortcode [bookingcalendar type=1 nummonths=2] is only for showing availability calendar, without form, where you can not select the dates.
Please read more how easily insert booking form or availability calendar into a pages or how manually configure Booking Calendar shortcodes in content of your pages.
If you see an error like "This iCal URL is invalid" while exporting bookings from your Booking Calendar to Airbnb (or other services), even though online validators (like icalvalidator.com or icalendar.org) show that the .ics feed is valid, the issue may be related to the inclusion of time information in the feed.
As of April 4, 2025, Airbnb does not support time-specific entries in the .ics feed. This means that the inclusion of specific times in your .ics file can cause the error.
Unsupported Format:
If your exported .ics file includes entries like the following, Airbnb will not accept them:
Start: 20250809T000000 (Sat, 09 Aug 2025 00:00:00 GMT)
End: 20250817T000000 (Sun, 17 Aug 2025 00:00:00 GMT)
ID: 2025-08-09-00
Supported Format:
Airbnb only supports full-day bookings in the .ics feed. For example, the correct format should be:
Start: 20250809 (Sat, 09 Aug 2025 00:00:00 GMT)
End: 20250817 (Sun, 17 Aug 2025 00:00:00 GMT)
ID: 2025-08-09-00
How to Export Full-Day Bookings in Booking Manager:
Be sure to use latest update of Booking Manager 2.1.12 or newer.
To ensure your Booking Manager exports only full-day bookings, follow these steps:
1. Go to the oPlugins Panel > Settings > General Settings.
2. Enable the option for full-day bookings.
3. Click Save Changes.
Now, Booking Manager will export only full-day events to the .ics feed, removing any time-specific information.
Handling Bookings with Specific Time Slots:
If you have a booking with specific start and end times, like:
Start: 20250809T121000 (Sat, 09 Aug 2025 12:10:00 GMT)
End: 20250809T140000 (Sat, 09 Aug 2025 14:00:00 GMT)
Booking Manager will export it as a full-day booking, converting the times as follows:
Start: 20250809 (Sat, 09 Aug 2025 00:00:00 GMT)
End: 20250810 (Sun, 10 Aug 2025 00:00:00 GMT)
This ensures the booking is compliant with Airbnb's full-day format.
Probably, you have inserted the shortcode for only "availability calendar" [bookingcalendar type=1] instead of shortcode for booking form [booking type=1].
Please note, this shortcode [bookingcalendar type=1] is only for showing availability calendar without form, where you can not select the dates. Booking form shortcode [booking type=1] already contain calendar and there you can select dates and submit the booking.
How to fix it?
Please open that page for editing and then remove exist shortcode.
After this switch from the "Visual" view mode to "Text" view mode your content editor. And then reinsert the Booking Calendar shortcode. You need to insert shortcode like this:
[booking type=1]Please read more how easily insert booking form or availability calendar into a pages or how manually configure shortcodes of Booking Calendar in content of your pages.
This issue is relative of showing the several booking calendars (booking forms) of the same booking resource at the same "visible" page. Its possible to show only one calendar (booking form) of the specific booking resource at one visible page. You will have no problems to show the calendars (booking forms) of the different booking resources at the same page.
At the Booking Calendar Free version is available only one default booking resource, so its mean that any calendars (booking forms) in this version is belong to the same booking resource. And thats why its not possible to show several booking calendars (booking forms) at the same visible page.
This info is relative to the several booking calendars (booking forms) inside of the content of the page or inside of the content of page and visible booking calendar widget (in this case you are need to deactivate the booking calendar widget, or add the exception of showing the widget at this page).
If you're encountering any of the following issues on your website:
- Booked dates or times are not promptly appearing on the front-end calendar, or there's a significant delay in displaying them after creating new bookings. However, in the admin panel at Booking > Add booking, all bookings are visible as expected.
- When you submit a booking or load the calendar, you encounter an error message: 'Error! Request did not pass a security check! Please refresh the page and try again.'
These problems could be caused by caching on your website.
Here's how to resolve these issues:
- Update Your Booking Calendar to version 10.1.3 or newer
Ensure you have updated your Booking Calendar to version 10.1.3 or newer. This update addresses cache plugin issues.Important! After updating, clear all minimized CSS and JavaScript files and cached pages or posts.If you have a paid version, you can request the latest update on this page.
- For Booking Calendar Versions 10.1.2 or Older
- Check for caching plugins like "WP Super Cache," "WP Fastest Cache," or "W3 Total Cache." If you're using any of these, consider deactivating them or adding an exception for the page with the booking form to prevent caching.
- If the problem persists, it might be a conflict with another plugin or your current theme. Deactivate your active plugins one by one in the WordPress > Plugins menu and test after each deactivation. If the issue remains, deactivate all plugins and switch to the default WordPress theme for testing.
- If the problem still isn't resolved, contact your hosting support and ask them to check for server-side caching. Request that they add exceptions for the pages with booking forms to prevent caching or inquire about deactivating the caching system.
If you encounter the error "Request do not pass security check!" follow these steps to resolve it:
Here's how to resolve these issues:
- Update Your Booking Calendar to version 10.1.3 or newer
Ensure you have updated your Booking Calendar to version 10.1.3 or newer. This update addresses cache plugin issues.Important! After updating, clear all minimized CSS and JavaScript files and cached pages or posts.If you have a paid version, you can request the latest update on this page.
- For Booking Calendar Versions 10.1.2 or Older
This error usually occurs when the NONCE field in the booking form is outdated. The NONCE field is a hidden field with a unique value that prevents remote (CSRF/XSRF) attacks. It is a standard security practice for all WordPress forms.The primary cause of this issue is caching.
Steps to Resolve in versions 10.1 or older and in some cases in new updates:
-
Check for Cache Issues:
- This error often stems from caching problems on your server, cache plugins, or caching tools/software.
- Check for any cache plugins like "WP Super Cache", "W3 Total Cache", "WP Optimize", "WP Rocket", etc... If you use any, deactivate them or add an exception to the page with the booking form to prevent it from being cached.
-
Deactivate Plugins:
- If the issue persists, deactivate your active plugins one by one from the WordPress > Plugins menu and test the booking form after each deactivation.
- If this does not resolve the issue, deactivate all plugins and activate the default WordPress theme. Then, retest the booking form.
-
Check Server Caching:
- If none of the above steps work, there may be caching at the server level.
- Contact your hosting provider’s support team to check for any server-side caching tools or software.
-
Check for Cache Issues:
By following these steps, you should be able to resolve the security check error and ensure your booking form works correctly.
If you encounter the message "Calendar is loading" instead of seeing the calendar on your page, and you notice one of the following JavaScript errors or warnings in your browser console:
Uncaught ReferenceError: visible_booking_id_on_page is not definedor
Uncaught ReferenceError: _wpbc is not definedor
jquery.min.js?ver=3.7.1:2 jQuery.Deferred exception: moveOptionalElementsToGarbage is not defined ReferenceError: moveOptionalElementsToGarbage is not defined
jquery.min.js?ver=3.7.1:2 jQuery.Deferred exception: _wpbc is not defined ReferenceError: _wpbc is not defined
jquery.min.js?ver=3.7.1:2 jQuery.Deferred exception: visible_booking_id_on_page is not defined ReferenceError: visible_booking_id_on_page is not defined
jquery.min.js?ver=3.7.1:2 Uncaught ReferenceError: moveOptionalElementsToGarbage is not defined
jquery.min.js?ver=3.7.1:2 Uncaught ReferenceError: _wpbc is not defined
jquery.min.js?ver=3.7.1:2 Uncaught ReferenceError: visible_booking_id_on_page is not defined
Please follow these steps to resolve the issue:
- Update Your Booking Calendar to version 10.1.3 or newer
Ensure you have updated your Booking Calendar to version 10.1.3 or newer. This update addresses cache plugin issues.Important! After updating, clear all minimized CSS and JavaScript files and cached pages or posts.If you have a paid version, you can request the latest update on this page.
- For Booking Calendar Versions 10.1.2 or Older
- Open the WP Booking Calendar > Settings General page in the "Advanced" section and ensure that the option "Load JS and CSS files only on specific pages" is not activated. It must be disabled.
- Check for any cache plugins such as "Jetpack Boost", "WP Super Cache", "WP Fastest Cache", "W3 Total Cache", or other cache plugins. If you are using any of these plugins, please deactivate the cache plugins or add exceptions to the page(s) with a booking form to prevent caching of these pages.
If you are using the Jetpack Boost plugin, please follow this troubleshooting instruction.
If you are using another cache plugin, contact the support of your cache plugin for instructions on how to add exceptions to the pages with booking forms to avoid caching these pages and prevent concatenation of JavaScript files by the Booking Calendar. - If the issue persists, it may be due to a conflict with another plugin or your current theme. Deactivate each of your active plugins one by one at the WordPress > Plugins menu and test the calendar after each deactivation. If deactivating plugins does not resolve the issue, deactivate all plugins and activate the default WordPress theme. Then, test the calendar again to identify the cause of the issue.
Here's how to resolve these issues:
- Update Your Booking Calendar to version 10.1.3 or newer
Ensure you have updated your Booking Calendar to version 10.1.3 or newer. This update addresses cache plugin issues.Important! After updating, clear all minimized CSS and JavaScript files and cached pages or posts.If you have a paid version, you can request the latest update on this page.
- For Booking Calendar Versions 10.1.2 or Older
This issue arises when the Concatenate JS feature in Jetpack Boost is enabled. To resolve this, you'll need to exclude specific JavaScript files from being concatenated in the Jetpack Boost settings.
Here are the JavaScript handles you need to exclude:
wpbc-global-vars, wpbc-popper, wpbc-tipcy, wpbc-datepick, wpbc_all, wpbc-main-client, wpbc_capacity, wpbc-times, wpbc-time-selector, wpbc-timeline-flexTo do this, simply copy this list and paste it into the "Exclude JS Strings" field within the Concatenate JS module. You can access this module by navigating to Jetpack -> Boost in your WordPress dashboard.
By excluding these scripts from concatenation, you can ensure that the Booking Calendar functions correctly on your site while still benefiting from other features of Jetpack Boost.
For additional info please contact the support of your cache plugin for instructions on how to add exceptions to the pages with booking forms to avoid caching these pages and prevent concatenation of JavaScript files by the Booking Calendar.
Also check more here.
1) Firstly please open the Booking > Settings > Emails page and deactivate all email templates.
Then try to make new booking. If you will be able to make new booking, so then its means following:
Some severs can block sending emails and generate "500 Internal Error", when you send it to visitor from domain different from your website. You need to check, if this condition set in your server configuration.
- Please try to set in the field "From" instead of visitor email shortcode, your email (its at the Booking > Settings > Emails page). The same email that you set in the field "To".
- Sometimes mail servers block emails, if the address "From" different from the domain of website, from where this email was sending. Its not really depend from the Booking Calendar. So please open the Booking > Settings > Emails page and recheck that field "From", its have to the same as your website domain. For example: info@your-server.com and not like this your_email@gmail.com
Otherwise, please contact support of your hosting company about recheck conditions, when your server block sending of emails.
2) Such error can be because in your server configuration (probably at the WordPress > Settings > General page for the options "WordPress Address (URL)" or "Site Address (URL)") configured different Domain that you try to submit the booking
For example, in Ajax URL its can be set as "https://www.yourserver.com/wp-admin/admin-ajax.php"
and you try to submit the booking from https://www.yourserver.com/education/bookings/
Because booking is sending from HTTP to HTTPS, we are having such type of error.
Please recheck your server configuration at the Settings General page as in above description, or in some other place, where you are set using HTTPS instead of HTTP protocol.
You need to use the same protocol in both ways. If you will have difficulty with searching where exactly you are having this issue, please contact your server administrator who make that configuration.
The same issue can be if you configured sever address with "www." But trying to submit booking from URL without "www." prefix in URL. Or backward.
3) Also please try to deactivate one by one all your active plugins at the WordPress > Plugins menu. Then retest it again.
If its not help, please deactivate your active theme and active the default WordPress theme. And then retest it again. May be there exist some conflict with some active plugin or actual theme and just need to find the reason of that issue.
4) If the previous solutions will not help, please recheck your error.log file from your server configuration (please contact your server administrator or support of the hosting company, if you will have troubles with searching of this file) to be sure in a reason of that issue.
If during export bookings to .ics feed at the WP Booking Calendar > Settings > Sync > "Export - .ics" page you have 404 error, then check these steps:
- Go to: WordPress Settings > Permalink page. Please be sure that you set for "Permalink structure" option "Post name" instead of "Plain" value.
- Recheck that you have correctly configured .ics feeds URLs for exporting. Open WP Booking Calendar > Settings > Sync > "Export - .ics" page and be sure that you have specified URL for exporting .ics feeds with one level of depth. For example: https://server.com/ics/my_resource/ or if its not work try to set it as this URL: https://server.com/ics/my_resource/wpbm.ics
- Please double-check the root folder of your website for any .htaccess files. Make sure these files don't have security restrictions affecting link generation. It's a good idea to reach out to your hosting support for assistance, as they are more knowledgeable about potential security restrictions.
- Take a look at any other security plugins in the WordPress > Plugins menu that might be blocking the creation of the URL structure for the .ics feed. Try deactivating each active plugin one by one and test after each deactivation. If the issue persists, deactivate all plugins and switch to the default WordPress theme. Test again to see if this resolves the problem.
- Review your server's error.log for any related errors in your server configuration. If you can't locate the error.log file, contact your hosting company's support for assistance in finding this file.
- If the previous steps don't resolve the issue, it suggests there might be server configuration restrictions. In this case, only your hosting support or server administrator would know how to reconfigure your server to avoid blocking the generation of the .ics feed. Please inform your hosting support that the "wpbm.ics" file is not a physical file on your server; the script generates it on-the-fly when someone attempts to access the URL defined in WP Booking Calendar > Settings > Sync > "Export - .ics" page.
Please note, Booking Calendar generate virtual ics feed form the php script. So it’s not the real file at that folder. It’s generate such feed dynamically, when someone access such url.
System have to work in the same way as WordPress working with pages at your website. As you may know, you can have link to some page like this: https://server.com/category/some-page/ . But it does not mean that you have real file like category/some-page/index.html at your server. Your system access general index.php file at root of your website and then load specific page based on permalink structure. The same with .ics feeds in Booking Calendar, when server try to access url: https://server.com/ics/wpbm.ics
this .ics feed generate dynamically from the php file.
If you do not see imported bookings, from external .ics feed, then please recheck these points:
1) Please be sure that in your ".ics" feed exist some events, relative to current or future days.
You can download this .ics feed and open in notepad and check your events there.
2) If events was imported before, then such events will not be imported again.
Booking Calendar can import the events from external sources only once (if have not been activated options "Force import" or "Trash all imported bookings before new import" at the Booking > Settings > Sync > "General" page in Advanced section).
May be you are having these event(s) in the Trash or such event(s) was imported into not exist booking resource.
In this case, you need to delete such previously imported bookings (that was imported into non exist booking resource), and then try to import these bookings once again by using correct shortcode.
3) How to check if events, was imported before into Booking Calendar?
3.1) Please update the Booking Manager plugin to the latest update.
3.2) This point work only in Booking Manager 2.0.11 or newer versions.
Open the "oPlugins Panel" > Settings > "Listing Template", and define in listing template these shortcodes:
<p>UID: [UID] ( Booking ID: <a href="[BOOKING_LINK]" target="_blank">[BOOKING_ID]</a> )</p>3.3) Open "oPlugins Panel" > "Manage .ics" page, then paste URL of your .ics feed (that you need to check), and click on "Show Events (.ics)" button.
You will see all the events from this .ics feed. Also in each event you will see ID of booking, if its was imported, like this:
Booking ID: 101if the booking was not imported you will see this:
Booking ID:You can click on booking ID link to open the Booking Listing page with this specific booking and see, details of this booking. Check the booking resource, where this booking saved.
4) If the booking was not imported, then please recheck parameters of import shortcode.
Please check carefully parameters, like:
import_conditions - if you defined import_conditions='if_dates_free', then event will be imported only, if the source booking resource (calendar), have all dates for this event as available
from - date from which start to import events. Usual value: from='today'
until - date of stop import events. Usual value: until='any'
5) Check this instruction how to start import of new events/bookings.
1) Probably you are using the old version of Booking Calendar (9.7.7 or older) and updated to the new WordPress version (6.4 or newer). Because of that you have this issue, where exist conflicts of old version of plugin with new WordPress versions.
Please check more here
2) In order to resolve this issue, please update your version of Booking Calendar to the latest update 9.8.3 or newer update.
You can request the new update of Booking Calendar on this page.

This warning relative to the Booking Calendar MultiUser version.
You can see this warning, because your WordPress user was not activated as regular user in Booking Calendar (have not own booking admin panel) at Booking > Settings > Users page, and this user is not the super booking admin user.
By default the first user in your website, its Super booking admin user.
1) Please login to admin panel with this "first user".
It can be that currently you have logged in with administrator user, that have ID as 5 (or any other). But your WordPress website, also have other administrator users with ID, like 1 or 2. If true, so then you need to login with User with login ID = 1
After this you will see access to the booking admin panel. Then you can activate the booking admin panel for other WordPress users at the Booking > Settings > Users page.
2) In case, if your current user do not have access to the Booking > Settings > Users page, and you do not know login details of your first user, so you can make small customization for activating your actual user as super booking admin user.
You can make this fix.
Firstly please recheck ID of your user. You can open the WordPress > Users page, and then near specific user you can click on edit button, then in browser URL you will see parameter user_id
which will show Id of your user, let say that this ID of your current user is 3

So then, please make this fix.
Please open this file ../{Booking Calendar Folder}/inc/_mu/multiuser.php
( you can check how to edit files in WordPress menu in this article https://wpbookingcalendar.com/faq/how-edit-file-in-wp-menu/ )
then find this code:
$this->super_admin_id = array( $admin_id ); // ID of Super Administratorsand replace it to this code:
$this->super_admin_id = array( $admin_id , 3 ); // ID of Super AdministratorsFirstly you need to check access to the wpdev-booking.php file. If booking plugin is installed to the https://www.myserver.com/wp-content/booking/wpdev-booking.php so copy that link to your browser and check access. Its have to show this error: Fatal error: Call to undefined function get_option(). If you see something like:Error 500 Internal Server Error, so then you need to set access to the wpdev-booking.php file. In most case you just need to set atribute to that file as 755 using your FTP client, sometimes is needed editing .htaccess file. So contact your administrator or check .htaccess file by yourself.
Sometimes wp-content and/or wp-content/plugins and/or wp-content/plugins/booking directories and/or file wp-content/plugins/booking/wpdev-booking.php had permissions set to 777. So its also can make this issue. Please change permissions on those directories and file to 755 and it have to work.
This issue is relative to the configuration of the DNS in your website.
Please try to reconfigure it or contact your administrator for fixing this issue.
Description of reason of the issue.
1) This error "0", can be because in your server configuration somewhere (probably in the WordPress > Settings > General page for the options "WordPress Address (URL)" or "Site Address (URL)") configured different Domain that you try to submit the booking.
For example, in Ajax URL its can be set as "https://www.yourserver.com/wp-admin/admin-ajax.php"
and you try to submit the booking from https://www.yourserver.com/bookings/ Or backward.
You can check it is by viewing the HTML code of your loaded page, in the section:
<!-- Booking Calendar Scripts -->Because booking is sending from HTTP to HTTPS, we are having such type of error.
Please recheck your server configuration at the WordPress > Settings > General page as in above description, or in some other place, where you are set using HTTPS instead of HTTP protocol.
You need to use the same protocol in both ways. If you will have difficulty with searching where exactly you are having this issue, please contact your server administrator who make that configuration.
The same issue can be if you configured sever address with "www." But trying to submit booking from URL without "www." prefix in URL. Or backward.
2) Also please try to deactivate one by one all your active plugins at the WordPress > Plugins menu. Then retest it again.
If its not help, please deactivate your active theme and active the default WordPress theme. And then retest it again. May be there exist some conflict with some active plugin or actual theme and just need to find the reason of that issue.
If the previous solutions will not help, please recheck your error.log file from your server configuration (please contact your server administrator or support of the hosting company, if you will have troubles with searching of this file) to be sure in a reason of that issue.
Please note, this workflow based on new update 7.0
If you using older version, please update it. For paid versions, you can request the new update of Booking Calendar on this page.
1) Reason of issue.
Such issue possible, if you previously have deleted some booking resources at Booking > Resources page.
And such deleted booking resources was having some bookings. So now you are having in Database such lost bookings.
2) How to fix it.

- Open the Booking Listing page and click on "Reset search filter and user options to default values" button (1)
- Click on "Remove all booking resources" button in toolbar (2)
- You will see all lost bookings (3)
- Click on "Change resource" button and assign to this booking some exist booking resource.
Legacy. How to fix in old versions of Booking Calendar.
Please try to open this link:
https://server.com/wp-admin/admin.php?page=wpbc&wh_booking_datenext=1&wh_booking_dateprior=1&wh_booking_date=3&wh_trash=any&wh_modification_dateprior=1&wh_modification_date=3&wh_pay_status=all&view_mode=vm_listing&wh_booking_typeSince update 7.2.1 please use this link
https://server.com/wp-admin/admin.php?page=wpbc&wh_booking_datenext=1&wh_booking_dateprior=1&wh_booking_date=3&wh_trash=any&wh_modification_dateprior=1&wh_modification_date=3&wh_pay_status=all&view_mode=vm_listing&wh_booking_type=-999Just replace "server.com" to your website DNS in this URL.
The trick in this link having empty "&wh_booking_type" parameter. Its will show all pending bookings, even if such bookings belonging to the booking resources that have been deleted.
Now, when you will see all such bookings, you will see near some bookings label that "Resource does not exist"
So you can assign to such booking(s) new exist booking resource, by clicking on specific "assign booking resource" button near this booking,
or if you do not need such booking, then please delete completely (even from trash) such booking.
1) This issue can happens in Booking Calendar Business Small or higher versions, if this you have activated using "Check in/out times" (check more about this feature here) at the Booking > Settings General page and incorrectly configured "Check in/out times fields" (usually these fields are empty during this issue.
How to fix.
- You need to be sure that the check in time is older than check out time. For example: Check in: "14:00" and check out: "12:00"
- Or you can simply deactivate "Check in/out times" option, if you do not need to use change-over days.
2) Also this issue possible if you have incorrectly configured time(s) fields at the Booking > Settings > Form page.
You can try to remove any times fields from the Booking > Settings > Form page, or try to reset booking form to one default "Form templates" (you can select one predefined form template at the toolbar, and then click on "Both" button, its will reset your form. After this you can click on "Save changes" button to save these changes.
Otherwise, please use shortcode generator at the right side of the Booking > Settings > Fields page for the fast and correct creation of booking form fields.
3) Other workaround. We do not recommend todo this point, because dropping indexes (as in bellow instruction), will significant impact to speed of loading.
So for fixing this issue, please open the phpMyAdmin or similar tool for the working with DB
and execute this SQL command:
ALTER TABLE bookingdates DROP INDEX booking_id_datesor this (depend from the prefix at your DB tables):
ALTER TABLE wp_bookingdates DROP INDEX booking_id_datesThis error is appear because of wrong installation of plugin.
1) Please, open the General Booking Settings page and set this option "Delete booking data during uninstall", as unchecked, at the right side of page, otherwise your exist booking data will be delete during deactivation of plugin.
2) Then open the Plugins menu and press Deactivate link of Booking Calendar. Wait, for the message about: "plugin is deactivated successfully".
3) Then press activate link. Wait, until message will show up that plugin is activated successfully.
Now, you can test it again.
1) Go to the general booking settings page and check ON use CAPTCHA check box and save a page.
2) If you use Standard (free) version skip this step, otherwise go to the form fields customization page add captcha shortcode to the customization form:
<p>[captcha]</p>3) Check write permission at the folder YOUR_WORDPRES_SERVER/wp-content/plugins/booking/js/captcha/tmp/. This folder have to be write-able.
4) Check that your server was configured for using 2.0 GD library.
Reason.
The cause is that you do not have the version 2.0 GD library loaded in PHP which defines this function, which is used for the captcha in this plugin.
Checking
Use this PHP code to view what extensions you have loaded on your hosting account.
print_r(get_loaded_extensions());
print_r(var_dump(gd_info()));
Just create a text file with the these lines above in your public_html folder (or wherever your web root is), name it with a .php extension like "test.php" and then run it by using your web browser like "https://www.yourdomain.com/test.php "
This does not write correct HTML but will show you the info you need. (Just do a View/Source on your browser if you want a nicer looking format.) Look for text like "[some number] => gd". If you don't see this, you do NOT have the GD library loaded.
Next you want to look for the version number. Something like: ["GD Version"]=> string(27) "bundled (2.0.28 compatible)"
This needs to say version 2.0 or later.
If you do not see GD version 2.0, you must get your hosting provider to install or upgrade your system.
LEARN MORE:
Learn more about the GD library:
https://www.php.net/manual/en/ref.image.php
Learn more about this function:
https://www.php.net/manual/en/function.imagecreatetruecolor.php
5) If you are using Cache plugin (like "WP Super Cache" ), please deactivate it or add the exception to the page with booking form to do not cache this page.
4) Finally, please try to deactivate one by one all your active plugins at the WordPress > Plugins menu. Then retest it again.
If its not help, please deactivate your active theme and active the default WordPress theme. And then retest it again. May be there exist some conflict with some active plugin or actual theme and just need to find the reason of that issue.
If you are still will have this issue, please recheck the error.log in your server configurations to be sure in a reason of that issue.
Kind Regards.
Here is 2 solutions.
A) Upload using FTP manager. It's can be any ftp manager for uploading files to your server. If you do not have FTP access, so then please contact support of your hosting. Also they can recommend to you FTP manager that can be good for your server to upload these files.
1) Please download the archive of the Booking Calendar to your desktop.
2) Extract it from archive. You have to get the "booking-calendar-com" folder.
3) Then upload this folder, using the FTP manager (like FAR or some other) to your server, to the folder
../wp-content/plugins/4) Now open admin panel of your WordPress site. At Plugins menu, you have to see "Booking Calendar Pro" plugin.
Click at the "Activate" link of your new paid version.
5) Please wait until message will show that the plugin is activated successfully. Now you can use the Booking Calendar plugin.
B) Or you can ask your serve administrator or support of hosting company to extend max file-size limit at your server.
Thank you.
This issue can be because of limitation in WAMP configuration.
WAMP can not load large translation php file ( wpbc_all_translations.php ) .
So please open this folder:
..\wp-content\plugins\booking\core\lib
and rename this file:
wpbc_all_translations.php
to this:
wpbc_all_translations2.php
By default Booking Calendar and Booking Manager plugins does not remove or update the bookings, if bookings was changed/canceled at other sources (Booking/Airbnb/Google Calendar).
In the update 8.6 of Booking Calendar or newer and latest update of Booking Manager plugins you can activate this option
"Trash all imported bookings before new import" at the Booking > Settings > Sync page.
Move all previously imported bookings to trash before new import bookings. Its can resolve issue of updating deleted and edited events in external sources. Its work only, if you are using one source (.ics feed) for importing into specific booking resource!
If you notice Booking > Settings General page is not saving, Suhosin (a security module in PHP) may be preventing the POST data from being saved. This issue can also be caused by servers with version PHP 5.3.9+ and servers running mod_security.
If enabled, Suhosin may need to be configured to increase its data submission limits. Changing Suhsoin settings differ from host to host so it’s usually better to consult with the provider than attempt it yourself, however some hosts allow you to change settings via php.ini, suhosin.ini, or .htaccess.
Commonly, the following vars will need changing:
memory_limit = 256M
max_execution_time = 120
post_max_size = 8M
upload_max_filesize = 8M
max_input_vars = 20480
post_max_size = 64M
suhosin.post.max_array_index_length = 1024
suhosin.post.max_totalname_length = 65535
suhosin.post.max_vars = 2048
suhosin.post.max_value_length = 1000000
suhosin.post.max_name_length = 256
suhosin.post.max_array_depth = 1000
suhosin.request.max_array_index_length = 1024
suhosin.request.max_totalname_length = 65535
suhosin.request.max_vars = 2048
suhosin.request.max_value_length = 1000000
suhosin.request.max_varname_length = 256
suhosin.request.max_array_depth = 1000
After saving you will need to restart the server for the changes to take effect. See https://www.hardened-php.net/suhosin/configuration.html for more information on Suhosin settings.
In shared hosting environments it may not be possible to edit php.ini, in which case you may be able to set the suhosin settings via .htaccess
It is still recommended however to consult your hosting providers documentation, or raise a ticket with them for assistance.
1) Please be sure that you have correctly configured "Content of booking fields data" form at the Booking > Settings > Form page.
For example, if you are having in the booking form configuration like this:
Last Name (required): [text* secondname] so then at the "Content of booking fields data" form you need to have configuration like this:
Last Name: [secondname]Please use shortcode generator at the right side of the Booking > Settings > Form page for the fast and correct creation of booking form fields.
2) Also in some old premium versions of Booking Calendar together with latest update of WordPress possible issue that all entering fields in booking form are blank.
In this case you need to update your version of booking calendar to latest update or rollback your WordPress version.
You can request the new update of Booking Calendar on this page.
After installing update, please make fully NEW bookings to test that booking details is saving correctly.
Kind Regards.
If you are using the booking calendar free version
Try to open the login dialog and retry the password. Then recheck what the email address is used in this email. If you will see the "Wordpress title", so then its somewhere in the settings of WordPress.
Try to open the wp_options table in your DB (using the phpMyAdmin tool or some other DB tool),
Find the option with name "admin_email" and recheck that the email for this field do not have the "WordPress" title.
If you are using the paid version of Booking Calendar, please check this:
Booking Calendar use the standard "WordPress" wp_mail function for sending of the emails, which possibly can be overridden by the other plugins or theme.
Firstly please open the Booking > Settings > Emails page and recheck that you correctly configured the emails in fields "From". that there was no any "WordPress titles". Test it.
Then please try to deactivate one by obe all other active plugins and test if its help or not, may be some other active plugin is override the wp_mail function and thats why you are having that "WordPress" title in the email template. try the same with theme.
For any versions:
Also please open your contact book at youe email account and try to delete that email contact, may be this contact already have the "WordPress" title saved in your contact book at your email account, and thats why you have that "WordPress" title in the emails.
If you try to edit additional cost at the Booking > Resources > Advanced cost page and during saving, all your changes removed back to default values "100%", then please check these steps:
1) Please be sure, if you are using custom booking forms, that the length of custom booking form name not longer than 30 symbols. If its longer, then you need to recreate your custom booking forms.
For doing that, please open the Booking > Settings > Fields page. Select your custom booking form.
Then copy content of "booking form" and "content of booking fields data" form to some TXT file.
Click on "Delete" button in the toolbar to delete this custom form.
Then create new custom form, where name must be not longer than 30 symbols. Paste in the forms your saved data and save changes.
If you was inserting into the posts or pages, booking shortcodes with previous custom form, you need to reinsert them.
Now you can test it.
2) Please be sure that you do not use in the names and values of checkboxes and selectboxes in your booking form some non standard symbols, like umlauts, or % or ' ,etc...
That's why please open the Booking > Settings > Fields page and for the each booking form (if you are having several custom booking forms), please recheck (re-create) shortcodes by using only standard symbols in the names and values.
Plugins
WP Rocket - To exclude the Booking Calendar scripts from Delay JavaScript Execution check info here.
Really Simple SSL - can generate issue of incorrect response from the Stripe payment system back to customer website, when using Live payment mode.
Modern Events Calendar - can generate Server error 500, during submitting booking in Booking Calendar.
WP iCal Availability Free - can generate issue with selected dates of setting to them some incorrect time-zone.
Gravity Forms [Tested in version 2.2.5, but this issue can exist in other versions of Gravity Forms]
Conflict paid versions of Booking Calendar with "Gravity Forms" plugin, if in "Gravity Forms" plugin was used "masked input" field(s).
Because of this conflict is generating JavaScript error and as reason of this, Gravity form is not showing and also calendar in Booking Calendar is not showing, as well.
Since update 8.1.1, Booking Calendar will not load masked input script for times fields, if was loaded masked input script in Gravity form. Its means that masked input for start/end times text fields, will be used as standard text inputs.
If you are using older versions of Booking Calendar, you can make this fix to resolve this issue.
Please open this file ../{Booking Calendar Folder}/inc/_ps/personal.php
( you can check how to edit files in WordPress menu in this article )
then find this code:
wp_enqueue_script( 'wpbc-meio-mask', WPBC_PLUGIN_URL . '/inc/js/jquery.meio.mask.min'.((WP_BK_MIN)?'.min':'').'.js', array( 'wpbc-global-vars' ), '1.0');
and replace it to this code (comment that line):
// wp_enqueue_script( 'wpbc-meio-mask', WPBC_PLUGIN_URL . '/inc/js/jquery.meio.mask.min'.((WP_BK_MIN)?'.min':'').'.js', array( 'wpbc-global-vars' ), '1.0');
advanced-custom-fields [Version 4.1.4]
So please deactivate this plugin, if you want to insert the booking shortcode into the post or page using the popup configuration dialog or you can insert the booking shortcode manually. Please read how manually to configure Booking Calendar shortcodes here
html5-jquery-audio-player [Version 2.1]
Fix:
Open file: ../html5-jquery-audio-player/index.php
Find this code:
    wp_enqueue_script('jquery');
    wp_deregister_script( 'hmp-jquery' );
    wp_register_script( 'hmp-jquery', "https://ajax.googleapis.com/ajax/libs/jquery/1.7.2/jquery.min.js");
and replace it to this code:
//    wp_enqueue_script('jquery');
//    wp_deregister_script( 'hmp-jquery' );
//    wp_register_script( 'hmp-jquery', "https://ajax.googleapis.com/ajax/libs/jquery/1.7.2/jquery.min.js");
Comprehensive Google Map Plugin [Version 7.0.31]
This issue is fixed in the Booking Calendar since update 4.2.
For the older versions please check this fix.
Fix:
Open file: ../booking/lib/wpdev-booking-class.php
1) Find this code:
        add_action( 'init', array(&$this,'add_custom_buttons') );
        add_action( 'admin_head', array(&$this,'insert_wpdev_button'));
and replace it to this code:
        add_action( 'init', array(&$this,'add_custom_buttons') );
        add_action( 'admin_head', array(&$this,'insert_wpdev_button'));
        // Remove the scripts, which generated conflicts
        add_action('admin_init', array(&$this, 'wpdevbk_remove_conflict_scripts'), 999);
2) Then find this code:
    // add hook for printing scripts only at this plugin page
    function on_add_admin_js_files() {
and replace it to this code:
    // Deregister scripts, which  is generate conflicts - only at the Booking Admin  menu pages
    function wpdevbk_remove_conflict_scripts(){
        if (strpos($_SERVER['REQUEST_URI'], 'wpdev-booking.phpwpdev-booking') !== false) {
            wp_dequeue_script( 'cgmp-jquery-tools-tooltip' );
        }
    }
    // add hook for printing scripts only at this plugin page
    function on_add_admin_js_files() {
Themes
Other questions relative to Booking Calendar
No, you do not need to make update from WordPress directory, because then you will use Booking Calendar Free version.
We will send to you update(s) of your Booking Calendar version (if these update(s) are ready) by email directly, after you are request update at this page.
You can check according new updates at this page.
1. Where all bookings details are saved?
Please note, Booking Calendar plugin saving all booking details at the your WordPress database at your server(s). Its does not transfer your booking details to our servers and does not store such info about booking details at our server(s).
Here is list of all database tables of Booking Calendar that is storing info about the booking details:
    wp_booking
    wp_bookingdates
    wp_bookingtypes    (available in paid versions)
    wp_booking_coupons (available in  Booking Calendar Business Large or higher version)
    wp_booking_seasons (available in  Booking Calendar Business Medium or higher versions )
    wp_booking_types_meta (available in  Booking Calendar Business Medium or higher versions )
Some info is saving into the wp_options table, but such records relative only to settings, and not the booking details.
2. Additional steps
Its means that your organization need to check and audit your website and booking details, what you store about bookings and apply additional steps to be compliant with GDPR data laws or some other data protection or saving laws. Its your obligatory to be complaint with any law that apply to you depend from your country or saving data.
To be compliant with GDPR data laws you need to check info about this law, because its about what data you are saving during booking process, how your visitor can access this data and how to erase this data, etc...
Check useful link here: http://www.wired.co.uk/article/what-is-gdpr-uk-eu-legislation-compliance-summary-fines-2018
And check this 12 steps prepare guide for General
Data Protection Regulation https://ico.org.uk/media/for-organisations/documents/1624219/preparing-for-the-gdpr-12-steps.pdf
Probably you will be need to check some additional relative info.
The primary details, of what exactly fields about persons you are saving you can check at the Booking > Settings > Form page. Basically its your booking form fields.
3. Adding required checkbox to the booking form, to accept your terms
You can add the "required checkbox" to your booking form at the Booking > Settings > Form page, to accept your terms and conditions and your privacy policy. Its supporting in all versions of Booking Calendar (including Booking Calendar Free version).
Watch this video guide about editing booking form fields in the paid versions of Booking Calendar.
4. List all past bookings and cancel specific bookings (available in paid versions)
In the paid versions of Booking Calendar you can use the ability to list all past bookings of user. So visitor who made the booking, can view all own past bookings (in timeline view, similar to this this example, but relative only to specific visitor).
Also visitor can cancel (move them to trash - its means that you still will require to make complete deleting of them (bookings from trash) at the Booking Listing page, after this request) own pending bookings. Please watch more about this in this video guide.
Explore Historical Resources of Booking Calendar on legacy FAQ page.